设计模式-Observer
1. 解决的问题:
假如现在要编写一个天气预报的公布栏, 公布栏有两种显示方式, 一种是图像方式显示, 一种是表格形式显示.
2. 问题分析:
应该根据数据与现实分离的原则将天气预报数据和现实形式分别封装起来,
今后可能增加其他的显示形式;
天气预报数据发生变化后,需要对所有的显示形式进行更新.
3. UML图与代码实现:
1)用Push的方式更新Observer数据, 通过Subject对Observer进行注册:
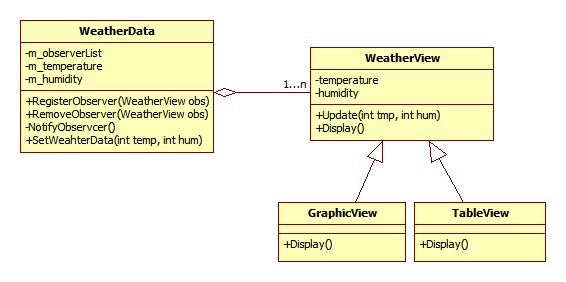
1: //这个例子中WeatherData就是Subject, 而WeatherView则是Observer,
2: //这里WeatherView中没有包含到WeatherData的引用,
3: //因此这里是Subject用push的方法向Observer发送数据;
4: //并且注册和反注册Observer的时候都是由Subject(WeatherData)执行的
5:
6: #include <iostream>
7: #include <vector>
8: #include <algorithm>
9:
10: using namespace std;
11:
12: class WeatherData;
13:
14: class WeatherView
15: { 16: public:
17: void Update(int temp, int hum)
18: { 19: temperature = temp;
20: humidity = hum;
21: };
22: virtual void Display()
23: { 24: cout << "temperature = " << temperature << ", humidity = " << humidity << endl;
25: }
26:
27: private:
28:
29: int temperature;
30: int humidity;
31: };
32:
33: class GraphicView: public WeatherView
34: { 35: public:
36: void Display()
37: { 38: cout << "====--Weather Report With Graphic Format--===="<< endl;
39: WeatherView::Display();
40: }
41: };
42:
43: class TableView: public WeatherView
44: { 45: public:
46: void Display()
47: { 48: cout << "====--Weather Report With Table Format--===="<< endl;
49: WeatherView::Display();
50: }
51: };
52:
53: class WeatherData
54: { 55: public:
56: void SetWeahterData(int temp, int hum)
57: { 58: temperature = temp;
59: humidity = hum;
60: NotifyObservcer();
61: }
62:
63: void RegisterObserver(WeatherView* obs)
64: { 65: obsList.push_back(obs);
66: }
67:
68: void RemoveObserver(WeatherView* obs)
69: { 70: vector<WeatherView*>::iterator it;
71: it = find(obsList.begin(), obsList.end(), obs);
72: if (it != obsList.end())
73: obsList.erase(it);
74: }
75:
76: private:
77: vector<WeatherView*> obsList;
78: int temperature;
79: int humidity;
80: void NotifyObservcer()
81: { 82: vector<WeatherView*>::iterator it;
83: for(it = obsList.begin(); it < obsList.end(); it++)
84: { 85: (*it)->Update(temperature, humidity);
86: }
87: }
88: };
89:
90:
91: int main()
92: { 93: WeatherData *wd = new WeatherData();
94: GraphicView *gv = new GraphicView();
95: TableView *tv = new TableView();
96:
97: wd->RegisterObserver(gv);
98: wd->RegisterObserver(tv);
99: wd->SetWeahterData(23,45);
100: gv->Display();
101: tv->Display();
102:
103: wd->RemoveObserver(gv);
104: wd->SetWeahterData(67,89);
105: gv->Display();
106: tv->Display();
107:
108: return 0;
109: }
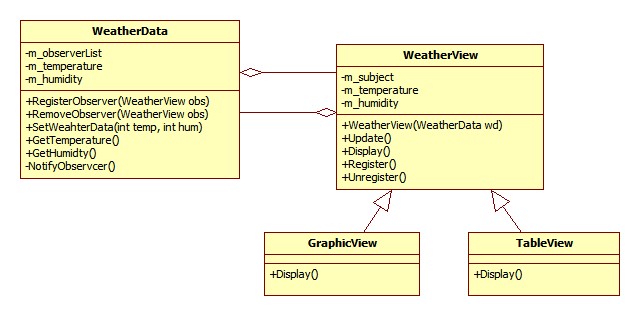
2)用Pull的方式更新Observer数据, Observer自己进行注册:
1: #ifndef WEATHERDATA_HPP_INCLUDED
2: #define WEATHERDATA_HPP_INCLUDED
3: #include <iostream>
4: #include <vector>
5:
6: #include "WeatherView.hpp"
7:
8: class WeatherData
9: { 10: public:
11: void SetWeahterData(int temp, int hum)
12: { 13: temperature = temp;
14: humidity = hum;
15: NotifyObservcer();
16: }
17:
18: int GetTemperature()
19: { 20: return temperature;
21: }
22:
23: int GetHumidty()
24: { 25: return humidity;
26: }
27:
28: void RegisterObserver(WeatherView* obs);
29: void RemoveObserver(WeatherView* obs);
30:
31: private:
32: vector<WeatherView*> obsList;
33: int temperature;
34: int humidity;
35: void NotifyObservcer();
36: };
37:
38: #endif
=================
1: #ifndef WEATHERVIEW_HPP_INCLUDED
2: #define WEATHERVIEW_HPP_INCLUDED
3:
4: #include <iostream>
5: #include <vector>
6: #include <algorithm>
7:
8:
9: class WeatherData;
10:
11: using namespace std;
12:
13: class WeatherView
14: { 15: public:
16: WeatherView(WeatherData* wd);
17:
18: void Update();
19: void Register();
20: void Unregister();
21:
22: virtual void Display()
23: { 24: cout << "temperature = " << temperature << ", humidity = " << humidity << endl;
25: }
26:
27: private:
28: WeatherData* wd;
29: int temperature;
30: int humidity;
31: };
32:
33: class GraphicView: public WeatherView
34: { 35: public:
36: GraphicView(WeatherData* wd);
37: void Display()
38: { 39: cout << "====--Weather Report With Graphic Format--===="<< endl;
40: WeatherView::Display();
41: }
42: };
43:
44: class TableView: public WeatherView
45: { 46: public:
47: TableView(WeatherData* wd);
48: void Display()
49: { 50: cout << "====--Weather Report With Table Format--===="<< endl;
51: WeatherView::Display();
52: }
53: };
54:
55: #endif
===================
1: //这个例子中WeatherData就是Subject, 而WeatherView则是Observer,
2: //这里WeatherView中有一个包含到WeatherData的指针,
3: //因此这里是Observer用pull的方法主动向Observer索取数据;
4: //并且注册和反注册都是Observer自己执行的
5: #include <iostream>
6: #include <vector>
7: #include <algorithm>
8: #include "WeatherView.hpp"
9: #include "WeatherData.hpp"
10:
11: void WeatherData::RegisterObserver(WeatherView* obs)
12: { 13: obsList.push_back(obs);
14: }
15:
16: void WeatherData::RemoveObserver(WeatherView* obs)
17: { 18: vector<WeatherView*>::iterator it;
19: it = find(obsList.begin(), obsList.end(), obs);
20: if (it != obsList.end())
21: obsList.erase(it);
22: }
23:
24: void WeatherData::NotifyObservcer()
25: { 26: vector<WeatherView*>::iterator it;
27: for(it = obsList.begin(); it < obsList.end(); it++)
28: { 29: (*it)->Update();
30: }
31: }
32:
33:
34: WeatherView::WeatherView(WeatherData* pwd)
35: { 36: wd = pwd;
37: }
38:
39: void WeatherView::Update()
40: { 41: temperature = wd->GetTemperature();
42: humidity = wd->GetHumidty();
43: };
44:
45: void WeatherView::Register()
46: { 47: wd->RegisterObserver(this);
48: };
49:
50: void WeatherView::Unregister()
51: { 52: wd->RemoveObserver(this);
53: };
54:
55: GraphicView::GraphicView(WeatherData* pwd) : WeatherView(pwd)
56: { 57:
58: }
59:
60: TableView::TableView(WeatherData* pwd) : WeatherView(pwd)
61: { 62:
63: }
64: int main()
65: { 66: WeatherData *wd = new WeatherData();
67: GraphicView *gv = new GraphicView(wd);
68: gv->Register();
69: TableView *tv = new TableView(wd);
70: tv->Register();
71:
72: wd->SetWeahterData(23,45);
73: gv->Display();
74: tv->Display();
75:
76: gv->Unregister();
77: wd->SetWeahterData(67,89);
78: gv->Display();
79: tv->Display();
80:
81: return 0;
82: }
======================
上面两种实现的执行结果如下:
  1: ====--Weather Report With Graphic Format--====
  2: temperature = 23, humidity = 45
  3: ====--Weather Report With Table Format--====
  4: temperature = 23, humidity = 45
  5: ====--Weather Report With Graphic Format--====
  6: temperature = 23, humidity = 45
  7: ====--Weather Report With Table Format--====
  8: temperature = 67, humidity = 89
4. Push还是Pull?
对于上面的例子, Observer中的数据是从Subject中一次性全部更新的(temperature 和 humidity), 这种更新数据的方式便是push;然而如果WeatherData中的数据量非常大, 而有些Observer并不需要所有的数据, 比如现在要新增两个显示方式,一个是只显示温度,而另一个则只显示湿度, 这样的话就没有必要让所有的Observer都得到所有的数据. 最好的方式是Observer能根据自己的需要从Subject中去取得数据,这种更新数据的方式便是Pull. Observer模式中Push和Pull两种设计方法体现在具体的程序中就是Observer中的Update()接口参数不同, 对于Push模式, Update()接口的参数通常就是需要Push的那些数据,比如这里的温度和湿度; 对于Pull模式, Update()的参数是Subject的一个引用, 然后Subject提供一些数据接口,由Observer通过这些接口自己取得所需要的数据.
5. 总结:
1. Strategy 模式定义:
定义对象间的一种一对多的依赖关系,当一个对象的状态发生改变时,所有依赖于它的对象都得到通知并被自动更新.
2. 体现的设计原则:
- 将数据与现实分别封装;
- 多使用组合,少使用继承;
- 面向接口编程,而不面向实现编程;
3. UML图:

4. 要点:
- Strategy 基类需要定义出可供Client使用的一些算法接口;
- 可以随时根据需要增加 Strategy 而不会影响到Client;
- Client 里面需要包含对 Strategy 的引用;
- Client 可以随时更换 Strategy;
6. 理解:
- Observer模式是解决对象之间数据传递问题的一种模式;
- Observer的注册可以由Subject执行也可以由Observer自己执行;
- 和Strategy模式的比较:
1) Observer模式中Observer 中定义了 Update()接口供 Subject调用; 而Strategy模式中,Strategy定义了AlgrithmInterface()供Client调用;
2) Observer模式中Subject和Observer是一对多的关系, 因此Subject是一次调用n个Observer的Update()接口;而Strategy模式中Client与Strategy之间是一对一的关系, Client 就是调用指定的那个Strategy的AlgrithmInterface();
3) 也正因为这种对应关系的不同, 在Observer模式中, Subject可以Register或者Remove某个Observer, 而Strategy模式中通常只是set某个Strategy
原文地址: http://blog.csdn.net/zhongjiekangping/article/details/6903017