#
摘要: 考虑一下多线程代码,在设计上,App为了获取更多的功能,从Window派生,而App同时为了获取某个模块的回调(所谓的Listener),App同时派生Listener,并将自己的指针交给另一个模块,另一个模块通过该指针多态回调到App的实现(对Listener规定的接口的implemention)。设计上只是一个很简单的Listener回调,在单线程模式下一切都很正常(后面我会罗列代码),但是换...
阅读全文
很早前就想写点总结将编程中遇到的各种错误刨根挖底地罗列出来。但是因为这些错误(VC中开调试器遇到的各种错误对话框)都是随机性的,真正想总结的时候又不想不起来有哪些错误。恰好最近运气比较背,各种错误都被我遇遍了,于是恰好有机会做个总结。
这里所说的VC下的错误对话框时指在VC中开调试器运行程序时,IDE弹出的对话框。
1.不是错误的错误:断言 .
将断言视为错误其实有点可笑,但是因为有些同学甚至不知道这个,所以我稍微提一下。断言对话框大致上类似于:

断言对话框是由assert引起的,在对话框上通常会给出表达式,例如assert( 0 ); 弹出对话框时就会将0这个表达式显示出来(Expression:0)。关于assert的具体信息建议自己google。这里稍微提一下一个技巧:有时候为了让assert提供更多的信息,我们可以这样写一个assert:
assert( expression && "Function : invalid argument!" );
因为字符串被用在布尔表达式中时,始终为true,不会妨碍对expression的判断,当断言发生时(expression为false) 时,断言对话框上就会显示这个字符串,从而方便我们调试。
要解决这个问题,首先要确定断言发生的位置,如果是你自己设置的断言被引发,就很好解决,如果是系统内部的函数产生的,那么一般是因为你传入的函数参数无效引起。
2.内存相关:最简单的非法访问:
C、C++程序中经常误用无效的指针,从而大致各种各样的非法内存访问(写/读)。最简单的情况类似于:
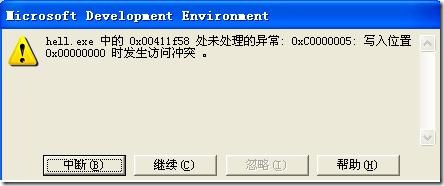
这样的情况由类似以下代码引起:
char *p = 0;
*p = 'a';
当你看到类似于“写入位置XXXX时发生访问冲突“时,那么你大致可以断定,你的程序在某个地方访问到非法内存。开调试器对调用堆栈进行跟踪即可找出错误。
3.内存相关:不小心的栈上数组越界:
当你写下类似以下的代码时:
char str[3];
strcpy( str, "abc" );
就将看到如下的对话框:
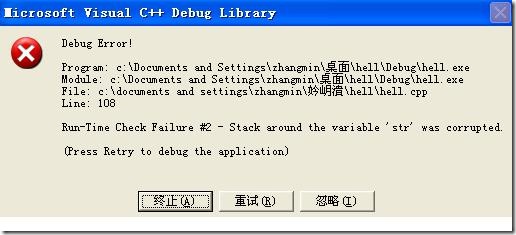
对话框大致的意思就是说str周围的栈被破坏了,因为str本身就被放在栈上,所以strcpy(str,"abc")多写入的'\0'就写到非法的栈区域。看到这样的对话框可以根据调用堆栈定位到错误发生的函数,然后检查此函数内部定义的数组访问,即可解决问题。
4.内存相关:不小心的堆上数组越界:
并不是每次数组越界都会得到上面所描述的错误,当数组是在堆上分配时,情况就变得隐秘得多:
char *str = new char [2];
strcpy( str, "ab" ); //执行到这里时并不见得会崩溃
delete [] str;//但是到这里时就肯定会崩溃
以上代码导致的错误对话框还要诡异些:
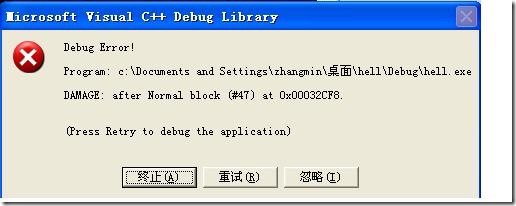
似乎不同的DAMAGE对应的错误号(这里是47)都不一样,因为这里的错误发生在delete,而delete跟new很可能在不同的地方,所以这个错误调试起来不是那么容易,很多时候只能靠经验。
当看到类似的对话框时,根据调用堆栈跟到delete时,你就可以大致怀疑堆上数组越界。
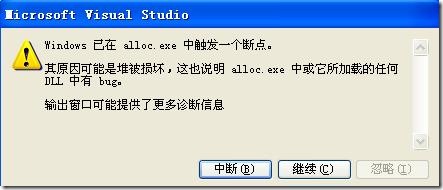
5.调用相关:函数调用约定带来的错误:
这是所有我这里描述的错误中最诡异的一种,先看下对话框大致的样子:
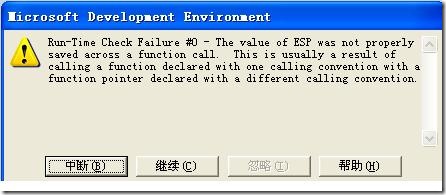
对话框大致的意思就是说(没开调试器时对话框样式可能不一样),通过函数指针调用某个函数时,函数指针的类型(函数原型)可能与函数指针指向的函数的类型不一样。这里的类型不一致主要是调用约定(call conversation)不一样。如果函数类型(参数个数,返回值)不一样,一般不会出错。
调用约定是指调用一个函数时,函数参数的压入顺序、谁来清理栈的内容等。例如默认的C、C++调用约定__cdecl,对于函数的参数是从右往左压入。而__stdcall(WIN API的调用约定)则是从左向右压。我这里所说的函数类型不一样,就是指一个函数是使用__cdecl,还是__stdcall。例如以下代码:
 #include <iostream>
void __stdcall show( const char *str )


 {
{

 }
}
void __stdcall show2()
{
}
int main()
{
typedef void (*Func)( const char *);
void *p = show;
Func my_func = (Func) p;
my_func( "kevin" );
return 0;
}
因为Func默认地被处理为__cdecl,而show是__stdcall的,所以当通过函数指针my_func时,就导致了以上对话框的出现。但是当p指向show2时,又不会出错,这是因为show2没有参数,不同的调用约定不影响这个规则。
6.异常相关:默认终止程序
当我们使用C++库时,因为库本身可能会抛出C++异常,如果你不捕获这个异常,那么C++默认就会调用abort(或者exit)函数终止程序。例如:
void test()
{
throw std::exception( "some exceptions" );
}
当你调用test函数时,如果不catch这个异常,开调试器就会得到类似的错误对话框:
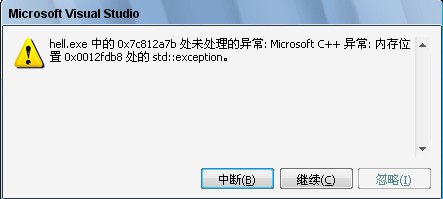
而如果不开调试器,则会得到:
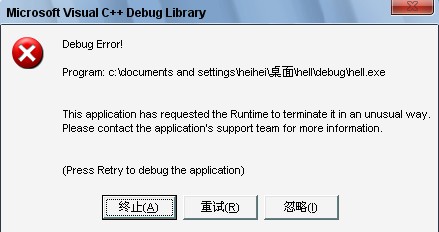
当你看到类似于“This application has requested the Runtime to terminate it…”之类的字眼时,那就表明程序调用了abort(或exit)函数,导致程序异常终止。其实这个错误只要开调试器,一般可以准确定位错误的发生点。
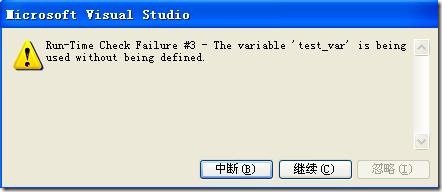
7.VC运行时检查-未初始化变量
VC的调试器会对代码进行运行时检查,这可能会导致VC弹出对你看上去正确的代码。这也许不是一个错误。例如:
int test_var;
if( test_var == -1 )
{
test_var = 0;
}
test_var没有初始化就进行if判断,当运行以上代码开调试器时,就会得到如下对话框:
8.破坏的堆
VC对于在堆上分配的内存都做了记录,我想这主要用于free释放内存时做归还处理。
char *p = (char*) malloc( 100 );
p += 10;
free( p );
当执行以上代码时,因为p的值已经改变,提交到free的指针值变化,VC就会给出以下错误提示:
最近在草草地看<TCP/IP详解>TCP那一部分,之所以草草地看是因为觉得早晚一天会回过头去细看。手头上
有工作要做,所以先草草地把之前随便摘抄的TCP/IP相关概念贴出来:
继续草草地贴:
--------------------------------------------------------------------------------------------------------------------------------------------------------
TCP segment:
Thus, we have simply “passed the buck” to TCP, which must take the stream from the application
and divide it into discrete messages for IP. These messages are called TCP segments.
On regular intervals, it forms segments to be transmitted using IP. The size of the segment is
controlled by two primary factors. The first issue is that there is an overall limit to the size
of a segment, chosen to prevent unnecessary fragmentation at the IP layer. This is governed by a
parameter called the maximum segment size (MSS), which is determined during connection establishment.
The second is that TCP is designed so that once a connection is set up, each of the devices tells the
other how much data it is ready to accept at any given time. If this is lower than the MSS value, a
smaller segment must be sent. This is part of the sliding window system described in the next topic.
Since TCP works with individual bytes of data rather than discrete messages, it must use an
identification scheme that works at the byte level to implement its data transmission and tracking
system. This is accomplished by assigning each byte TCP processes a sequence number.
Since applications send data to TCP as a stream of bytes and not prepackaged messages, each
application must use its own scheme to determine where one application data element ends and the
next begins.
--------------------------------------------------------------------------------------------------------------------------------------------------------
TCP MSS:
http://www.tcpipguide.com/free/t_TCPMaximumSegmentSizeMSSandRelationshiptoIPDatagra.htm
In addition to the dictates of the current window size, each TCP device also has associated
with it a ceiling on TCP size—a segment size that will never be exceeded regardless of how
large the current window is. This is called the maximum segment size (MSS). When deciding
how much data to put into a segment, each device in the TCP connection will choose the amount
based on the current window size, in conjunction with the various algorithms described in
the reliability section, but it will never be so large that the amount of data exceeds the
MSS of the device to which it is sending.
Note: I need to point out that the name “maximum segment size” is in fact misleading. The
value actually refers to the maximum amount of data that a segment can hold—it does not
include the TCP headers. So if the MSS is 100, the actual maximum segment size could be 120
(for a regular TCP header) or larger (if the segment includes TCP options).
This was computed by starting with the minimum MTU for IP networks of 576.
Devices can indicate that they wish to use a different MSS value from the default by including
a Maximum Segment Size option in the SYN message they use to establish a connection. Each
device in the connection may use a different MSS value.
--------------------------------------------------------------------------------------------------------------------------------------------------------
delayed ACK algorithm
http://tangentsoft.net/wskfaq/intermediate.html#delayed-ack
In a simpleminded implementation of TCP, every data packet that comes in is immediately acknowledged
with an ACK packet. (ACKs help to provide the reliability TCP promises.)
In modern stacks, ACKs are delayed for a short time (up to 200ms, typically) for three reasons: a)
to avoid the silly window syndrome; b) to allow ACKs to piggyback on a reply frame if one is ready
to go when the stack decides to do the ACK; and c) to allow the stack to send one ACK for several
frames, if those frames arrive within the delay period.
The stack is only allowed to delay ACKs for up to 2 frames of data.
--------------------------------------------------------------------------------------------------------------------------------------------------------
Nagle algorithm:
Nagle's algorithm, named after John Nagle, is a means of improving the efficiency of TCP/IP networks by reducing the number of packets that need to be sent over the network.
Nagle's document, Congestion Control in IP/TCP Internetworks (RFC896) describes what he called the 'small packet problem', where an application repeatedly emits data in small chunks, frequently only 1 byte in size. Since TCP packets have a 40 byte header (20 bytes for TCP, 20 bytes for IPv4), this results in a 41 byte packet for 1 byte of useful information, a huge overhead. This situation often occurs in Telnet sessions, where most keypresses generate a single byte of data which is transmitted immediately. Worse, over slow links, many such packets can be in transit at the same time, potentially leading to congestion collapse.
Nagle's algorithm works by coalescing a number of small outgoing messages, and sending them all at once. Specifically, as long as there is a sent packet for which the sender has received no acknowledgment, the sender should keep buffering its output until it has a full packet's worth of output, so that output can be sent all at once.
[edit] Algorithm
if there is new data to send
if the window size >= MSS and available data is >= MSS
send complete MSS segment now
else
if there is unconfirmed data still in the pipe
enqueue data in the buffer until an acknowledge is received
else
send data immediately
end if
end if
end if
where MSS = Maximum segment size
This algorithm interacts badly with TCP delayed acknowledgments, a feature introduced into TCP at roughly the same time in the early 1980s, but by a different group. With both algorithms enabled, applications which do two successive writes to a TCP connection, followed by a read, experience a constant delay of up to 500 milliseconds, the "ACK delay". For this reason, TCP implementations usually provide applications with an interface to disable the Nagle algorithm. This is typically called the TCP_NODELAY option. The first major application to run into this problem was the X Window System.
The tinygram problem and silly window syndrome are sometimes confused. The tinygram problem occurs when the window is almost empty. Silly window syndrome occurs when the window is almost full
===================================================================================================================================
3.17 - What is the Nagle algorithm?
The Nagle algorithm is an optimization to TCP that makes the stack wait until all data is acknowledged on the connection before it sends more data. The exception is that Nagle will not cause the stack to wait for an ACK if it has enough enqueued data that it can fill a network frame. (Without this exception, the Nagle algorithm would effectively disable TCP's sliding window algorithm.) For a full description of the Nagle algorithm, see RFC 896.
So, you ask, what's the purpose of the Nagle algorithm?
The ideal case in networking is that each program always sends a full frame of data with each call to send(). That maximizes the percentage of useful program data in a packet.
The basic TCP and IPv4 headers are 20 bytes each. The worst case protocol overhead percentage, therefore, is 40/41, or 98%. Since the maximum amount of data in an Ethernet frame is 1500 bytes, the best case protocol overhead percentage is 40/1500, less than 3%.
While the Nagle algorithm is causing the stack to wait for data to be ACKed by the remote peer, the local program can make more calls to send(). Because TCP is a stream protocol, it can coalesce the data in those send() calls into a single TCP packet, increasing the percentage of useful data.
Imagine a simple Telnet program: the bulk of a Telnet conversation consists of sending one character, and receiving an echo of that character back from the remote host. Without the Nagle algorithm, this results in TCP's worst case: one byte of user data wrapped in dozens of bytes of protocol overhead. With the Nagle algorithm enabled, the TCP stack won't send that one Telnet character out until the previous characters have all been acknowledged. By then, the user may well have typed another character or two, reducing the relative protocol overhead.
This simple optimization interacts with other features of the TCP protocol suite, too:
Most stacks implement the delayed ACK algorithm: this causes the remote stack to delay ACKs under certain circumstances, which allows the local stack a bit of time to "Nagle" some more bytes into a single packet.
The Nagle algorithm tends to improve the percentage of useful data in packets more on slow networks than on fast networks, because ACKs take longer to come back.
TCP allows an ACK packet to also contain data. If the local stack decides it needs to send out an ACK packet and the Nagle algorithm has caused data to build up in the output buffer, the enqueued data will go out along with the ACK packet.
The Nagle algorithm is on by default in Winsock, but it can be turned off on a per-socket basis with the TCP_NODELAY option of setsockopt(). This option should not be turned off except in a very few situations.
Beware of depending on the Nagle algorithm too heavily. send() is a kernel function, so every call to send() takes much more time than for a regular function call. Your application should coalesce its own data as much as is practical to minimize the number of calls to send().
--------------------------------------------------------------------------------------------------------------------------------------------------------
Sliding Window Acknowledgment System :
http://www.tcpipguide.com/free/t_TCPSlidingWindowAcknowledgmentSystemForDataTranspo.htm
--------------------------------------------------------------------------------------------
A basic technique for ensuring reliability in communications uses a rule that requires a
device to send back an acknowledgment each time it successfully receives a transmission.
If a transmission is not acknowledged after a period of time, it is retransmitted by its
sender. This system is called positive acknowledgment with retransmission (PAR). One
drawback with this basic scheme is that the transmitter cannot send a second message
until the first has been acknowledged.
--------------------------------------------------------------------------------------------
http://www.ssfnet.org/Exchange/tcp/tcpTutorialNotes.html
The sliding window serves several purposes:
(1) it guarantees the reliable delivery of data
(2) it ensures that the data is delivered in order,
(3) it enforces flow control between the sender and the receiver.
------------------to be continued
Ascent网络模块
Author: Kevin Lynx
Ascent是WoW的服务器模拟器,你可以从它的SVN上获取它的全部代码,并从它的WIKI页面获取架构起整个服务器的相关步骤。
基本架构:
Ascent网络模块核心的几个类关系如下图所示:
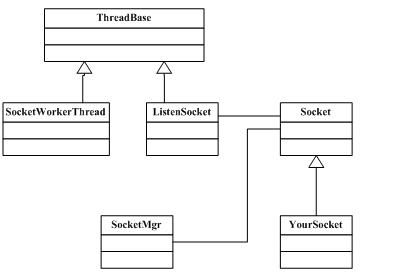
ThreadBase属于Ascent线程池模块中的类,它实现了一个job类,当其被加入到线程池中开始执行时,线程池管理器会为其分配一个线程(如果有线程资源)并多态调用到ThreadBase派生类的run函数。
SocketWorkerThread用以代表IOCP网络模型中的一个工作者线程,它会从IOCP结果队列里取出异步IO的操作结果。这里的IOCP使用的完成键是Socket对象指针。SocketWorkerThread获取到IO操作结果后,根据获得的完成键将结果通知给具体的Socket对象。(Socket的说明见后面)
ListenSocket代表一个监听套接字。该网络模块其实只是简单地将socket中的概念加以封装。也就说,它依然把一个套接字分为两种类型:监听套接字和数据套接字(代表一个网络连接)。所谓的监听套接字,是指只可以在该套接字上进行监听操作;而数据套接字则只可以在此套接字上进行发送、接收数据的操作。
Socket代表我上面说的数据套接字。ListenSocket是一个类模板,为这个模板指定的模板参数通常是派生于Socket的类。其实这里使用了这个小技巧隐藏了工厂模式的细节。因为ListenSocket被放在一个单独的线程里运作,当其接受到一个新的网络连接时,就创建一个Socket派生类对象。(ListenSocket类如何知道这个派生类的类名?这就是通过类模板的那个模板参数)
上层模块通常会派生Socket类,实现一些IO操作的回调。也就说,当某个IO操作完成后,会通过Socket基类让上层模块获取通知。
SocketMgr是一个全局单件类。它主要负责一些网络库的全局操作(例如winsock库的初始化),它还维护了一个容器,保存所有的Socket对象。这其实是它的主要作用。
运作之一,接收新的连接:
接收新的网络连接是通过ListenSocket实现的。在创建一个ListenSocket对象时,你需要指定它的模板参数。这个参数通常是一个派生于Socket的类。如下:
ascent-logonserver/Main.cpp
ListenSocket<AuthSocket> * cl = new ListenSocket<AuthSocket>(host.c_str(), cport);
AuthSocket派生于Socket。创建ListenSocket时构造函数指定监听IP和监听端口。
因为ListenSocket派生于ThreadBase,属于线程池job,因此要让ListenSocket工作起来,只需要将其加入到线程池管理器:
ascent-logonserver/Main.cpp
ThreadPool.ExecuteTask(cl);
ListenSocket开始运作起来后,会阻塞式地WSAAccept。如果WSAAccept返回一个有效的套接字,ListenSocket就创建一个Socket派生类对象(类型由模板参数指定),在上面举的例子中,也就是AuthSocket:
ascent-logonserver/ ListenSocketWin32.h
socket = new T(aSocket); //创建AuthSocket并保存网络套接字aSocket
socket->SetCompletionPort(m_cp);//保存完成端口对象
socket->Accept(&m_tempAddress); //关联到完成端口等
Accept函数最终会将新创建的Socket对象保存到SocketMgr对象内部维护的容器里。在这里,还会回调到上层模块的OnConnect函数,从而实现信息捕获。
运作之二,接收数据
在windows平台下,该网络模块使用的是IOCP模型,属于异步IO。当接收新的连接时,即发出WSARecv的IO操作。在工作者线程中,也就是SocketWorkerThread中,会根据IOCP完成键得到Socket对象指针,然后根据不同的IO操作结果多态回调到Socket派生类对应的函数。例如如果是WSARecv完成,则调用到AuthSocket::OnRead函数(上述例子)。OnRead函数直接可以获取到保存数据的缓冲区指针。事实上,每一个Socket对象在被创建时,就会自动创建接收缓冲区以及发送缓冲区。
运作之三,发送数据
分析到这里,我们可以看出,该网络模块实现得很一般。在接受数据部分,网络工作者线程回调到对应的Socket对象,Socket直接对数据进行上层逻辑处理。更好的做法是当工作者线程回调到上层Socket(Socket的派生类)时,这里应该简单地将数据组织成上层数据包并放入上层数据包队列,让上层逻辑稍后处理,而不是让网络模块自己去处理。这样做主要是考虑到多线程模型。
同样,该网络模块的发送模块也是一样,没有缓冲机制。当要发送数据时,直接调用到Socket的Send函数。该函数拷贝用户数据到自己维护的发送缓冲区,然后将自己的缓冲区指针直接提交给IOCP,WSASend发送。
结束
该网络模块实现的似乎有点简陋,在该模块之上也没有数据校验、数据加密的模块(这些动作散乱地分布在最上层逻辑)。在架构上也没能很好地将概念区分开来,Socket套用了原始socket中的数据套接字,而不是我所希望的NetSession。可以圈点的地方在于该模块很多地方使用了回调函数表,从而方便地实现事件传送。
摘要: 探究CRC32算法实现原理-why table-driven implemention
Author : Kevin Lynxemail : zmhn320@163.com
Preface
基于不重造轮子的原则,本文尽量不涉及网络上遍地都是的资料。
What's CRC ?
简而言之,CRC是一个数值。该数值被用于校验数据的正确性。CRC数值简单地说就是通过让你需要做处理的数...
阅读全文
Author : Kevin Lynx
当软件作为release模式被发布给用户时,当程序崩溃时我们很难去查找原因。常见的手法是输出LOG文件,根据LOG文件分析
程序崩溃时的运行情况。我们可以通过SEH来捕获程序错误,然后输出一些有用的信息作为我们分析错误的资料。一般我们需要
输出的信息包括:系统信息、CPU寄存器信息、堆栈信息、调用堆栈等。而调用堆栈则是最有用的部分,它可以直接帮我们定位
到程序崩溃时所处的位置(在何处崩溃)。(codeproject上关于这个专题的常见开场白 = =#)
要获取call stack(所谓的调用堆栈),就需要查看(unwind)stack的内容。We could conceivably attempt to unwind the
stack ourselves using inline assembly. But stack frames can be organized in different ways, depending on compiler
optimizations and calling conventions, so it could become complicated to do it that way.(摘自vld文档)要获取栈的
内容,我们可以自己使用内联汇编获取,但是考虑到兼容性,内联汇编并不是一个好的解决方案。我们可以使用微软的dbghelp
中的StackWalk64来获取栈的内容。
StackWalk64声明如下:
BOOL StackWalk64(
DWORD MachineType,
HANDLE hProcess,
HANDLE hThread,
LPSTACKFRAME64 StackFrame,
PVOID ContextRecord,
PREAD_PROCESS_MEMORY_ROUTINE64 ReadMemoryRoutine,
PFUNCTION_TABLE_ACCESS_ROUTINE64 FunctionTableAccessRoutine,
PGET_MODULE_BASE_ROUTINE64 GetModuleBaseRoutine,
PTRANSLATE_ADDRESS_ROUTINE64 TranslateAddress
);
具体每个参数的含义可以参见MSDN。这里说下ContextRecord参数,该参数指定了CPU各个寄存器的内容。StackFrame指定了stack
frame的内容。stack frame是什么,我也不知道。(= =) StackWalk64函数需要用户指定当前frame的地址,以及当前程序的指令
地址。这两个信息都被填充进ContextRecord,然后传进StackWalk64函数。
那么如何获取当前的stack frame地址和当前程序指令地址呢?如前所说,你可以使用内联汇编。(对于程序指令地址,因为要获取
EIP寄存器的内容,而该寄存器不能被软件访问)也可以使用GetThreadContext一次性获取当前线程当前运行情况下的CPU各个寄存器
内容。补充下,当前frame地址被放在EBP寄存器里,当前程序指令地址放在EIP寄存器里。但是,如同MSDN对GetThreadContext函数
的说明一样,该函数可能获取到错误的寄存器内容(You cannot get a valid context for a running thread)。
另一种获取Context(包含EBP and EIP)的方法就是使用SEH(结构化异常处理),在__except中使用GetExceptionInformation获取。
GetExceptionInformation 传回一个LPEXCEPTION_POINTERS指针,该指针指向一个EXCEPTION_POINTERS结构,该结构里包含一个
Context的指针,即达到目标,可以使用StackWalk函数。
补充一下,你可以直接使用StackWalk函数,StackWalk被define为StackWalk64(windows平台相关)。
unwind栈后,可以进一步获取一个stack frame的内容,例如函数名。这里涉及到SymFromAddr函数,该函数可以根据一个地址返回
符号名(函数名)。还有一个有意思的函数:SymGetLineFromAddr,可以获取函数对应的源代码的文件名和行号。
当然,这一切都依赖于VC产生的程序数据库文件(pdb),以及提供以上API函数的dbghelp.dll。
参考一段简单的代码:
/**////
///
///#include <windows.h>
#include <stdio.h>
#include <dbghelp.h>
#pragma comment( lib, "dbghelp.lib" )
void dump_callstack( CONTEXT *context )
{
STACKFRAME sf;
memset( &sf, 0, sizeof( STACKFRAME ) );
sf.AddrPC.Offset = context->Eip;
sf.AddrPC.Mode = AddrModeFlat;
sf.AddrStack.Offset = context->Esp;
sf.AddrStack.Mode = AddrModeFlat;
sf.AddrFrame.Offset = context->Ebp;
sf.AddrFrame.Mode = AddrModeFlat;
DWORD machineType = IMAGE_FILE_MACHINE_I386;
HANDLE hProcess = GetCurrentProcess();
HANDLE hThread = GetCurrentThread();
for( ; ; )

 {
{
if( !StackWalk(machineType, hProcess, hThread, &sf, context, 0, SymFunctionTableAccess, SymGetModuleBase, 0 ) )
{
break;
 }
}
if( sf.AddrFrame.Offset == 0 )
{
break;
}
BYTE symbolBuffer[ sizeof( SYMBOL_INFO ) + 1024 ];
PSYMBOL_INFO pSymbol = ( PSYMBOL_INFO ) symbolBuffer;
pSymbol->SizeOfStruct = sizeof( symbolBuffer );
pSymbol->MaxNameLen = 1024;
DWORD64 symDisplacement = 0;
if( SymFromAddr( hProcess, sf.AddrPC.Offset, 0, pSymbol ) )
{
printf( "Function : %s\n", pSymbol->Name );
}
else
{
printf( "SymFromAdd failed!\n" );
}
IMAGEHLP_LINE lineInfo = { sizeof(IMAGEHLP_LINE) };
DWORD dwLineDisplacement;
if( SymGetLineFromAddr( hProcess, sf.AddrPC.Offset, &dwLineDisplacement, &lineInfo ) )
{
printf( "[Source File : %s]\n", lineInfo.FileName );
printf( "[Source Line : %u]\n", lineInfo.LineNumber );
}
else
{
printf( "SymGetLineFromAddr failed!\n" );
}
}
}
DWORD excep_filter( LPEXCEPTION_POINTERS lpEP )
{
/**//// init dbghelp.dll
if( SymInitialize( GetCurrentProcess(), NULL, TRUE ) )
{
printf( "Init dbghelp ok.\n" );
}
dump_callstack( lpEP->ContextRecord );
if( SymCleanup( GetCurrentProcess() ) )
{
printf( "Cleanup dbghelp ok.\n" );
}
return EXCEPTION_EXECUTE_HANDLER;
}
void func1( int i )
{
int *p = 0;
*p = i;
}
void func2( int i )
{
func1( i - 1 );
}
void func3( int i )
{
func2( i - 1 );
}
void test( int i )
{
func3( i - 1 );
}
int main()
{
__try
{
test( 10 );
}
__except( excep_filter( GetExceptionInformation() ) )
{
printf( "Some exception occures.\n" );
}
return 0;
}
以上代码在release模式下需要关掉优化,否则调用堆栈显示不正确(某些函数被去掉了?),同时需要pdb文件。
参考资料:
http://www.codeproject.com/KB/threads/StackWalker.aspx
http://www.cnblogs.com/protalfox/articles/84723.html
http://www.codeproject.com/KB/debug/XCrashReportPt1.aspx
http://www.codeproject.com/KB/applications/visualleakdetector.aspx
ps,本文技术浅尝辄止,部分内容是否完全准确(正确)我个人都持保留态度,仅供参考。:D
Author : Kevin Lynx
众多C++书籍都忠告我们C语言宏是万恶之首,但事情总不如我们想象的那么坏,就如同goto一样。宏有
一个很大的作用,就是自动为我们产生代码。如果说模板可以为我们产生各种型别的代码(型别替换),
那么宏其实可以为我们在符号上产生新的代码(即符号替换、增加)。
关于宏的一些语法问题,可以在google上找到。相信我,你对于宏的了解绝对没你想象的那么多。如果你
还不知道#和##,也不知道prescan,那么你肯定对宏的了解不够。
我稍微讲解下宏的一些语法问题(说语法问题似乎不妥,macro只与preprocessor有关,跟语义分析又无关):
1. 宏可以像函数一样被定义,例如:
#define min(x,y) (x<y?x:y) //事实上这个宏存在BUG
但是在实际使用时,只有当写上min(),必须加括号,min才会被作为宏展开,否则不做任何处理。
2. 如果宏需要参数,你可以不传,编译器会给你警告(宏参数不够),但是这会导致错误。如C++书籍中所描
述的,编译器(预处理器)对宏的语法检查不够,所以更多的检查性工作得你自己来做。
3. 很多程序员不知道的#和##
#符号把一个符号直接转换为字符串,例如:
#define STRING(x) #x
const char *str = STRING( test_string ); str的内容就是"test_string",也就是说#会把其后的符号
直接加上双引号。
##符号会连接两个符号,从而产生新的符号(词法层次),例如:
#define SIGN( x ) INT_##x
int SIGN( 1 ); 宏被展开后将成为:int INT_1;
4. 变参宏,这个比较酷,它使得你可以定义类似的宏:
#define LOG( format, ... ) printf( format, __VA_ARGS__ )
LOG( "%s %d", str, count );
__VA_ARGS__是系统预定义宏,被自动替换为参数列表。
5. 当一个宏自己调用自己时,会发生什么?例如:
#define TEST( x ) ( x + TEST( x ) )
TEST( 1 ); 会发生什么?为了防止无限制递归展开,语法规定,当一个宏遇到自己时,就停止展开,也就是
说,当对TEST( 1 )进行展开时,展开过程中又发现了一个TEST,那么就将这个TEST当作一般的符号。TEST(1)
最终被展开为:1 + TEST( 1) 。
6. 宏参数的prescan,
当一个宏参数被放进宏体时,这个宏参数会首先被全部展开(有例外,见下文)。当展开后的宏参数被放进宏体时,
预处理器对新展开的宏体进行第二次扫描,并继续展开。例如:
#define PARAM( x ) x
#define ADDPARAM( x ) INT_##x
PARAM( ADDPARAM( 1 ) );
因为ADDPARAM( 1 ) 是作为PARAM的宏参数,所以先将ADDPARAM( 1 )展开为INT_1,然后再将INT_1放进PARAM。
例外情况是,如果PARAM宏里对宏参数使用了#或##,那么宏参数不会被展开:
#define PARAM( x ) #x
#define ADDPARAM( x ) INT_##x
PARAM( ADDPARAM( 1 ) ); 将被展开为"ADDPARAM( 1 )"。
使用这么一个规则,可以创建一个很有趣的技术:打印出一个宏被展开后的样子,这样可以方便你分析代码:
#define TO_STRING( x ) TO_STRING1( x )
#define TO_STRING1( x ) #x
TO_STRING首先会将x全部展开(如果x也是一个宏的话),然后再传给TO_STRING1转换为字符串,现在你可以这样:
const char *str = TO_STRING( PARAM( ADDPARAM( 1 ) ) );去一探PARAM展开后的样子。
7. 一个很重要的补充:就像我在第一点说的那样,如果一个像函数的宏在使用时没有出现括号,那么预处理器只是
将这个宏作为一般的符号处理(那就是不处理)。
我们来见识一下宏是如何帮助我们自动产生代码的。如我所说,宏是在符号层次产生代码。我在分析Boost.Function
模块时,因为它使用了大量的宏(宏嵌套,再嵌套),导致我压根没看明白代码。后来发现了一个小型的模板库ttl,说的
是开发一些小型组件去取代部分Boost(这是一个好理由,因为Boost确实太大)。同样,这个库也包含了一个function库。
这里的function也就是我之前提到的functor。ttl.function库里为了自动产生很多类似的代码,使用了一个宏:
#define TTL_FUNC_BUILD_FUNCTOR_CALLER(n) \
template< typename R, TTL_TPARAMS(n) > \
struct functor_caller_base##n \
///...
该宏的最终目的是:通过类似于TTL_FUNC_BUILD_FUNCTOR_CALLER(1)的调用方式,自动产生很多functor_caller_base模板:
template <typename R, typename T1> struct functor_caller_base1
template <typename R, typename T1, typename T2> struct functor_caller_base2
template <typename R, typename T1, typename T2, typename T3> struct functor_caller_base3
///...
那么,核心部分在于TTL_TPARAMS(n)这个宏,可以看出这个宏最终产生的是:
typename T1
typename T1, typename T2
typename T1, typename T2, typename T3
///...
我们不妨分析TTL_TPARAMS(n)的整个过程。分析宏主要把握我以上提到的一些要点即可。以下过程我建议你翻着ttl的代码,
相关代码文件:function.hpp, macro_params.hpp, macro_repeat.hpp, macro_misc.hpp, macro_counter.hpp。
so, here we go
分析过程,逐层分析,逐层展开,例如TTL_TPARAMS(1):
#define TTL_TPARAMS(n) TTL_TPARAMSX(n,T)
=> TTL_TPARAMSX( 1, T )
#define TTL_TPARAMSX(n,t) TTL_REPEAT(n, TTL_TPARAM, TTL_TPARAM_END, t)
=> TTL_REPEAT( 1, TTL_TPARAM, TTL_TPARAM_END, T )
#define TTL_TPARAM(n,t) typename t##n,
#define TTL_TPARAM_END(n,t) typename t##n
#define TTL_REPEAT(n, m, l, p) TTL_APPEND(TTL_REPEAT_, TTL_DEC(n))(m,l,p) TTL_APPEND(TTL_LAST_REPEAT_,n)(l,p)
注意,TTL_TPARAM, TTL_TPARAM_END虽然也是两个宏,他们被作为TTL_REPEAT宏的参数,按照prescan规则,似乎应该先将
这两个宏展开再传给TTL_REPEAT。但是,如同我在前面重点提到的,这两个宏是function-like macro,使用时需要加括号,
如果没加括号,则不当作宏处理。因此,展开TTL_REPEAT时,应该为:
=> TTL_APPEND( TTL_REPEAT_, TTL_DEC(1))(TTL_TPARAM,TTL_TPARAM_END,T) TTL_APPEND( TTL_LAST_REPEAT_,1)(
TTL_TPARAM_END,T)
这个宏体看起来很复杂,仔细分析下,可以分为两部分:
TTL_APPEND( TTL_REPEAT_, TTL_DEC(1))(TTL_TPARAM,TTL_TPARAM_END,T)以及
TTL_APPEND( TTL_LAST_REPEAT_,1)(TTL_TPARAM_END,T)
先分析第一部分:
#define TTL_APPEND( x, y ) TTL_APPEND1(x,y) //先展开x,y再将x,y连接起来
#define TTL_APPEND1( x, y ) x ## y
#define TTL_DEC(n) TTL_APPEND(TTL_CNTDEC_, n)
根据先展开参数的原则,会先展开TTL_DEC(1)
=> TTL_APPEND(TTL_CNTDEC_,1) => TTL_CNTDEC_1
#define TTL_CNTDEC_1 0 注意,TTL_CNTDEC_不是宏,TTL_CNTDEC_1是一个宏。
=> 0 , 也就是说,TTL_DEC(1)最终被展开为0。回到TTL_APPEND部分:
=> TTL_REPEAT_0 (TTL_TPARAM,TTL_TPARAM_END,T)
#define TTL_REPEAT_0(m,l,p)
TTL_REPEAT_0这个宏为空,那么,上面说的第一部分被忽略,现在只剩下第二部分:
TTL_APPEND( TTL_LAST_REPEAT_,1)(TTL_TPARAM_END,T)
=> TTL_LAST_REPEAT_1 (TTL_TPARAM_END,T) // TTL_APPEND将TTL_LAST_REPEAT_和1合并起来
#define TTL_LAST_REPEAT_1(m,p) m(1,p)
=> TTL_TPARAM_END( 1, T )
#define TTL_TPARAM_END(n,t) typename t##n
=> typename T1 展开完毕。
虽然我们分析出来了,但是这其实并不是我们想要的。我们应该从那些宏里去获取作者关于宏的编程思想。很好地使用宏
看上去似乎是一些偏门的奇技淫巧,但是他确实可以让我们编码更自动化。
参考资料:
macro语法: http://developer.apple.com/documentation/DeveloperTools/gcc-4.0.1/cpp/Macros.html
ttl(tiny template library) : http://tinytl.sourceforge.net/
摘要: 作者:Kevin Lynx
需求:
开发一种组件,用以包装C函数、通常的函数对象、成员函数,使其对外保持一种一致的接口。我将最终的组件称为functor,这里的functor与loki中的functor以及boost中的function功能一致,同STL中的functor在概念层次上可以说也是一样的。那么,functor其实也可以进一步传进其他functor构成新的functor。
C++世...
阅读全文
从SGI的STl文档来看,STL functor(function object)模块主要分为两个部分:预先定义的functor
以及functor adaptors。除此之外,为了使客端程序员写出适用于functor adaptor的functor,STL
又定义了一系列基本上只包含typedef的空类型(例如unary_function)。用户只需要派生这些类,即
可让自己写的functor被functor adaptor使用。以下称类基类型为base functor。
base functor包括: unary_function, binary_function,分别表示只有一个参数的函数和有两个参数
的函数。实际上STL里还有一个所谓的generator,代表没有参数的函数。因为STL泛型算法一般最多
只会使用两个参数的函数,所以这里并没有定义更多参数的base functor。
可被functor adaptor使用的functor又称为adaptable function,根据参数的个数,会被命名为诸如
adaptable unary function, adaptable binary function。
一个返回值为bool的functor又被称为predicate,可被用于functor adaptor的predicate被称为
adaptable predicate。其实所谓的adaptable,只需要在类型内部typedef一些类型即可,一般包括
first_argument_type, second_argument_type, result_type。functor adaptor会使用这些定义。
预定义的functors都是些很简单的functor,基本上就是封装诸如plus, minus, equal_to之类的算术
运算,列举一个predefined functor的代码:
template <class _Tp>
struct plus : public binary_function<_Tp, _Tp, _Tp>
{
_Tp operator()(const _Tp& __x, const _Tp& __y) const
{
return __x + __y;
}
};
因为从binary_function(即我所谓的base functor)派生,因此这些predefined functor也是adaptable
function。
functor adaptors里有很多有趣的东西,其实functor adaptor也是一些functor(从SGI的观点来看,一般
的C函数,函数指针都算作functor)。所不同的是,他们通常会适配(adapt)一种functor到另一种。例如:
std::binder1st,严格地说它是一个函数模板,它会把一个adaptable binary function转换为一个
adaptable unary function,并绑定一个参数。又如: std::ptr_fun,它会将一个只有一个参数的C函数
适配成一个pointer_to_unary_function的functor。
下面列举一些具体的代码:
关于base functor,基本上就只有unary_function, binary_function :
template <class _Arg, class _Result>
struct unary_function
{
typedef _Arg argument_type;
typedef _Result result_type;
};
关于predefined functor,如之前列举的plus一样,再列举一个:
template <class _Tp>
struct greater : public binary_function<_Tp, _Tp, bool>
{
bool operator()(const _Tp& __x, const _Tp& __y) const
{
return __x > __y;
}
};
关于functor adaptors,也是我觉得比较有趣的部分,多列举几个:
template <class _Operation, class _Tp>
inline binder1st<_Operation>
bind1st(const _Operation& __fn, const _Tp& __x)
{
typedef typename _Operation::first_argument_type _Arg1_type;
return binder1st<_Operation>(__fn, _Arg1_type(__x));
}
bind1st返回的binder1st定义为:
template <class _Operation>
class binder1st : public unary_function<typename _Operation::second_argument_type,
typename _Operation::result_type>
{
protected:
_Operation op;
typename _Operation::first_argument_type value;
public:
binder1st(const _Operation& __x, const typename _Operation::first_argument_type& __y):
op(__x), value(__y)
{}
typename _Operation::result_type
operator()(const typename _Operation::second_argument_type& __x) const
{
return op(value, __x);
}
typename _Operation::result_type
operator()(typename _Operation::second_argument_type& __x) const
{
return op(value, __x);
}
};
值得一提的是,ptr_fun以及相关的pointer_to_unary_function, pointer_to_binary_function,基本上
就是用来绑定C函数的组件,不过这里采用了很基础的模板技术,因此只实现了绑定一个参数和两个参数
的C函数。这种组件类似于loki中的functor,以及boost中的bind,只是功能弱很多。与之相关的还有
mem_fun, mem_fun_ref, mem_fun1, mem_fun1_ref等,这些都是用于绑定成员函数的。另一方面,与其说
是绑定,还不如说适配,即将函数适配为functor(特指重载operator()的类)。( Mem_fun_t is an adaptor
for member functions )采用这些(ptr_fun, mem_fun之类的东西)组件,客端程序员可以很容易地将各种
运行体(Kevin似乎很喜欢发明各种名字)(C函数、成员函数)适配成functor,从而与STL泛型算法结合。
例如, SGI文档中给出的mem_fun例子:
struct B {
virtual void print() = 0;
};
struct D1 : public B {
void print() { cout << "I'm a D1" << endl; }
};
struct D2 : public B {
void print() { cout << "I'm a D2" << endl; }
};
int main()
{
vector<B*> V;
V.push_back(new D1);
V.push_back(new D2);
V.push_back(new D2);
V.push_back(new D1);
for_each(V.begin(), V.end(), mem_fun(&B::print));
}
注:以上分析基于dev-cpp中自带的stl,源代码见stl_functional.h。