Using Key−Framed Skeletal Animation Sets
If you have explored the DirectX SDK samples, you might have come across a
little demo called SkinnedMesh, which shows you how to use a pre−calculated
key−frame animation stored in an .X file to animate an on−screen character. The
problem is, that sample's code is so convoluted and hard to understand that
it'll make your head spin. With no real documentation of how to use .X file
animation data, the skinned mesh animation sample remains full of mystery.
You have saw how to work with skeletal−based meshes, called skinned meshes,
which adhere to an underlying hierarchy of bones (a skeletal structure). The
vertices of the skinned mesh are attached to those bones, and they move as the
bones do. Basically, animation is achieved by slowly applying a set of
transformations to the hierarchy of bones and letting the vertices follow along
with the movements.
The sequence of these animation transformations is called a key frame. You
use key frames to define both the transformation and the time of the
transformation to use in the animation sequence. Where do you get the
transformations you use to apply the movements to those bones? There are many
file formats at your disposal, but to keep on the DirectX route, I'll be
concentrating on using .X files.
If you take a look at the SkinnedMesh demo's .X file (Tiny.x) from the
DirectX SDK, you'll notice that along with the typical Frame and Mesh templates,
there is an AnimationSet template with a number of embedded Animation and
AnimationKey objects. It's from these animation data objects that you obtain the
transformations used to animate your skinned mesh's bone hierarchy. Take a
closer look at some of these animation objects within an .X file to see what I
mean.
AnimationSet Walk {
	Animation {
		{Bip01}
		AnimationKey {
			4;
			3;
			0; 16; 1.00000, 0.00000, 0.00000, 0.00000,
			0.00000, 1.00000, 0.00000, 0.00000,
			0.00000, 0.00000, 1.00000, 0.00000,
			0.00000, 0.00000, 0.00000, 1.00000;;,
			1000; 16; 1.00000, 0.00000, 0.00000, 0.00000,
			0.00000, 1.00000, 0.00000, 0.00000,
			0.00000, 0.00000, 1.00000, 0.00000,
			0.00000, 0.00000, 0.00000, 1.00000;;,
			2000; 16; 1.00000, 0.00000, 0.00000, 0.00000,
			0.00000, 1.00000, 0.00000, 0.00000,
			0.00000, 0.00000, 1.00000, 0.00000,
			0.00000, 0.00000, 0.00000, 1.00000;;;
		}
}
	Animation {
		{Bip01_LeftArm}
		AnimationKey {
			0;
			1;
			0; 4; 1.00000, 0.000000, 0.00000, 0.000000;;;
		}
		AnimationKey {
			1;
			1;
			0; 4; 1.000000, 1.00000, 1.000000;;;
		}
		AnimationKey {
			2;
			1;
			0; 3; 0.000000, 0.00000, 0.000000;;;
		}
	}
}
What you're looking at is a simple animation that works with two bones. Each
animation is defined inside an AnimationSet data object; in the previous
instance, this animation has been assigned the name Walk. Two Animation objects
that contain the various keys of animation for each bone are embedded in this
AnimationSet object. Keys?! What the heck am I talking about? Well, my friend,
let me take a moment to explain the concept of keys in animation.
Using Keys in Animation
A key, short for an animation key, is a timeline marker that signifies a
change in a bone's position and/or orientation. An animation that uses keys is
called a key−framed animation. The reasons for using keys are quite significant,
with the most important one being memory conservation.
You see, an animation is a series of movements (bone movements, in this case)
over a set period of time. During this animation, your bone hierarchy is
modified to convey the motion in the animation. Trying to store every bone's
position and orientation for every millisecond of animation is impossible;
there's just too much data to store it effectively. Instead, you can space out
the movements over a longer period of time (every second or two)or better yet,
whenever a major change in each bone's position or orientation takes place. For
example, imagine your armrather, imagine the arm illustrated in Figure 5.1 .
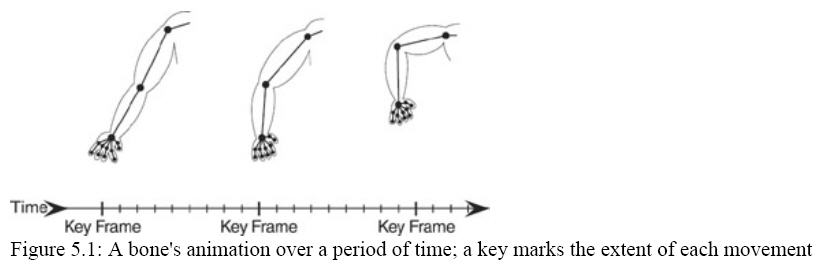
The bones that construct the arm in Figure 5.1 are pointing straight out at
the start of the animation. Over time, the bones bend at the imaginary elbow,
come to a rest, and then bend at a different angle. So there are three major
changes in the bones' orientationstraight (the default position), slightly bent,
and a major bend in the joint. These three changes are the three keys in the
animation.
Now, instead of storing the orientation of the bones every millisecond, store
those three keys and the exact time (in milliseconds) that the bones would reach
the appropriate orientation. In this example, suppose the arm animation starts
at 0 milliseconds, reaches the first key (half−bent) at 500 milliseconds, and
reaches the last key (fully bent) at 1,200 milliseconds.
Here's where using key frames comes in handy. Suppose you want to calculate
the orientation of the bones at a specific timesay, at 648 milliseconds. That
time just so happens to fall between the second and third keys (148 milliseconds
past the second key). Now, assume that the two transformation matrices represent
the orientations of each bone in the animation.
D3DXMATRIX matKey1, matKey2;
By taking each key and interpolating the values between them, you can come up
with a transformation to use at any time between the keys. In this example, at
648 milliseconds in the animation, you can interpolate the transformations as
follows:
// Get the difference in the matrices
D3DXMATRIX matTransformation = matKey2 − MatKey1;
// Get keys' times
float Key1Time = 500.0f;
float Key2Time = 1200.0f;
// Get the time difference of the keys
float TimeDiff = Key2Time − Key1Time;
// Get the scalar from animation time and time difference
float Scalar = (648.0f − Key1Time) / TimeDiff;
// Calculate the interpolated transformation matrix
matTransformation *= Scalar;
matTransformation += matKey1;
And there you have it! The matTransformation matrix now holds the
interpolated transformation that you would apply to the bone in question to
perfectly synchronize it to the animation! To increase precision, you can use
translation, rotation, and scaling values instead of transformation matrices
during the interpolation. I'll get back to doing just that in a bit, but for now
let's get back to the Animation template with which you'll be dealing.
For every bone in your hierarchy, there should be a matching Animation
object. Immediately following the Animation object declaration, you'll see a
referenced data object name. This is the name of the bone that has its animation
data defined using the preceding AnimationKey objects. This means that in the
previous example, the two bones, Bip01 and Bip01_LeftArm, are being animated.
One or more AnimationKey objects follow the data object reference. The
AnimationKey objects define the keys of the animation a bone uses, which can
include translation, rotation, scale, or transformation keys. Take a closer look
at each key type and how you store its information in the objects.