Walking Curved Paths
In your game, the paths need not be so straight. You can have your objects
move along a nice, curvy path, such as when a character walks around in a
circle. Trying to define a smooth circular path using straight lines is nearly
impossible, so you must develop a second type of path−one that can handle
curves. Not just any type of curve, however. Remember that this is advanced
animation−we're going for the big leagues here, and that major hitter you want
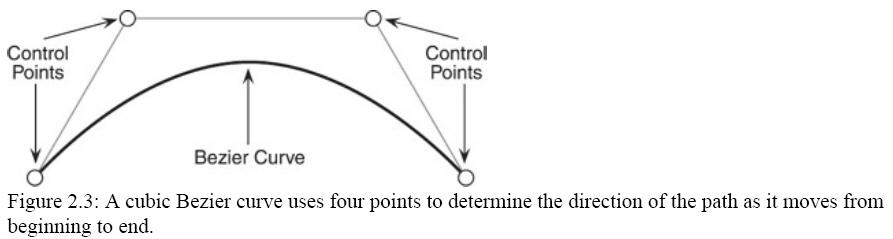
is a cubic Bezier curve! As Figure 2.3 illustrates, a cubic Bezier curve uses
four control points (two end points and two midpoints) to define the various
aspects of the curve.
As you can see, a cubic Bezier curve is not a typical curve−it can bend and
twist in a myriad of curved shapes. By manipulating the four control points you
can create some really useful paths to use in your projects. The way a cubic
Bezier curve works is fairly easy in theory, but a little difficult to
implement.
To understand the theory behind a cubic Bezier curve, take a look at Figure
2.4, which shows how the curve is drawn using the four control points.
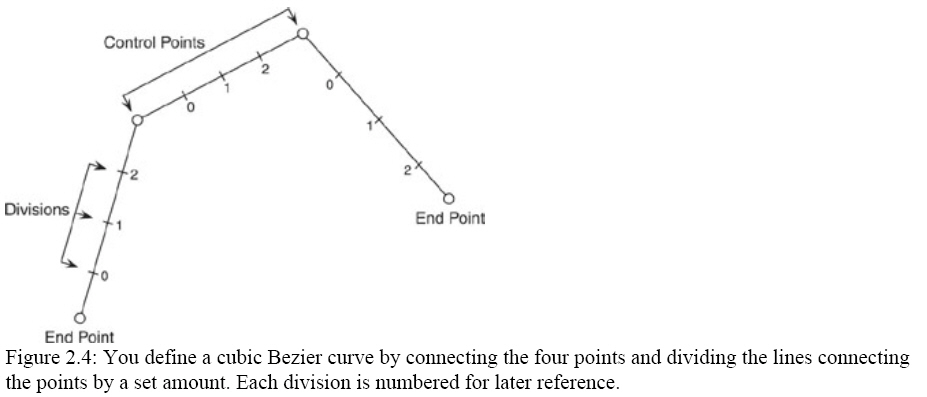
The purpose of dividing the lines that connect the curve's points is both for
visual aid and to serve as the curve's granularity (or smoothness). The more
additional divisions you add to each line, the smoother the resulting curve will
look. To actually see the curve that the points create, you need to connect the
divisions on either side of the line, as you can see in Figure 2.5
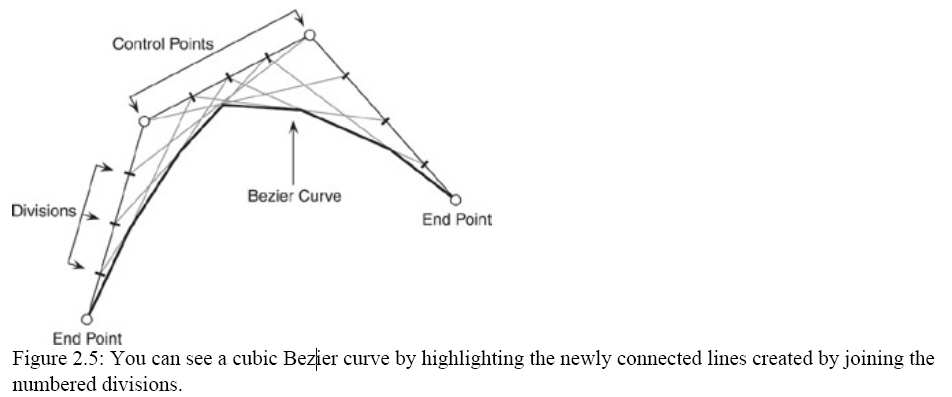
Although it's cool to draw the curve in the manner I just showed you, it
won't make much sense to your computer, nor will it help you figure out the
coordinates of a point in the curve. What you need to do is come up with a way
to calculate the exact coordinates of any point along the curve. That way, you
can do anything you want with the coordinates, from drawing curves to
calculating the coordinates where you want to position an object along the curve
path! The formula to calculate the coordinates along the curve is

In the formula, the control points are defined as P0, P1, P2, and P3, which
represent the starting point, first midpoint, second midpoint, and ending point,
respectively. The resulting coordinates along the curve are defined as C(s),
where s is a scalar value (or a time value) ranging from 0 to 1 that determines
the position along the curve for which the coordinates should be calculated.
A value of s=0 designates the starting point, whereas a value of s=1
designates the ending point. Any value of s from 0 to 1 designates a point
between the two end points. Therefore, to calculate the midpoint of the curve,
you would specify s=0.5. The one−quarter position of the curve would be s=0.25,
and so on.
To make things easy, you can create a function that takes the four control
points (as vector objects) and a scalar value as parameters. The function will
return another vector object that contains the coordinates of the point along
the curve as specified by the four points and the scalar value. Call the
function CubicBezierCurve, and use the following prototype to define it.
void CubicBezierCurve(D3DXVECTOR3 *vecPoint1, // Start
point
D3DXVECTOR3 *vecPoint2, // Midpoint 1
D3DXVECTOR3 *vecPoint3, // Midpoint 2
D3DXVECTOR3 *vecPoint4, // End point
float Scalar,
D3DXVECTOR3 *vecOut)
{
Now get ready for this−you're going to recreate the cubic Bezier curve
formula in program code by replacing
the appropriate variables with the control point vectors and the scalar value.
// C(s) =
*vecOut =
// P0 * (1 − s)3 +
(*vecPoint1)*(1.0f−Scalar)*(1.0f−Scalar)*(1.0f−Scalar) +
// P1 * 3 * s * (1 − s)2 +
(*vecPoint2)*3.0f*Scalar*(1.0f−Scalar)*(1.0f−Scalar) +
// P2 * 3 * s2 * (1 − s) +
(*vecPoint3)*3.0f*Scalar*Scalar*(1.0f−Scalar) +
// P3 * s3
(*vecPoint4)*Scalar*Scalar*Scalar;
}
That's it! Yep, from now on you can calculate the coordinates along a cubic
Bezier curve by passing the four control points' coordinates, a scalar, and a
returning vector object. For example, going back to the sample curve, you can
use the following function call to CubicBezierCurve to find the parametric
midpoint:
D3DXVECTOR3 vecPos;
CubicBezierCurve(&D3DXVECTOR3(−50.0f, 25.0f, 0.0f),
&D3DXVECTOR3(0.0f, 50.0f, 0.0f),
&D3DXVECTOR3(50.0f, 0.0f, 0.0f),
&D3DXVECTOR3(25.0f, −50.0f, 0.0f) ,
0.5f, &vecPos);
Getting back to the point, you can use the return coordinates from the
CubicBezierCurve function (contained in the vecPos vector object) as the
coordinates in which to place an object in the game. By slowly changing the
scalar value from 0 to 1 (over a specified amount of time), you move the object
from the start of the path to the end. For instance, to travel a curved path
over a period of 1,000 milliseconds, you can use the following code:
// vecPoints[4] = Starting, midpoint 1, midpoint 2, and
end points
// Every frame, use the following code to position an object along the curve
based on the current time.
D3DXVECTOR3 vecPos;
float Scalar = (float)(timeGetTime() % 1001) / 1000.0f;
CubicBezierCurve(&vecPoints[0], &vecPoints[1],
&vecPoints[2], &vecPoints[3], Scalar, &vecPos);
// Use vecPos.x, vecPos.y, and vecPos.z coordinates for
object
That's cool, but having to deal with a scalar value is a little unorthodox
when you need to work with actual 3D unit measurements. I mean, how are you
supposed to know which scalar value to use when you want to move an object 50
units along the curved path? Isn't there a way to calculate the length of the
curve and use that, much like you did with straight lines?
Strangely enough, no. There is no easy way to calculate the length of a
Bezier curve. However, you can approximate the length using a few simple
calculations. Assuming the four control points of the curve are denoted as p0,
p1, p2, and p3, you can add the lengths between the points p0 and p1, p1 and p2,
and p2 and p3, divide the result in half, and add the length between points p0
and p3 (also divided in half). In code, those calculations would look like this:
// p[4] = four control points' coordinate vectors
float Length01 = D3DXVec3Length(&(p[1]−p[0]));
float Length12 = D3DXVec3Length(&(p[2]−p[1]));
float Length23 = D3DXVec3Length(&(p[3]−p[2]));
float Length03 = D3DXVec3Length(&(p[3]−p[0]));
float CurveLength = (Length01+Length12+Length23) * 0.5f
+ Length03 * 0.5f;
The CurveLength variable will therefore contain the estimated length of the
curve. You'll use the CurveLength value much like you did in the straight−path
calculations to convert the unit length to a scalar value to calculate the exact
coordinates along the curve.
// Pos = position in curve (from 0−CurveLength)
float Scalar = Pos / CurveLength;
CubicBezierCurve(&vecPoints[0], &vecPoints[1], &vecPoints[2], &vecPoints[3],
Scalar, &vecPos);
As you can see, cubic Bezier curves aren't too difficult to use. The formulas
are pretty basic, and I'd rather leave it up to the math textbooks to go into
the details of the calculations (or a fine book like Kelly Dempski's Focus On
Curves and Surfaces). For now, I'm only interested in making it work for your
game project. Speaking of that, let's see what you can do with your newfound
knowledge of using straight and curved paths to create routes.
Main Routine:
#include <windows.h>
#include "d3d9.h"
#include "d3dx9.h"
#include "Direct3D.h"
struct sLine
{
D3DXVECTOR3 start;
D3DXVECTOR3 end;
};
struct sCurve
{
D3DXVECTOR3 start;
D3DXVECTOR3 end;
D3DXVECTOR3 control1;
D3DXVECTOR3 control2;
};
struct sBackdropVertex
{
float x, y, z, rhw;
float u, v;
};
#define BACKDROP_FVF (D3DFVF_XYZRHW | D3DFVF_TEX1)
////////////////////////////////////////////////////////////////////////////////////////////////
IDirect3D9* g_d3d;
IDirect3DDevice9* g_device;
D3DXMESHCONTAINER_EX* g_robot_mesh_container;
D3DXMESHCONTAINER_EX* g_ground_mesh_container;
D3DXVECTOR3 g_robot_pos[4];
D3DXVECTOR3 g_robot_last_pos[4];
IDirect3DVertexBuffer9* g_backdrop_vb;
IDirect3DTexture9* g_backdrop_texture;
sLine g_lines[2];
sCurve g_curves[2];
const char g_class_name[] = "TimeMovementClass";
const char g_caption[] = "Timed Movement Demo";
////////////////////////////////////////////////////////////////////////////////////////////////
LRESULT FAR PASCAL window_proc(HWND hwnd, UINT msg, WPARAM wParam, LPARAM lParam);
bool do_init(HWND hwnd);
void do_shutdown();
void do_frame();
void cal_pos_in_line(const sLine* line, float scalar, D3DXVECTOR3* pos);
void cubic_bezier_curve(const sCurve* curve, float scalar, D3DXVECTOR3* pos);
//////////////////////////////////////////////////////////////////////////////////////////////
int PASCAL WinMain(HINSTANCE inst, HINSTANCE, LPSTR, int cmd_show)
{
CoInitialize(NULL); // Initialize the COM system
// Create the window class here and register it
WNDCLASSEX win_class;
win_class.cbSize = sizeof(win_class);
win_class.style = CS_CLASSDC;
win_class.lpfnWndProc = window_proc;
win_class.cbClsExtra = 0;
win_class.cbWndExtra = 0;
win_class.hInstance = inst;
win_class.hIcon = LoadIcon(NULL, IDI_APPLICATION);
win_class.hCursor = LoadCursor(NULL, IDC_ARROW);
win_class.hbrBackground = NULL;
win_class.lpszMenuName = NULL;
win_class.lpszClassName = g_class_name;
win_class.hIconSm = LoadIcon(NULL, IDI_APPLICATION);
if(!RegisterClassEx(&win_class))
return FALSE;
// Create the main window
HWND hwnd = CreateWindow(g_class_name, g_caption, WS_CAPTION | WS_SYSMENU | WS_MINIMIZEBOX,
0, 0, 640, 480, NULL, NULL, inst, NULL);
if(hwnd == NULL)
return FALSE;
ShowWindow(hwnd, cmd_show);
UpdateWindow(hwnd);
// Call init function and enter message pump
if(do_init(hwnd))
{
MSG msg;
ZeroMemory(&msg, sizeof(MSG));
// Start message pump, waiting for user to exit
while(msg.message != WM_QUIT)
{
if(PeekMessage(&msg, NULL, 0, 0, PM_REMOVE))
{
TranslateMessage(&msg);
DispatchMessage(&msg);
}
do_frame(); // Render a single frame
}
}
do_shutdown();
UnregisterClass(g_class_name, inst);
CoUninitialize();
return 0;
}
LRESULT FAR PASCAL window_proc(HWND hwnd, UINT msg, WPARAM wParam, LPARAM lParam)
{
// Only handle window destruction messages
switch(msg)
{
case WM_DESTROY:
PostQuitMessage(0);
break;
case WM_KEYDOWN:
if(wParam == VK_ESCAPE)
DestroyWindow(hwnd);
break;
}
return DefWindowProc(hwnd, msg, wParam, lParam);
}
bool do_init(HWND hwnd)
{
init_d3d(&g_d3d, &g_device, hwnd, false, false);
if(FAILED(load_mesh(&g_robot_mesh_container, g_device, "..\\Data\\robot.x", "..\\Data\\", 0, 0)))
return FALSE;
if(FAILED(load_mesh(&g_ground_mesh_container, g_device, "..\\Data\\ground.x", "..\\Data\\", 0, 0)))
return FALSE;
// create the backdrop
sBackdropVertex backdrop_verts[4] =
{
{ 0.0f, 0.0, 1.0, 1.0f, 0.0f, 0.0f },
{ 640.0f, 0.0, 1.0, 1.0f, 1.0f, 0.0f },
{ 0.0f, 480.0, 1.0, 1.0f, 0.0f, 1.0f },
{ 640.0f, 480.0, 1.0, 1.0f, 1.0f, 1.0f }
};
g_device->CreateVertexBuffer(sizeof(backdrop_verts), D3DUSAGE_WRITEONLY, BACKDROP_FVF, D3DPOOL_DEFAULT,
&g_backdrop_vb, NULL);
char* ptr;
g_backdrop_vb->Lock(0, 0, (void**)&ptr, 0);
memcpy(ptr, backdrop_verts, sizeof(backdrop_verts));
g_backdrop_vb->Unlock();
D3DXCreateTextureFromFile(g_device, "..\\Data\\Backdrop.bmp", &g_backdrop_texture);
// setup a directional light
D3DLIGHT9 light;
ZeroMemory(&light, sizeof(D3DLIGHT9));
light.Type = D3DLIGHT_DIRECTIONAL;
light.Diffuse.r = light.Diffuse.g = light.Diffuse.b = light.Diffuse.a = 1.0f;
light.Direction = D3DXVECTOR3(0.0f, -0.5f, 0.5f);
g_device->SetLight(0, &light);
g_device->LightEnable(0, TRUE);
// define two lines
g_lines[0].start = D3DXVECTOR3(-150.0f, 10.0f, 0.0f);
g_lines[0].end = D3DXVECTOR3( 0.0f, 10.0f, 150.0f);
g_lines[1].start = D3DXVECTOR3(0.0f, 10.0f, 0.0f);
g_lines[1].end = D3DXVECTOR3(0.0f, 150.0f, 0.0f);
// define two curves
g_curves[0].start = D3DXVECTOR3( 0.0f, 10.0f, 150.0f);
g_curves[0].control1 = D3DXVECTOR3(150.0f, 10.0f, 100.0f);
g_curves[0].control2 = D3DXVECTOR3(200.0f, 10.0f, 50.0f);
g_curves[0].end = D3DXVECTOR3(150.0f, 10.0f, 0.0f);
g_curves[1].start = D3DXVECTOR3(-150.0f, 50.0f, -100.0f);
g_curves[1].control1 = D3DXVECTOR3( -20.0f, 0.0f, -100.0f);
g_curves[1].control2 = D3DXVECTOR3( 20.0f, 0.0f, -100.0f);
g_curves[1].end = D3DXVECTOR3( 150.0f, 50.0f, -100.0f);
return true;
}
void do_shutdown()
{
// free mesh data
delete g_robot_mesh_container; g_robot_mesh_container = NULL;
delete g_ground_mesh_container; g_ground_mesh_container = NULL;
release_com(g_backdrop_vb);
release_com(g_backdrop_texture);
// release D3D objects
release_com(g_device);
release_com(g_d3d);
}
void do_frame()
{
// compute a time scalar based on a sine wave
float time = timeGetTime() * 0.001f;
float scalar = (sin(time) + 1.0f) * 0.5f;
// update the position of the robots
cal_pos_in_line(&g_lines[0], scalar, &g_robot_pos[0]);
cal_pos_in_line(&g_lines[1], scalar, &g_robot_pos[1]);
cubic_bezier_curve(&g_curves[0], scalar, &g_robot_pos[2]);
cubic_bezier_curve(&g_curves[1], scalar, &g_robot_pos[3]);
// set a view transformation matrix
D3DXMATRIX mat_view;
D3DXVECTOR3 eye(0.0f, 240.0f, -350.0f);
D3DXVECTOR3 at(0.0f, 0.0f, 0.0f);
D3DXVECTOR3 up(0.0f, 1.0f, 0.0f);
D3DXMatrixLookAtLH(&mat_view, &eye, &at, &up);
g_device->SetTransform(D3DTS_VIEW, &mat_view);
// clear the device and start drawing the scene
g_device->Clear(0, NULL, D3DCLEAR_TARGET | D3DCLEAR_ZBUFFER, D3DCOLOR_RGBA(0, 0, 0, 255), 1.0f, 0);
g_device->BeginScene();
// draw the backdrop
g_device->SetFVF(BACKDROP_FVF);
g_device->SetStreamSource(0, g_backdrop_vb, 0, sizeof(sBackdropVertex));
g_device->SetTexture(0, g_backdrop_texture);
g_device->DrawPrimitive(D3DPT_TRIANGLESTRIP, 0, 2);
g_device->SetRenderState(D3DRS_LIGHTING, TRUE);
// draw the ground mesh
D3DXMATRIX mat_world;
D3DXMatrixIdentity(&mat_world);
g_device->SetTransform(D3DTS_WORLD, &mat_world);
draw_mesh(g_ground_mesh_container);
// draw each of the four robots at theire respective locations
for(DWORD i = 0; i < 4; i++)
{
// calculate the rotation of the robots based on last known position, and update last position once done.
D3DXVECTOR3 diff = g_robot_pos[i] - g_robot_last_pos[i];
float rot_x = atan2(diff.y, diff.z);
float rot_y = -atan2(diff.z, diff.x);
g_robot_last_pos[i] = g_robot_pos[i];
// rotate the robot to point in direction of movement
D3DXMatrixRotationYawPitchRoll(&mat_world, rot_y, rot_x, 0.0f);
// position the robot by setting the coordinates directly in the world transformation matrix
mat_world._41 = g_robot_pos[i].x;
mat_world._42 = g_robot_pos[i].y;
mat_world._43 = g_robot_pos[i].z;
g_device->SetTransform(D3DTS_WORLD, &mat_world);
draw_mesh(g_robot_mesh_container);
}
g_device->SetRenderState(D3DRS_LIGHTING, FALSE);
g_device->EndScene();
g_device->Present(NULL, NULL, NULL, NULL);
}
void cal_pos_in_line(const sLine* line, float scalar, D3DXVECTOR3* pos)
{
*pos = (line->end - line->start) * scalar + line->start;
}
void cubic_bezier_curve(const sCurve* curve, float scalar, D3DXVECTOR3* pos)
{
*pos = (curve->start) * (1.0f - scalar) * (1.0f - scalar) * (1.0f - scalar) +
(curve->control1) * 3.0f * scalar * (1.0f - scalar) * (1.0f - scalar) +
(curve->control2) * 3.0f * scalar * scalar * (1.0f - scalar) +
(curve->end) * scalar * scalar * scalar;
}
Runtime Snap:

download source file