我们介绍一种叫做混合(blending)的技术,它允许我们混合像素,我们通常用已经光栅化的像素光栅化同一位置的像素。换句话说就是我们在图元上混合图元,这种技术允许我们完成多种特效。
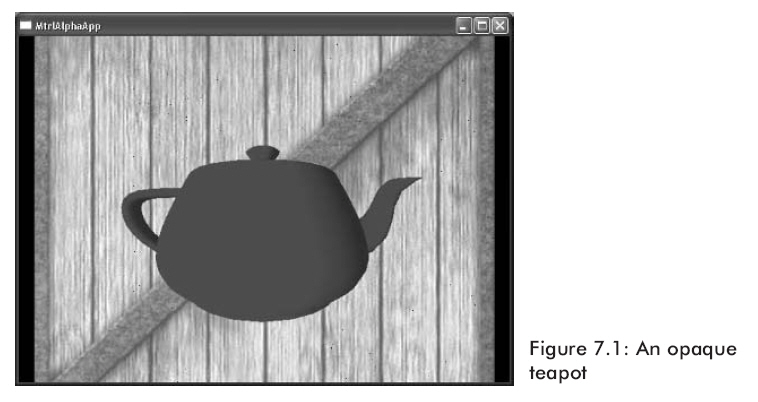
观察图7.1,我们将一个红色的茶壶绘制在一个木质背景上。
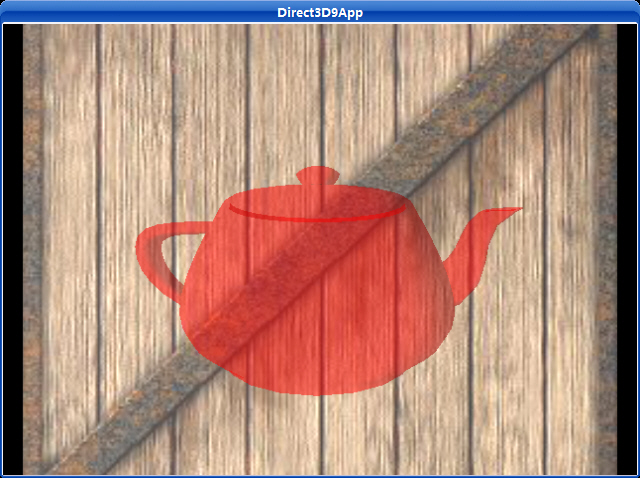
假设想让茶壶有一个透明度,以便我们能够透过茶壶看见背景(如图7.2)。
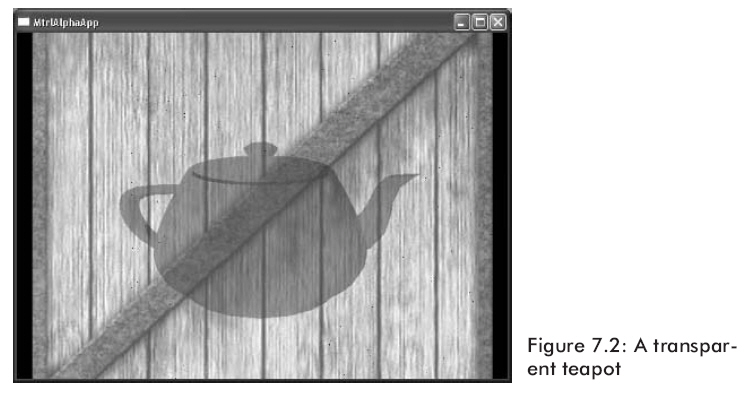
我们怎样才能实现这个效果呢?我们只需要在木箱子上光栅化茶壶三角形,我们需要结合像素颜色,就象通过茶壶显示木箱那样来计算茶壶的像素颜色。结合像素值的意思就是用以前写过的目标像素值去估算源像素值这被叫做混合。注意混合的效果不仅仅象是玻璃透明一样。我们有很多选项来指定颜色是怎样被混合的,就象7.2部分中看到的一样。
这是很重要的,认识三角形普遍利用以前写入后缓存中的像素来与之混合来光栅化。在示例图片中,木箱图片首先被画出来且它的像素在后缓存中。我们然后绘制茶壶,以便用木箱的像素来混合茶壶的像素。因此,当使用混合时,下面的规则将被遵循:
规则:首先不使用混合绘制物体。然后根据物体离摄象机的距离使用混合对物体拣选;这是非常有效的处理,假如物体是在视图坐标中,那么你能够利用z分量简单地拣选。最后使用从后到前的顺序混合绘制物体。
下面的公式是用来混合两个像素值的:

上面的所有变量都是一个4D颜色向量(r,g,b,a),并且叉号表示分量相乘。
OutputPixel——混合后的像素结果。
SourcePixel——通常被计算的像素,它是利用在后缓存中的像素来被混合的。
SourceBlendFactor——在[0,1]范围内的一个值。它指定源像素在混合中的百分比。
DestPixel——在后缓存中的像素。
DestBlendFactor——在[0,1]范围内的一个值。它指定目的像素在混合中的百分比。
源和目的混合要素使我们能够按照多种途径改变原始源和目的像素,允许实现不同的效果。7.2节列举了能够被使用的预先确定的值。
混合默认是被关闭的;你能够通过设置D3DRS_ALPHABLENDENABLE渲染状态为true来开启它:
|
Device->SetRenderState(D3DRS_ALPHABLENDENABLE,
true);
|
通过设置不同的源和目的要素,我们能够创造很多不同的混合效果。通过实验,使用不同的组合看看它们到底能实现什么效果。你能够通过设置D3DRS_SRCBLEND和D3DRS_DESTBLEND渲染状态来分别设置源混合要素和目的混合要素。
Sets a single device render-state parameter.
HRESULT SetRenderState(
  D3DRENDERSTATETYPE State,
  DWORD Value
);
Parameters
- State
- [in] Device state variable that is being modified.
This parameter can be any member of the D3DRENDERSTATETYPE enumerated type.
- Value
- [in] New value for the device render state to be
set. The meaning of this parameter is dependent on the value specified for
State. For example, if State were D3DRS_SHADEMODE, the second
parameter would be one member of the D3DSHADEMODE enumerated type.
Return Values
If the method succeeds, the return value is D3D_OK.
D3DERR_INVALIDCALL is returned if one of the arguments is invalid.
例如我们可以这样写:
|
Device->SetRenderState(D3DRS_SRCBLEND, Source);
Device->SetRenderState(D3DRS_DESTBLEND, Destination);
|
这里Source和Destination能够使用下面混合要素中的一个:
-
D3DBLEND_ZERO—blendFactor=(0,
0, 0, 0)
-
D3DBLEND_ONE—blendFactor=(1,
1, 1, 1)
-
D3DBLEND_SRCCOLOR—blendFactor=(rs,
gs, bs, as)
-
D3DBLEND_INVSRCCOLOR—blendFactor=(1
-rs, 1 -gs,
1 - bs, 1-as)
-
D3DBLEND_SRCALPHA—blendFactor=(as,
as, as, as)
-
D3DBLEND_INVSRCALPHA—blendFactor=(1
- as, 1 - as,
1 - as, 1 - as)
-
D3DBLEND_DESTALPHA—blendFactor=(ad,
ad, ad, ad)
-
D3DBLEND_INVDESTALPHA—blendFactor=(1
- ad, 1 - ad,
1 - ad, 1 - ad)
-
D3DBLEND_DESTCOLOR—blendFactor=(rd,
gd, bd, ad)
-
D3DBLEND_INVDESTCOLOR—blendFactor=(1
-rd, 1 -gd,
1 -bd, 1-ad)
-
D3DBLEND_SRCALPHASAT—blendFactor=(f,
f, f, 1), where f=min(as,
1 -ad)
-
D3DBLEND_BOTHINVSRCALPHA—This
blend mode sets the source blend factor to (1 - as, 1 -
as, 1 - as,
1- as) and the destination blend
factor to (as, as, as,
as). This blend mode is only valid for
D3DRS_SRCBLEND.
源和目的混合要素的默认值分别是D3DBLEND_SRCALPHA和D3DBLEND_INVSRCALPHA。
在以前的章节中我们忽略了颜色顶点和材质中的alpha部分,那是因为当时它并不是必须的,现在它首先被用在混合中。
Alpha部分主要是用来指定像素的透明等级。我们为每个像素的alpha部分保留8位,alpha的有效值在[0,255]范围内,[0,255]代表不透明度[0%,100%]。因此,像素的alpha为0时,表示完全透明,像素的alpha为128时,表示50%透明,像素的alpha为255时,表示完全不透明。
为了让alpha部分描述像素的透明等级,我们必须设置源混合要素为D3DBLEND_SRCALPHA以及目的混合要素为D3DBLEND_INVSRCALPHA。这些值碰巧也是被默认设置的。
7.3.1Alpha通道
代替使用Alpha部分来计算遮影,我们能够从纹理的alpha通道中得到alpha信息。Alpha通道是额外的设置位,用它来保存每一个点的alpha值。当一个纹理被映射到一个图元上时,在alpha通道中的alpha信息也被映射,并且它们利用alpha信息为每个像素赋予纹理。图7.3显示了一个带8位alpha通道的图片。
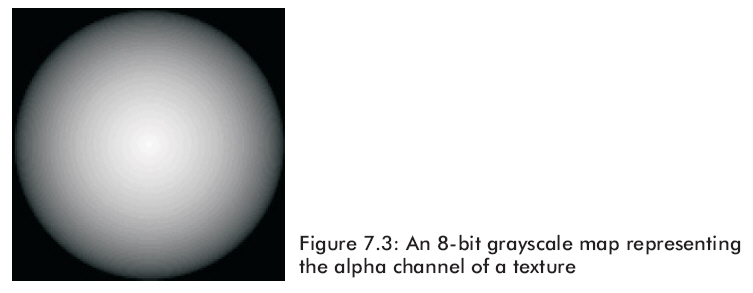
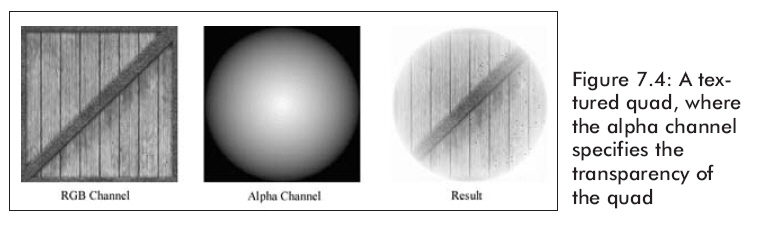
图7.4显示的是一个利用alpha通道指定透明度来渲染的一个纹理方块。
7.3.2指定Alpha资源
默认情况下,设置一个有alpha通道的纹理,alpha值从在alpha通道中获得。假如没有alpha通道,那么alpha值是通过顶点颜色获得。
Sets the state value for the currently assigned
texture.
HRESULT SetTextureStageState(
  DWORD Stage,
  D3DTEXTURESTAGESTATETYPE Type,
  DWORD Value
);
Parameters
- Stage
- [in] Stage identifier of the texture for which the
state value is set. Stage identifiers are zero-based. Devices can have up to
eight set textures, so the maximum value allowed for Stage is 7.
- Type
- [in] Texture state to set. This parameter can be
any member of the D3DTEXTURESTAGESTATETYPE enumerated type.
- Value
- [in] State value to set. The meaning of this value
is determined by the Type parameter.
Return Values
If the method succeeds, the return value is D3D_OK. If
the method fails, the return value can be D3DERR_INVALIDCALL.
然而,你能够通过下面的渲染状态来指定使用哪一个资源:
|
// compute
alpha from diffuse colors during shading
Device->SetTextureStageState(0, D3DTSS_ALPHAARG1, D3DTA_DIFFUSE);
Device->SetTextureStageState(0, D3DTSS_ALPHAOP, D3DTOP_SELECTARG1);
// take alpha
from alpha channel
Device->SetTextureStageState(0, D3DTSS_ALPHAARG1, D3DTA_TEXTURE);
Device->SetTextureStageState(0, D3DTSS_ALPHAOP, D3DTOP_SELECTARG1);
|
7.5实例程序:透明度
这个实例程序是在一个木箱背景上绘制一个透明的茶壶,就象图7.2所显示的一样。在这个例子中alpha值是从材质中得到。应用程序允许我们通过按A或S键来增加/减少alpha的值。
使用混合的必要步骤是:
1. 设置混合要素D3DRS_SRCBLEND
和
D3DRS_DESTBLEND。
2. 假如你使用alpha部分,指定资源(材质或alpha通道)。
3. 允许alpha混合渲染状态。
/**************************************************************************************
Renders a semi transparent teapot using alpha blending.
In this sample, the alpha is taken from the material's diffuse alpha value.
You can increase the opaqueness with the 'A' key and can descrease it with the 'S' key.
**************************************************************************************/
#include "d3dUtility.h"
#pragma warning(disable : 4100)
class cTextureVertex
{
public:
float m_x, m_y, m_z;
float m_nx, m_ny, m_nz;
float m_u, m_v; // texture coordinates
cTextureVertex() { }
cTextureVertex(float x, float y, float z,
float nx, float ny, float nz,
float u, float v)
{
m_x = x; m_y = y; m_z = z;
m_nx = nx; m_ny = ny; m_nz = nz;
m_u = u; m_v = v;
}
};
const DWORD TEXTURE_VERTEX_FVF = D3DFVF_XYZ | D3DFVF_NORMAL | D3DFVF_TEX1;
const int WIDTH = 640;
const int HEIGHT = 480;
IDirect3DDevice9* g_d3d_device;
ID3DXMesh* g_teapot_mesh;
D3DMATERIAL9 g_teapot_material;
IDirect3DVertexBuffer9* g_back_vb;
IDirect3DTexture9* g_back_texture;
D3DMATERIAL9 g_back_material;
////////////////////////////////////////////////////////////////////////////////////////////////////
bool setup()
{
// init materials
g_teapot_material = RED_MATERIAL;
g_teapot_material.Diffuse.a = 0.5f; // set alpha to 50% opacity
g_back_material = WHITE_MATERIAL;
D3DXCreateTeapot(g_d3d_device, &g_teapot_mesh, NULL);
// create the background quad
g_d3d_device->CreateVertexBuffer(6 * sizeof(cTextureVertex), D3DUSAGE_WRITEONLY, TEXTURE_VERTEX_FVF,
D3DPOOL_MANAGED, &g_back_vb, NULL);
cTextureVertex* vertices;
g_back_vb->Lock(0, 0, (void**)&vertices, 0);
// quad built from two triangles, note texture coordinate.
vertices[0] = cTextureVertex(-10.0f, -10.0f, 5.0f, 0.0f, 0.0f, -1.0f, 0.0f, 1.0f);
vertices[1] = cTextureVertex(-10.0f, 10.0f, 5.0f, 0.0f, 0.0f, -1.0f, 0.0f, 0.0f);
vertices[2] = cTextureVertex( 10.0f, 10.0f, 5.0f, 0.0f, 0.0f, -1.0f, 1.0f, 0.0f);
vertices[3] = cTextureVertex(-10.0f, -10.0f, 5.0f, 0.0f, 0.0f, -1.0f, 0.0f, 1.0f);
vertices[4] = cTextureVertex( 10.0f, 10.0f, 5.0f, 0.0f, 0.0f, -1.0f, 1.0f, 0.0f);
vertices[5] = cTextureVertex( 10.0f, -10.0f, 5.0f, 0.0f, 0.0f, -1.0f, 1.0f, 1.0f);
g_back_vb->Unlock();
// setup a directional light
D3DLIGHT9 light;
ZeroMemory(&light, sizeof(light));
light.Type = D3DLIGHT_DIRECTIONAL;
light.Diffuse = WHITE;
light.Specular = WHITE * 0.2f;
light.Ambient = WHITE * 0.6f;
light.Direction = D3DXVECTOR3(0.707f, 0.0f, 0.707f);
g_d3d_device->SetLight(0, &light);
g_d3d_device->LightEnable(0, TRUE);
g_d3d_device->SetRenderState(D3DRS_NORMALIZENORMALS, TRUE);
g_d3d_device->SetRenderState(D3DRS_SPECULARENABLE, TRUE);
// create the texture and set filters
D3DXCreateTextureFromFile(g_d3d_device, "crate.jpg", &g_back_texture);
g_d3d_device->SetSamplerState(0, D3DSAMP_MAGFILTER, D3DTEXF_LINEAR);
g_d3d_device->SetSamplerState(0, D3DSAMP_MINFILTER, D3DTEXF_LINEAR);
g_d3d_device->SetSamplerState(0, D3DSAMP_MIPFILTER, D3DTEXF_POINT);
// set alpha blending states
// use alhpa in material's diffuse component for alpha
g_d3d_device->SetTextureStageState(0, D3DTSS_ALPHAARG1, D3DTA_DIFFUSE);
g_d3d_device->SetTextureStageState(0, D3DTSS_ALPHAOP, D3DTOP_SELECTARG1);
// set blending factors so that alpha component determines transparency
g_d3d_device->SetRenderState(D3DRS_SRCBLEND, D3DBLEND_SRCALPHA);
g_d3d_device->SetRenderState(D3DRS_DESTBLEND, D3DBLEND_INVSRCALPHA);
// set camera
D3DXVECTOR3 pos(0.0f, 0.0f, -3.0f);
D3DXVECTOR3 target(0.0f, 0.0f, 0.0f);
D3DXVECTOR3 up(0.0f, 1.0f, 0.0f);
D3DXMATRIX view_matrix;
D3DXMatrixLookAtLH(&view_matrix, &pos, &target, &up);
g_d3d_device->SetTransform(D3DTS_VIEW, &view_matrix);
// set the projection matrix
D3DXMATRIX proj;
D3DXMatrixPerspectiveFovLH(&proj, D3DX_PI * 0.5f, (float)WIDTH/HEIGHT, 1.0f, 1000.0f);
g_d3d_device->SetTransform(D3DTS_PROJECTION, &proj);
return true;
}
void cleanup()
{
safe_release<IDirect3DVertexBuffer9*>(g_back_vb);
safe_release<IDirect3DTexture9*>(g_back_texture);
safe_release<ID3DXMesh*>(g_teapot_mesh);
}
bool display(float time_delta)
{
// increase/decrease alpha via keyboard input
if(GetAsyncKeyState('A') & 0x8000f)
g_teapot_material.Diffuse.a += 0.01f;
if(GetAsyncKeyState('S') & 0x8000f)
g_teapot_material.Diffuse.a -= 0.01f;
// force alpha to [0, 1] interval
if(g_teapot_material.Diffuse.a > 1.0f)
g_teapot_material.Diffuse.a = 1.0f;
if(g_teapot_material.Diffuse.a < 0.0f)
g_teapot_material.Diffuse.a = 0.0f;
// render now
g_d3d_device->Clear(0, NULL, D3DCLEAR_TARGET | D3DCLEAR_ZBUFFER, 0x00000000, 1.0f, 0);
g_d3d_device->BeginScene();
// draw the background
D3DXMATRIX world_matrix;
D3DXMatrixIdentity(&world_matrix);
g_d3d_device->SetTransform(D3DTS_WORLD, &world_matrix);
g_d3d_device->SetFVF(TEXTURE_VERTEX_FVF);
g_d3d_device->SetStreamSource(0, g_back_vb, 0, sizeof(cTextureVertex));
g_d3d_device->SetMaterial(&g_back_material);
g_d3d_device->SetTexture(0, g_back_texture);
g_d3d_device->DrawPrimitive(D3DPT_TRIANGLELIST, 0, 2);
// draw the teapot
g_d3d_device->SetRenderState(D3DRS_ALPHABLENDENABLE, TRUE);
D3DXMatrixScaling(&world_matrix, 1.5f, 1.5f, 1.5f);
g_d3d_device->SetTransform(D3DTS_WORLD, &world_matrix);
g_d3d_device->SetMaterial(&g_teapot_material);
g_d3d_device->SetTexture(0, NULL);
g_teapot_mesh->DrawSubset(0);
g_d3d_device->SetRenderState(D3DRS_ALPHABLENDENABLE, FALSE);
g_d3d_device->EndScene();
g_d3d_device->Present(NULL, NULL, NULL, NULL);
return true;
}
LRESULT CALLBACK wnd_proc(HWND hwnd, UINT msg, WPARAM word_param, LPARAM long_param)
{
switch(msg)
{
case WM_DESTROY:
PostQuitMessage(0);
break;
case WM_KEYDOWN:
if(word_param == VK_ESCAPE)
DestroyWindow(hwnd);
break;
}
return DefWindowProc(hwnd, msg, word_param, long_param);
}
int WINAPI WinMain(HINSTANCE inst, HINSTANCE, PSTR cmd_line, int cmd_show)
{
if(! init_d3d(inst, WIDTH, HEIGHT, true, D3DDEVTYPE_HAL, &g_d3d_device))
{
MessageBox(NULL, "init_d3d() - failed.", 0, MB_OK);
return 0;
}
if(! setup())
{
MessageBox(NULL, "Steup() - failed.", 0, MB_OK);
return 0;
}
enter_msg_loop(display);
cleanup();
g_d3d_device->Release();
return 0;
}
setup方法指定alpha值的获取资源。在这个例子中,我们通过材质指定alpha值。注意我们设置茶壶的材质alpha部分为0.5,也就是说茶壶将按照50%的透明度被渲染。我们在这里也要设置混合要素。要注意的是在这个方法中我们不能将alpha混合设置为启用。理由是alpha混合要进行额外的处理并且应该仅在需要用时才被使用。举例,在这个例子中只有茶壶需要用允许alpha混合来被渲染——而方块不需要。因此,我们在display函数中启用alpha混合。
在Display函数中,我们检测假如A或S键被按下那么就通过增加或减少材质的alpha值来反馈。注意这个方法要保证alpha值不会超出[0,1]的范围。我们然后渲染背景。最后,我们启用alpha混合,利用alpha混合来渲染茶壶,关闭alpha混合。
截图:
下载源程序