Direct3D支持三种类型的光源。
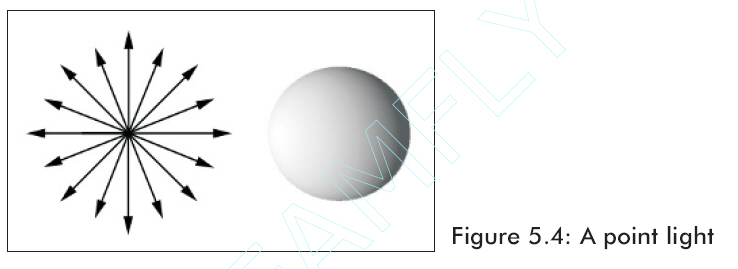
点光源——这种光源在世界坐标中有一个位置且向所有方向上都照射光线。
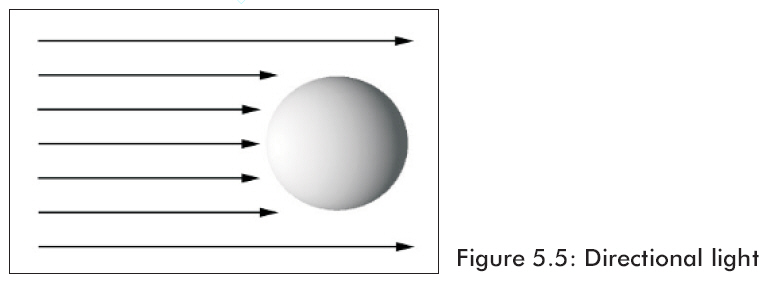
方向光源——这种光源没有位置但是向指定方向发出平行光线。
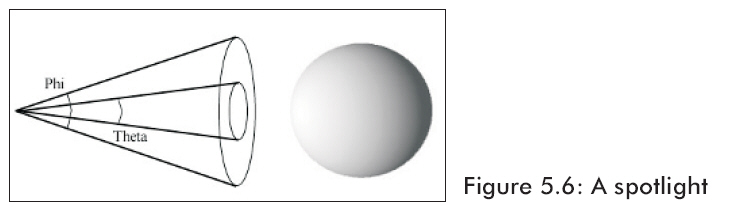
聚光灯——这种类型的光源和手电筒的光类似;它有位置并且发出的光在指定方向上按照圆锥形照射。这个圆锥形有两个角度,θ和φ。角度θ描述内圆锥,φ描述外圆锥。
在代码中一个灯光资源是通过D3DLIGHT9结构来表现的。
typedef struct _D3DLIGHT9 {
D3DLIGHTTYPE Type;
D3DCOLORVALUE Diffuse;
D3DCOLORVALUE Specular;
D3DCOLORVALUE Ambient;
D3DVECTOR Position;
D3DVECTOR Direction;
float Range;
float Falloff;
float Attenuation0;
float Attenuation1;
float Attenuation2;
float Theta;
float Phi;
} D3DLIGHT9;
Type——定义灯光类型,我们能够使用下面三种类型之一:D3DLIGHT_POINT,
D3DLIGHT_SPOT, D3DLIGHT_DIRECTIONAL
Diffuse——此光源发出的漫射光颜色。
Specular——此光源发出的镜面光颜色。
Ambient——此光源发出的环境光颜色。
Position——用一个向量来描述的光源世界坐标位置。这个值对于灯光的方向是无意义的。
Direction——用一个向量来描述的光源世界坐标照射方向。这个值不能用在点光源上。
Range——灯光能够传播的最大范围。这个值不能比 大。且不能用于方向光源。
Attenuation0, Attenuation1, Attenuation2——这些衰减变量被用来定义灯光强度的传播距离衰减。它们只被用于点光源和聚光灯上。Attenuation0定义恒定衰减,Attenuation1定义线性衰减,Attenuation2定义二次衰减。适当的使用这个公式,D是代表到光源的距离,A0,A1,A2与Attenuation0,1,2相匹配。
attenuation = 1/(A0 + A1D + A2D2)
Theta——只用于聚光灯;指定内圆锥的角度,单位是弧度。
Phi——只用于聚光灯;指定外圆锥的角度,单位是弧度。
现在只是演示怎样使用InitDirectionalLight。其他的也很类似:
创建一个方向光源,它沿着x轴正方向照射白色灯光。我们按照下面的方法来做:
|
D3DXVECTOR3 dir(1.0f, 0.0f,
0.0f);
D3DXCOLOR c = d3d::WHITE;
D3DLIGHT9 dirLight =
d3d::InitDirectionalLight(&dir, &c);
|
在把D3DLIGHT9初始化好以后,我们需要用Direct3D内在支持的灯光来注册。就象这样做:
|
Device->SetLight(
0,
// element in the light list to set, range is
0-maxlights
&light);//
address of the D3DLIGHT9 structure to set
|
一旦灯光注册了,我们就能使用下面的列举的例子来开或关灯光了:
|
Device->LightEnable(
0,
// the element in the light list to
enable/disable
true); // true
= enable, false = disable
|
5.5实例程序:灯光
这一章的例子是创建如图5.7所显示的场景。它示范了怎样指定顶点法线,怎样创建材质,以及怎样创建和使用一个方向灯光。注意在这个示例程序中我们不会使用在文件d3dUtility.h/cpp中的材质和灯光函数。因为我们想展示怎样手动来做这些设置。

图5.7
给场景增加灯光的步骤是:
1、
允许使用灯光。
2、
为每个物体创建材质并且在渲染相应物体前应将材质附予物体。
3、
创建一个或多个光源,设置它们,把它们设为可用。
4、
将其他附加光源设为可用,比如镜面高光。
/**************************************************************************************
Renders a light pyramid. Demonstrates how to specify the vertex normals, how to create
and set a material, and how to create and set a directional light.
**************************************************************************************/
#include "d3dUtility.h"
#pragma warning(disable : 4100)
class cLightVertex
{
public:
float m_x, m_y, m_z;
float m_nx, m_ny, m_nz;
cLightVertex() {}
cLightVertex(float x, float y, float z, float nx, float ny, float nz)
{
m_x = x; m_y = y; m_z = z;
m_nx = nx; m_ny = ny; m_nz = nz;
}
};
const DWORD LIGHT_VERTEX_FVF = D3DFVF_XYZ | D3DFVF_NORMAL;
////////////////////////////////////////////////////////////////////////////////////////////////////
const int WIDTH = 640;
const int HEIGHT = 480;
IDirect3DDevice9* g_d3d_device = NULL;
IDirect3DVertexBuffer9* g_pyramid_vb = NULL;
////////////////////////////////////////////////////////////////////////////////////////////////////
bool setup()
{
// turn on lighting
g_d3d_device->SetRenderState(D3DRS_LIGHTING, TRUE);
g_d3d_device->CreateVertexBuffer(12 * sizeof(cLightVertex), D3DUSAGE_WRITEONLY, LIGHT_VERTEX_FVF,
D3DPOOL_MANAGED, &g_pyramid_vb, NULL);
// fill the buffers with the triangle data
cLightVertex* vertices;
g_pyramid_vb->Lock(0, 0, (void**)&vertices, 0);
// front face
vertices[0] = cLightVertex(-1.0f, 0.0f, -1.0f, 0.0f, 0.707f, -0.707f);
vertices[1] = cLightVertex( 0.0f, 1.0f, 0.0f, 0.0f, 0.707f, -0.707f);
vertices[2] = cLightVertex( 1.0f, 0.0f, -1.0f, 0.0f, 0.707f, -0.707f);
// left face
vertices[3] = cLightVertex(-1.0f, 0.0f, 1.0f, -0.707f, 0.707f, 0.0f);
vertices[4] = cLightVertex( 0.0f, 1.0f, 0.0f, -0.707f, 0.707f, 0.0f);
vertices[5] = cLightVertex(-1.0f, 0.0f, -1.0f, -0.707f, 0.707f, 0.0f);
// right face
vertices[6] = cLightVertex( 1.0f, 0.0f, -1.0f, 0.707f, 0.707f, 0.0f);
vertices[7] = cLightVertex( 0.0f, 1.0f, 0.0f, 0.707f, 0.707f, 0.0f);
vertices[8] = cLightVertex( 1.0f, 0.0f, 1.0f, 0.707f, 0.707f, 0.0f);
// back face
vertices[9] = cLightVertex( 1.0f, 0.0f, 1.0f, 0.0f, 0.707f, 0.707f);
vertices[10] = cLightVertex( 0.0f, 1.0f, 0.0f, 0.0f, 0.707f, 0.707f);
vertices[11] = cLightVertex(-1.0f, 0.0f, 1.0f, 0.0f, 0.707f, 0.707f);
g_pyramid_vb->Unlock();
// create and set the material
D3DMATERIAL9 material;
material.Ambient = WHITE;
material.Diffuse = WHITE;
material.Specular = WHITE;
material.Emissive = BLACK;
material.Power = 5.0f;
g_d3d_device->SetMaterial(&material);
// setup a directional light
D3DLIGHT9 dir_light;
ZeroMemory(&dir_light, sizeof(dir_light));
dir_light.Type = D3DLIGHT_DIRECTIONAL;
dir_light.Diffuse = WHITE;
dir_light.Specular = WHITE * 0.3f;
dir_light.Ambient = WHITE * 0.3f;
dir_light.Direction = D3DXVECTOR3(1.0f, 0.0f, 0.0f);
// set and enable the light
g_d3d_device->SetLight(0, &dir_light);
g_d3d_device->LightEnable(0, TRUE);
// turn on specular lighting and instruct Direct3D to renormalize normals
g_d3d_device->SetRenderState(D3DRS_NORMALIZENORMALS, TRUE);
g_d3d_device->SetRenderState(D3DRS_SPECULARENABLE, TRUE);
// position and aim the camera
D3DXMATRIX view_matrix;
D3DXVECTOR3 pos(0.0f, 1.0f, -3.0f);
D3DXVECTOR3 target(0.0f, 0.0f, 0.0f);
D3DXVECTOR3 up(0.0f, 1.0f, 0.0f);
D3DXMatrixLookAtLH(&view_matrix, &pos, &target, &up);
g_d3d_device->SetTransform(D3DTS_VIEW, &view_matrix);
// set the projection matrix
D3DXMATRIX proj;
D3DXMatrixPerspectiveFovLH(&proj, D3DX_PI * 0.5f, (float)WIDTH/HEIGHT, 1.0f, 1000.0f);
g_d3d_device->SetTransform(D3DTS_PROJECTION, &proj);
return true;
}
void cleanup()
{
safe_release<IDirect3DVertexBuffer9*>(g_pyramid_vb);
}
bool display(float time_delta)
{
// update the scene: rotate the pyramid
D3DXMATRIX y_rot;
static float y = 0.0f;
D3DXMatrixRotationY(&y_rot, y);
y += time_delta;
if(y >= 6.28f)
y = 0.0f;
g_d3d_device->SetTransform(D3DTS_WORLD, &y_rot);
// draw the scene
g_d3d_device->Clear(0, NULL, D3DCLEAR_TARGET | D3DCLEAR_ZBUFFER, 0x00000000, 1.0f, 0);
g_d3d_device->BeginScene();
g_d3d_device->SetStreamSource(0, g_pyramid_vb, 0, sizeof(cLightVertex));
g_d3d_device->SetFVF(LIGHT_VERTEX_FVF);
g_d3d_device->DrawPrimitive(D3DPT_TRIANGLELIST, 0, 4);
g_d3d_device->EndScene();
g_d3d_device->Present(NULL, NULL, NULL, NULL);
return true;
}
LRESULT CALLBACK wnd_proc(HWND hwnd, UINT msg, WPARAM word_param, LPARAM long_param)
{
switch(msg)
{
case WM_DESTROY:
PostQuitMessage(0);
break;
case WM_KEYDOWN:
if(word_param == VK_ESCAPE)
DestroyWindow(hwnd);
break;
}
return DefWindowProc(hwnd, msg, word_param, long_param);
}
int WINAPI WinMain(HINSTANCE inst, HINSTANCE, PSTR cmd_line, int cmd_show)
{
if(! init_d3d(inst, WIDTH, HEIGHT, true, D3DDEVTYPE_HAL, &g_d3d_device))
{
MessageBox(NULL, "init_d3d() - failed.", 0, MB_OK);
return 0;
}
if(! setup())
{
MessageBox(NULL, "Steup() - failed.", 0, MB_OK);
return 0;
}
enter_msg_loop(display);
cleanup();
g_d3d_device->Release();
return 0;
}
Setup函数给场景加入灯光。首先允许使用灯光,当然这不是必须的因为默认设置就是允许使用灯光的。
下一步,我们创建顶点缓存,锁定,并且把“金字塔”的三角形顶点放入其中。顶点法线是利用5.3节中的运算法则预先计算好的。注意三角形共享顶点,但它们的法线不能共享;因此对这个物体使用索引列表并不是最有利的。例如,所有三角形都共享顶点(0,1,0);然而,对每个三角形,它们的顶点法线是不相同的。
为物体产生了顶点数据以后,我们描述利用灯光表现各自材质的物体间是怎样相互影响的。在这个例子中,“金字塔”反射出白光,自身不发光,且会产生一些高光。
接着,我们创建一个方向光并将其设为可用。方向光是沿着x轴的正方向照射的。灯光照射最强的白色漫射光(dir.Diffuse
= WHITE),较弱的白色镜面光(dir.Specular
= WHITE * 0.3f)以及一个中等强度的白色环境光(dir.Ambient
= WHITE *0.6f)。
最后,我们设置状态使法线重新单位化且把镜面高光设置为可用。
下载源程序