Global Data
The application class uses
three global variables to contain the data about the character
and spell meshes, and the character animation information:
#define PER_ROW_SPELLS 3
#define PER_SPELL_WIDTH 200
#define PER_SPELL_HEIGHT 20
#define CLIENT_WIDTH 640
#define CLIENT_HEIGHT 480
#define TARGET_VERTEX_FVF D3DFVF_XYZ | D3DFVF_DIFFUSE
typedef struct sTargetVertex
{
float x, y, z;
D3DCOLOR diffuse;
} *sTargetVertexPtr;
const sTargetVertex g_target_verts[6] =
{
{ -20.0f, 40.0f, 0.0f, 0xFFFF4444 },
{ 20.0f, 40.0f, 0.0f, 0xFFFF4444 },
{ 0.0f, 20.0f, 0.0f, 0xFFFF4444 },
{ 0.0f, -20.0f, 0.0f, 0xFFFF4444 },
{ 20.0f, -40.0f, 0.0f, 0xFFFF4444 },
{ -20.0f, -40.0f, 0.0f, 0xFFFF4444 }
};
const char* g_char_mesh_names[] =
{
{ "..\\Data\\Warrior.x" }, // Mesh # 0
{ "..\\Data\\Yodan.x" } // Mesh # 1
};
const sCharAnimInfo g_char_anim_infos[] =
{
{ "Idle", true },
{ "Walk", true },
{ "Swing", false },
{ "Spell", false },
{ "Swing", false },
{ "Hurt", false },
{ "Die", false },
{ "Idle", true }
};
const char* g_spell_mesh_names[] =
{
{ "..\\Data\\fireball.x" },
{ "..\\Data\\Explosion.x" },
{ "..\\Data\\Groundball.x" },
{ "..\\Data\\ice.x" },
{ "..\\Data\\bomb.x" },
{ "..\\Data\\heal.x" },
{ "..\\Data\\force.x" }
};
cApp::Init
Init, the first overloaded
function in the application class, initializes the graphics
and input systems, loads all graphics, fonts, items, and other data needed for
the
program:
bool cApp::init()
{
create_display(g_hwnd, CLIENT_WIDTH, CLIENT_HEIGHT, 16, true, true);
set_perspective(D3DX_PI/4, 1.3333f, 1.0f, 10000.0f);
create_font(&m_font, "Arial", 16, true, false);
m_input.create(g_hwnd, get_window_inst());
m_keyboard.create_keyboard(&m_input);
m_mouse.create_mouse(&m_input, true);
create_vertex_buffer(&m_target_vb, 6, sizeof(sTargetVertex), TARGET_VERTEX_FVF);
fill_in_vertex_buffer(m_target_vb, 0, 6, g_target_verts);
load_texture_from_file(&m_button, "..\\Data\\Buttons.bmp", 0, D3DFMT_UNKNOWN);
m_terrain_mesh.load("..\\Data\\Battle.x", "..\\Data\\");
m_terrain_obj.create(&m_terrain_mesh);
// create character stats and spell options text window
m_char_stats.create(m_font);
m_char_stats.move(508, 400, 128, 48, -1, -1, COLOR_DARK_BLUE, COLOR_ARGENTINE);
m_spell_options.create(m_font);
m_spell_options.move(4, 4, 632, 328, -1, -1, COLOR_DARK_BLUE, COLOR_ARGENTINE);
// load in master item list
FILE* fp = fopen("..\\Data\\Default.mil", "rb");
if(fp)
{
fread(m_mil, 1, sizeof(m_mil), fp);
fclose(fp);
}
m_char_controller.init(m_font, "..\\Data\\Default.mcl",
m_mil, m_spell_controller.get_spell_list(),
array_num(g_char_mesh_names), g_char_mesh_names,
"..\\Data\\", "..\\Data\\",
array_num(g_char_anim_infos), g_char_anim_infos);
m_spell_controller.init("..\\Data\\Default.msl",
array_num(g_spell_mesh_names), g_spell_mesh_names,
"..\\Data\\");
m_char_controller.attach(&m_spell_controller);
m_spell_controller.attach(&m_char_controller);
// add player
m_char_controller.add_char(0, 0, CHAR_PC, CHAR_STAND, 200.0f, 0.0f, 0.0f, 4.71f);
// hardcoded - add monster
m_char_controller.add_char(1, 1, CHAR_MONSTER, CHAR_STAND, -200.0f, 0.0f, 0.0f, 1.57f);
m_char_controller.add_char(2, 1, CHAR_MONSTER, CHAR_STAND, -100.0f, 0.0f, -200.0f, 1.57f);
m_char_controller.add_char(3, 1, CHAR_MONSTER, CHAR_STAND, 0.0f, 0.0f, 100.0f, 1.57f);
// give an axe to one of the monsters
m_char_controller.equip(m_char_controller.get_char(1), 8, WEAPON, true);
return true;
}
As is typical in a graphics
project, the graphics system is initialized and an Arial font
is created. Next comes initialization of the input system and devices.
As I mentioned, you need to target
a character in order to attack or cast a spell
on the character. A pair of red, spinning triangles contained within a triangle
list
vertex buffer with six vertices represents the target (as illustrated in Figure
18.5).
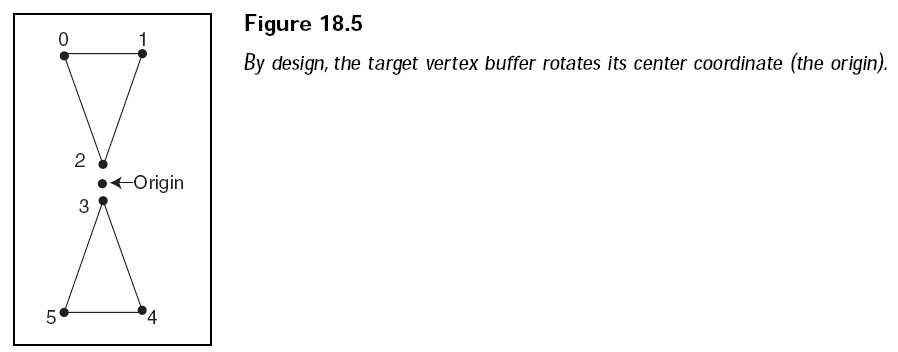
At this point in the Init
function, create the vertex buffer that contains the two triangles
that represent the target.
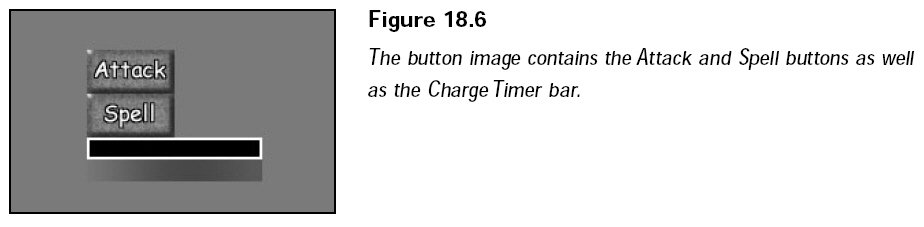
Once the target vertex buffer
is created, the various graphics need to be loaded
from disk. First, you load the button graphics used to select an action. You can
see
the button graphics image in Figure 18.6. The images used to draw the charge
timer are included with the button graphics image. Next, you load the arena mesh
and object.
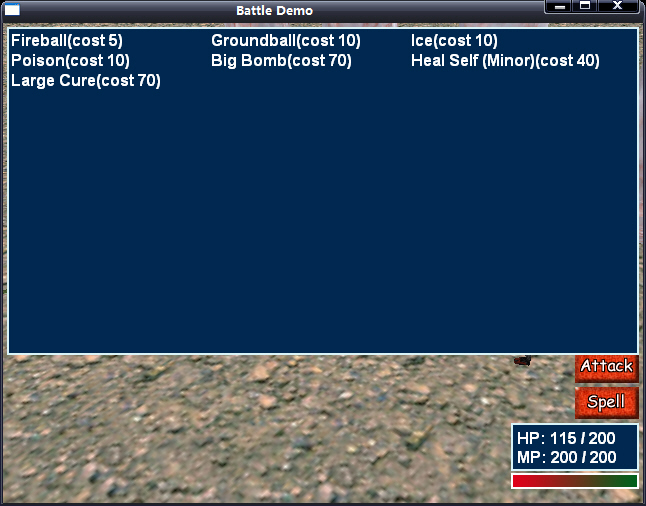
In order to display the player
character’s status (including health and mana points), you create a text window
below the character. Create a second window to contain the names of all known
spells from which players can select spells as needed. As you can see in
following snap this second window covers the top of the display.
Next, you need to load the
master item list and initialize the character and spell
controller classes.
To finish the Init function,
you position a few characters (players and monsters)
within the arena. (I was a little lazy here; hard-coding the characters
encountered
and their positions in the arena should be a bit randomized, but I’ll leave that
up
to you.) To add and position characters in the battle, use the character
controller’s
add_char function.
Notice that a total of four
characters are added to the fray. To make things a little
harder for the player, I went ahead and equipped the second character (a
monster)
with an ax weapon. To equip characters with a weapon, you use the character
controller’s
equip function, as I did.