一、SWIG环境搭建
1、 下载Swig for Windows:http://www.swig.org/download.html
2、 解压 .zip 文件到目录,比如:D:\backupsoftware
3、 添加环境变量到path, 比如: D:\backupsoftware\swigwin-3.0.10
4、 简单测试安装是否成功:
打开Dos,在命令行执行: swig --help, 显示 Target Language Options即表明安装成功。二、以c++为例1、编写c++源文件//example.h
#include <iostream>
using namespace std;
class Example{
public:
void say_hello();
};
//example.cpp
#include "example.h"
void Example::say_hello()
{
printf("hello");
}
2、再写一个swig模块定义文件如下
%module example
%{
#include "example.h"
%}
%include "example.h"
3、通过命令行运行:$ swig -python -c++ example.i 如果是使用C源码,则选项:$ swig -Python example.i
这样会创建两个不同的文件:example_wrap.cxx(如果用c源码是example_wrap.c),和python文件example.py。
4、使用python.distutils生成模块动态库python自带一个distutils工具,可以用它来创建python的扩展模块。使用它也很简单,只需要先定义一个配置文件,通常是命名为setup.py,如下:#!/usr/bin/env python
"""
setup.py file for SWIG C\+\+/Python example
"""
from distutils.core import setup, Extension
example_module = Extension('_example',
sources=['example.cpp', 'example_wrap.cxx',],
)
setup (name = 'example',
version = '0.1',
author = "www",
description = """Simple swig C\+\+/Python example""",
ext_modules = [example_module],
py_modules = ["example"],
)
注:swig生成的扩展模块对象名必须使用python模块名并在前面加上下划线_,刚才我们通过swig生成的python文件是example.py,所以这里的模块对象名必须是'_example',否则无法顺利编译。5、编译
命令行中将当前工作目录切换到文件example.cpp,example_wrap.cxx,example.py,setup.py所在的目录,然后输入以下命令:python setup.py build_ext --inplace会在本目录下生成_example.pyd模块。
6、测试import examlpeexample.Example().say_hello()注:如果导入模块失败,需要将模块所在路径添加到sys.path中,在次导入就会成功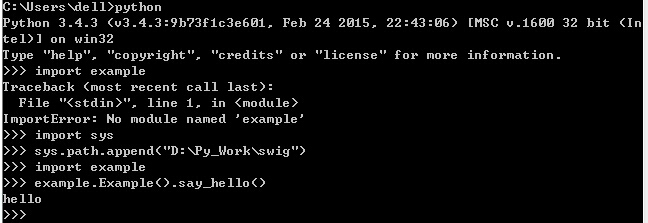
posted @
2016-08-18 11:20 王海光 阅读(4812) |
评论 (0) |
编辑 收藏
摘要: UISearchBar控件就是要为你完成搜索功能的一个专用控件。它集成了很多你意想不到的功能和特点!首先,还是来普及一下UISearchBar控件API相关的属性和方法吧!UISearchBar属性相关_searchBar = [[UISearchBar alloc] initWithFrame:CGRectZero];// 初始化,不解释 &nb...
阅读全文
posted @
2015-03-04 19:23 王海光 阅读(936) |
评论 (0) |
编辑 收藏
摘要: 标准库C++标准库,包括了STL容器,算法和函数等。C++ Standard Library:是一系列类和函数的集合,使用核心语言编写,也是C++ISO自身标准的一部分。Standard Template Library:标准模板库C POSIX library : POSIX系统的C标准库规范ISO C++ Standards Committee :C++标准委员会 ...
阅读全文
posted @
2014-11-14 08:58 王海光 阅读(2520) |
评论 (0) |
编辑 收藏
不知道大家有没有我这种体验.大家先看看下面这段代码:int fp=_wopen(L"Hello.dat",O_BINARY | O_CREAT | O_TRUNC | O_RDWR);
if(fp==-1) return;
write(fp,L"123中国人",wcslen(L"123中国人"));
close(fp);
上面这段代码不知道大家看出什么BUG来了.如果大家看不出毛病也不足为怪,因为这是我们的习惯导致了我们的错误产生.先让我来分析一下write吧.下面是write的原型:int write( int handle, const void *buffer, unsigned int count );参数:handle 已打开或已创建的文件句柄buffer 待写入的数据count 待写入的数据大小现在分析为什么上面的那代码有bug,其实主要问题就在一个buffer,和count.如果我们写入一个Ansi字符串,上面的代码改成相应的形式确实没有错.但如果是写入一个宽字符串,那么上面的代码就不严格.原因就在于count.我们首先看一下strlen和wcslen,如果使用strlen,一般情况下,我们直接作为字符串的长度,而使用wcslen,你会发现,得出的不是字符串的长度而是字符的个数.这就是问题的所在.一般情况下.char的长度是1,这是用sizeof(char)运算出来的结果.len=strlen(str)*sizeof(char);而我们一般情况下,都只用strlen(str)来等价,这就是平时的习惯.正是由于这个习惯所引来的问题,这个习惯并不适用于宽字符串.因为wcslen(str)*sizeof(wchar_t)并不等于wcslen(strl).这就是习惯所引起的错误.说到这里我想大家都明白了.我在这里把这种习惯称之为不良习惯.所以大家以后在计算字符串长度的时候,千万不能简而简之,一定要len=strlen(str)*sizeof(char),len=wcslen(str)*sizeof(wchar_t).不要再犯这种习惯性的低级错误.
本文转自:
http://blog.csdn.net/aylixuan/article/details/6130820
posted @
2014-10-10 11:53 王海光 阅读(3895) |
评论 (0) |
编辑 收藏
使用版本:1.1.10今天弄了一下Gloox中自带的收发文件例子,收发文件的例子都是好使的,只不过,在调试过程中需要注意一些问题,下面将我遇到的问题做个记录(例子中以In-Band Bytestreams方式收发)。1、发送文件过程中遇到404错误<iq type='error' id='uid-8509a748-00000005' to='wanghaiguang@wanghaiguang-wk/glooxsendfile'from='www@192.168.60.67/Spark 2.6.3'><sixmlns='http://jabber.org/protocol/si' id='uid-8509a748-00000006' profile='http://jabber.org/protocol/si/profile/file-transfer'><file xmlns='http://jabber.org/protocol/si/profile/file-transfer' name='d:\offline.bmp' size='6998'/><feature xmlns='http://jabber.org/protocol/feature-neg'><x xmlns='jabber:x:data' type='form'><field type='list-single'var='stream-method'><option label='ibb'><value>http://jabber.org/protocol/ibb</value></option><option label='oob'><value>jabber:iq:oob</value></option><option label='s5b'><value>http://jabber.org/protocol/bytestreams</value></option><value/></field></x></feature></si><error code='404' type='cancel'><remote-server-not-found xmlns='urn:ietf:params:xml:ns:xmpp-stanzas'/></error></iq>
可以将ip地址换成服务器名称试试JID j( "www@192.168.60.67/gloox" );——> JID j( "www@wanghaiguang-wk/gloox" );
2、发送文件过程中遇到503错误<iq type='error' id='uid-8663a748-00000005' from='www@wanghaiguang-wk/glooxsend'to='wanghaiguang@wanghaiguang-wk/glooxsendfile'><si xmlns='http://jabber.org/protocol/si' id='uid-8663a748-00000006' profile='http://jabber.org/protocol/si/profile/file-transfer'><file xmlns='http://jabber.org/protocol/si/profile/file-transfer' name='d:\offline.bmp' size='6998'/><feature xmlns='http://jabber.org/protocol/feature-neg'><x xmlns='jabber:x:data' type='form'><field type='list-single' var='stream-method'><option label='ibb'><value>http://jabber.org/protocol/ibb</value></option><option label='oob'><value>jabber:iq:oob</value></option><option label='s5b'><value>http://jabber.org/protocol/bytestreams</value></option><value/></field></x></feature></si><error code='503' type='cancel'><service-unavailable xmlns='urn:ietf:params:xml:ns:xmpp-stanzas'/></error></iq>
这个问题可能是由于你接收端的资源名称与发送端不匹配//接收端登录的jid
JID jid( "www@192.168.60.67/glooxsendfile" );
j = new Client( jid, "111" );
//发送端的jid名称(发送给对方的jid名称)
JID j( "www@wanghaiguang-wk/gloox" );
if( j.resource().empty() )
{
printf( "error: need full jid\n" );
return 1;
}
posted @
2014-09-02 17:18 王海光 阅读(2529) |
评论 (0) |
编辑 收藏
引文:
调试GLOOX 1.0.10的注册功能颇费了一些功夫。总体逻辑如GLOOX自带的例子一样是毫无疑问的,但是照搬例子又是不能完成注册的,返回错误码为4------RegistrationBadRequest。笔者一开始在网上狂搜解决方案,资料少之又少,有建议重写Client::handleNormalNode函数(目的是禁止SASL认证)的,有直接继承Client重写Client::handleNormalNode函数的,但都没说到点子上。经过一段时间的研究,在GLOOX的maillist上得到启发,顺利完成注册。现将解决方案记录下来:
环境
客户端:GLOOX1.0.1.0 VS2008
服务器:OPENFIRE 默认安装
对于GLOOX自带的注册例子不能正常注册的问题有人在邮件列表里提出来。一个哥们这样回答:
Ok, I've found what the problem was
In openFire server parameters, Anonymous Login => Disabled !!!
意思是要禁用openFire服务器里的选项”注册和登录“的”匿名登录“项。笔者按此说明禁用该选项,果然注册成功。
这说明开始的注册失败是和匿名登录有关系的。我们来看一下引用registration_expmple例子登录失败时的XML流:
S->C:服务器返回给客户端支持的认证机制:
<stream:features xmlns:stream='http://etherx.jabber.org/streams'><mechanisms xmlns='urn:ietf:params:xml:ns:xmpp-sasl'><mechanism>DIGEST-MD5</mechanism><mechanism>PLAIN</mechanism><mechanism>ANONYMOUS</mechanism><mechanism>CRAM-MD5</mechanism></mechanisms><compression xmlns='http://jabber.org/features/compress'><method>zlib</method></compression><auth xmlns='http://jabber.org/features/iq-auth'/><register xmlns='http://jabber.org/features/iq-register'/></stream:features>
从上面XML流中我们可以看到,默认openFire支持四种认证机制,分别是:DIGEST-MD5、PLAIN、ANONYMOUS、CRAM-MD5。然后我们看GLOOX客户端的响应流:
C->S:客户端返回选择的认证方式:
<auth xmlns='urn:ietf:params:xml:ns:xmpp-sasl' mechanism='ANONYMOUS'/>
可以看出,客户端”无耻“的选择了”匿名“--'ANONYMOUS'方式接下来的流程就是客户端”无耻“的选择了以匿名的方式登录了服务器,然后再发送注册请求,请求如下:
<iq id='uid:4e69eccd:00006784' type='set' from='447e0585@zxl/447e0585' xmlns='jabber:client'><query xmlns='jabber:iq:register'><username>bbaxiao</username><password>123456</password><name>test2</name><email>163@gmail.com</email></query></iq>
我们看到,IQ节里包含“form”属性,即客户端匿名身份标识。
注意,一个客户端已经以一个身份(由服务器临时分配的一个JID)登录,建立了会话,在服务器上我们会看到这个会话,并且服务器发送心跳一直维护这个会话。这种情况下,这个客户端再发送注册请求(另一个身份)建立与服务器的连接是不被允许的。具体请参考XEP-0077(In-Band Registration):我们关注这两段:
If the entity cancels its registration with its "home" server (i.e., the server at which it has maintained its XMPP account), then the entity SHOULD NOT include a 'from' or 'to' address in the remove request the server SHOULD then return a <not-authorized/> stream error and terminate all active sessions for the entity. The server SHOULD perform the remove based on the bare JID <localpart@domain.tld> associated with the current session or connection over which it received the remove request. If the server is an instant messaging and presence server that conforms to XMPP IM [8], the server SHOULD also cancel all existing presence subscriptions related to that entity (as stored in the entity's roster).
If the entity cancels its registration with a service other than its home server, its home server MUST stamp a 'from' address on the remove request, which in accordance with XMPP Core will be the entity's full JID <localpart@domain.tld/resource>. The service MUST perform the remove based on the bare JID <localpart@domain.tld> portion of the 'from' address.
意思是说注册请求不能包含“from”属性。正常的注册流如下:
<iq id='uid:4e69eccd:00003d6c' type='set' xmlns='jabber:client'><query xmlns='jabber:iq:register'><username>bbaxiao</username><password>123456</password><name>test2</name><email>163@gmail.com</email></query></iq>
---------------------------
综上所述,解决方案如下:
一、关闭openFire的匿名登录功能。^_^……
二、禁止GLOOX匿名认证功能。
file:client.cpp
fun: int Client::getSaslMechs( Tag* tag )
line:423
//将423行注释掉即可。
422:if( tag->hasChildWithCData( mech, "ANONYMOUS" ) )
423 //mechs |= SaslMechAnonymous;
重新编译生成DLL即可。三、手动设置GLOOX客户端SASL认证机制
在调用j->connect()之前设置SASL认证机制,比如设置为“DIGEST-MD5”
j->setSASLMechanisms(SaslMechDigestMd5);
这种方式的缺点是需要先确定服务器支持的认证机制。四、根据XEP-0077所述,即使其名登录,注册流只要不带“from”属性应该也可以。所以我们要处理发出的注册流,去除“from”属性重新发送注册流即可。
本文转自:http://blog.csdn.net/abcpanpeng/article/details/7370974
posted @
2014-08-28 17:59 王海光 阅读(1600) |
评论 (0) |
编辑 收藏
NSString中如果包括中文字符,在转换为NSURL时得到的值为nil
解决办法:
NSString *urlString = [NSString stringWithFormat:@"http://api.openweathermap.org/data/2.5/weather?q=%@&units=imperial",cityName];
urlString = [urlString stringByAddingPercentEscapesUsingEncoding:NSUTF8StringEncoding];
NSURL *url = [NSURL URLWithString:urlString];
NSLog(@"%@", url);
posted @
2014-08-18 09:45 王海光 阅读(1754) |
评论 (0) |
编辑 收藏
第一步:
创建2个NSNotificationCenter监听
[[NSNotificationCenter defaultCenter] addObserver:self selector:@selector(applicationWillResignActive:)
name:UIApplicationWillResignActiveNotification object:nil]; //监听是否触发home键挂起程序.

[[NSNotificationCenter defaultCenter] addObserver:self selector:@selector(applicationDidBecomeActive:)
name:UIApplicationDidBecomeActiveNotification object:nil]; //监听是否重新进入程序程序.
第二步:
实现2个NSNotificationCenter所触发的事件方法
- (void)applicationWillResignActive:(NSNotification *)notification
{
    printf("按理说是触发home按下\n");
}
- (void)applicationDidBecomeActive:(NSNotification *)notification
{
    printf("按理说是重新进来后响应\n");
}
注: 在home键触发后,AppDelegate响应的方法为:
- (void)applicationDidEnterBackground:(UIApplication *)application
{
    /*
     Use this method to release shared resources, save user data, invalidate timers,

     and store enough application state information to restore your application to its current state in case it is terminated later.
     If your application supports background execution, this method is called instead of applicationWillTerminate: when the user quits.
     */
}
本文转自:http://blog.csdn.net/sqc3375177/article/details/9466687
其他相关信息:
- - (BOOL)application:(UIApplication *)application didFinishLaunchingWithOptions:(NSDictionary *)launchOptions
- {
- // Override point for customization after application launch.
- NSLog(@"\n ===> 程序开始 !");
-
- return YES;
- }
-
- - (void)applicationWillResignActive:(UIApplication *)application
- {
-
- NSLog(@"\n ===> 程序暂行 !");
- }
-
- - (void)applicationDidEnterBackground:(UIApplication *)application
- {
-
- NSLog(@"\n ===> 程序进入后台 !");
- }
-
- - (void)applicationWillEnterForeground:(UIApplication *)application
- {
-
- NSLog(@"\n ===> 程序进入前台 !");
- }
-
- - (void)applicationDidBecomeActive:(UIApplication *)application
- {
- NSLog(@"\n ===> 程序重新激活 !");
-
- }
-
- - (void)applicationWillTerminate:(UIApplication *)application
- {
- NSLog(@"\n ===> 程序意外暂行 !");
-
- UIDevice *device = [UIDevice currentDevice];
-
- }
首次运行:
- (BOOL)application:(UIApplication *)application didFinishLaunchingWithOptions:(NSDictionary *)launchOptions
- (void)applicationDidBecomeActive:(UIApplication *)application
首次关闭(home):
- (void)applicationWillResignActive:(UIApplication *)application
- (void)applicationDidEnterBackground:(UIApplication *)application
再次运行:
- (void)applicationWillEnterForeground:(UIApplication *)application
- (void)applicationDidBecomeActive:(UIApplication *)application
再次关闭:
- (void)applicationWillResignActive:(UIApplication *)application
- (void)applicationDidEnterBackground:(UIApplication *)application
本文转自:http://friendlysong.blog.163.com/blog/static/3225243920128144251666/
posted @
2014-08-01 13:31 王海光 阅读(2425) |
评论 (0) |
编辑 收藏
摘要: UIGestureRecognizer 是一个具体手势的基类,提供了较为简单的手势实现方式 The concrete subclasses of UIGestureRecognizer are the following:UITapGestureRecognizerUIPinchGestureRecognizerUIRotationGestureRecog...
阅读全文
posted @
2014-07-29 13:35 王海光 阅读(2093) |
评论 (0) |
编辑 收藏
在“Header Search Paths” 中添加“/usr/include/libxml2″
在“Other Linker Flags”添加“-lxml2″
运行后出现错误找不到<libxml/tree.h>
解决办法:在“Header Search Paths” 中添加 ${SDKROOT}/usr/include/libxml2
posted @
2014-07-15 13:50 王海光 阅读(1199) |
评论 (0) |
编辑 收藏