有关ICE的基础知识,请参照前面的ICE专题文章。由于这些文章均来自于网络,故未发之于首页。下面仅仅给出相关link:
ICE专题:利用ICE编写程序的几个注意点
ICE专题:ICE架构
ICE专题:ICE起步
ICE专题:ICE的5个服务
ICE专题:使用C#编写ICE分布式应用程序
ICE专题:学习ICE 3.0
ICE专题:在客户端中如何定位服务器(即如何寻找代理)
ICE专题:ICE在Linux下的安装
ICE专题:ICE简介
目标:在Windows平台上编写第一个基于ICE的Hello Word程序。
1、安装
从http://www.zeroc.com/download.html#bin下载安装文件:
Windows Installer for Visual Studio 2005
Ice-3.2.0-VC80.msi
【必需】
Everything needed to use Ice on Windows XP/Server 2003/Vista in C++, Java, C#, Visual Basic and Python. This installer includes executables, debug and release DLLs, header files, import libraries, PDBs, Java classes, sample programs, and third-party dependencies.
Visual Studio 2005 is only required for C++, C#, and Visual Basic developers. Visual Studio 2005 Express compilers are also supported.
Ice-3.2.0-ThirdParty-VC80.msi
Use this installer if you want to build Ice for C++ or Ice for Java from sources. It includes header files, debug/release DLLs, and JAR files for Ice's third-party dependencies:
- Berkeley DB 4.5.20
- OpenSSL 0.9.8d
- Libbzip2 1.0.3
- Expat 2.0.0
Ice for Java users who do not want to install the full Ice distribution may also find this installer useful, as it includes the Java classes for Berkeley DB.
Ice for C#
IceCS-3.2.0.tar.gz
IceCS-3.2.0.zip
The complete Ice for C# source code.
Note that, to build Ice for C#, you must first compile Ice for C++ or, alternatively, download and install an appropriate binary distribution. This is necessary because the Slice-to-C# compiler is written in C++.
以上的3个文件,Ice-x.x.-VC80.msi是ICE在Windows平台下的运行时文件,包含了必需的库文件,头文件,和命令行工具。有关运行时的介绍,以后的专题文章将一一介绍(随项目进度逐步介绍吧:P)。第3方库,建议安装,特别是用C++开发时。当然,如果不使用C++,就不必安装了。ICE for C#的包,是个源码库,包含了ICE for C#的实现,实际上是封装了.NET Framework与ICE运行库之间的交互,即.NET程序与C++程序的交互,会看到大量的平台调用。如果起个更好的名字,也许称之为“ICE for C# Provider/Wrapper"更好。
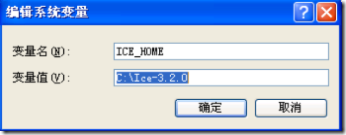
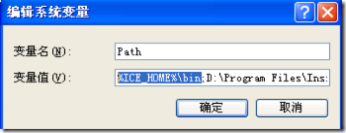
注意安装运行时后,需要添加环境变量ICE_HOME,并将%ICE_HOME%bin添加到Path中:
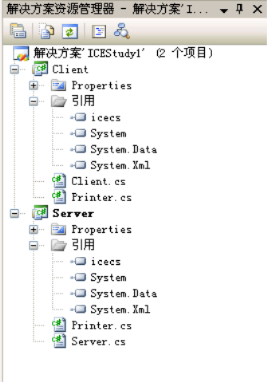
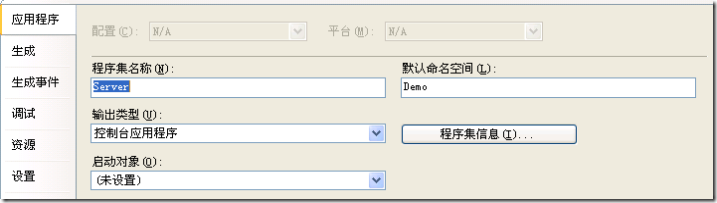
2、建立C#控制台项目
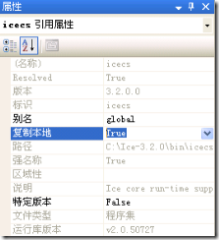
启动VS 2005,建立两个控制台项目,一个叫Server,一个叫Client。均添加对icecs.dll的引用。
由于我的ICE运行时安装于C:Ice-3.2.0,故在C:Ice-3.2.0bin下找到此文件,需要注意的是,一定要选择:复制到本地。
3、定义接口方法
module Demo {
interface Printer {
void printString(string s);
};
};
将这段代码存为:Printer.ice。在此文件同目录下,创建批处理命令文件cmd1.bat,内容如下:
																								mkdir generated
slice2cs --output-dir generated Printer.ice
运行cmd1.bat,则会在generated 文件夹下生成Printer.cs。这里暂时不分析Printer.cs的结构,直接使用它了。将Printer.cs拷贝到新建的两个项目中,注意,你必须将项目中使用的namespace设置成相同的,例如,我将根namespace设置为Demo。

4、添加应用逻辑
在Client项目中添加Client.cs,内容如下:
																								using System;
using System.Collections.Generic;
using System.Text;
namespace Demo
{
publicclass Client
{
publicstaticvoid Main(string[] args)
{
int status = 0;
Ice.Communicator ic = null;
try
{
ic = Ice.Util.initialize(ref args);
Ice.ObjectPrx obj = ic.stringToProxy(
"SimplePrinter:tcp -p 12345:udp -p 12345");
PrinterPrx printer
= PrinterPrxHelper.checkedCast(obj);
if (printer == null)
thrownew ApplicationException("Invalid proxy");
printer.printString("Hello World!");
}
catch (Exception e)
{
Console.Error.WriteLine(e);
status = 1;
}
if (ic != null)
{
// Clean up//try
{
ic.destroy();
}
catch (Exception e)
{
Console.Error.WriteLine(e);
status = 1;
}
}
Environment.Exit(status);
}
}
}
在server项目中,添加Server.cs文件,内容如下:
																								namespace Demo
{
using System;
publicclass PrinterI : Demo.PrinterDisp_
{
publicoverridevoid printString(string s, Ice.Current current)
{
Console.WriteLine(s);
}
}
publicclass Server
{
publicstaticvoid Main(string[] args)
{
int status = 0;
Ice.Communicator ic = null;
try
{
ic = Ice.Util.initialize(ref args);
Ice.ObjectAdapter adapter
= ic.createObjectAdapterWithEndpoints(
"SimplePrinter", "tcp -p 12345:udp -p 12345");
Ice.Object obj = new PrinterI();
adapter.add(
obj,
Ice.Util.stringToIdentity("SimplePrinter"));
adapter.activate();
ic.waitForShutdown();
}
catch (Exception e)
{
Console.Error.WriteLine(e);
status = 1;
}
if (ic != null)
{
// Clean up//try
{
ic.destroy();
}
catch (Exception e)
{
Console.Error.WriteLine(e);
status = 1;
}
}
Environment.Exit(status);
}
}
}
5、测试应用
切换到Server项目的生成目录,发现生成了server.exe程序,运行:Server.exe。
如果你的OS安装了网络防火墙,注意开通相应的12345端口。最好关闭所有防火墙软件后,测试应用程序。
server.exe运行后,就一直处于监听状态。运行netstat -an,可以看到服务器端程序监听着12345端口。

在命令行下运行Client.exe,会发现Server.exe的控制台显示:Hello Word!
注意事项:
1、通信协议串请使用TCP或UDP,如以上所提供的那样,ICE手册中所给的协议是:"default -p 10000",这在我的平台下并不可用,这需要给ICE配置默认设置。ICE设置使用 【程序名.config】 文件来配置,下面给出一个例子:
#
# The client reads this property to create the reference to the
# "hello" object in the server.
#
Hello.Proxy=hello:tcp -p 10000:udp -p 10000:ssl -p 10001
#
# Warn about connection exceptions.
#
#Ice.Warn.Connections=1
#
# We want a faster ACM for this demo.
#
Ice.ACM.Client=10
#
# Network Tracing
#
# 0 = no network tracing
# 1 = trace connection establishment and closure
# 2 = like 1, but more detailed
# 3 = like 2, but also trace data transfer
#
#Ice.Trace.Network=1
#
# Protocol Tracing
#
# 0 = no protocol tracing
# 1 = trace protocol messages
#
#Ice.Trace.Protocol=1
#
# Security Tracing
#
# 0 = no security tracing
# 1 = trace messages
#
#IceSSL.Trace.Security=1
#
# SSL Configuration
#
Ice.Plugin.IceSSL=icesslcs, Version=3.2.0.0, Culture=neutral, PublicKeyToken=1f998c50fec78381:IceSSL.PluginFactory
IceSSL.DefaultDir=../../../certs
IceSSL.ImportCert.CurrentUser.Root=cacert.pem
IceSSL.CertFile=c_rsa1024.pfx
IceSSL.Password=password
Ice.ThreadPerConnection=1
2、关闭防护墙
当不关闭防火墙时,出现一些莫名其妙的问题,均是程序的TCP/IP出入受到了限制导致的。
后记:
最近项目使用了ICE来实现分布式应用,ICE的确功能强大,希望使用过的朋友或对ICE关注的朋友能一起交流交流经验,彼此提高。【开源应用技术群 25935569】 。