https://solderspot.wordpress.com/2014/10/18/using-opencv-for-simple-object-detection/
My current project is to build a bot for the “Blue Block Challenge”. The goal is to create an autonomous robot that can move about a table, without falling off, find a blue colored block and move it onto a red colored disc, which is somewhere else on the table.
My very unoriginal plan is to have a video camera equipped Raspberry Pi be the eyes and brains of the robot. The Pi’s logic grabs individual frames of video from the camera and processes them using OpenCV to detect regions of a particular color and directs the robot accordingly.
However, my first goal is to learn how to use OpenCV to perform the object detection, which is the topic of this post.
Also, because this code will be running on the Raspberry Pi, which does not have a lot of processing power, it is extremely important that the detection method be as simple and efficient as possible. At this point I’m not even sure if the Raspberry Pi can achieve the required level of processing needed to get the bot to work well.
What is OpenCV
OpenCV is a very popular and powerful image processing library written in C/C++. It has lots of code for doing all sorts of image analysis and manipulation. You can visit opencv.org to learn more and there is a special page (opencv.org/books.html) that lists lots of books available for the library.
I bought “Practical OpenCV” myself but it is way overpriced for what it is so I cannot recommend it. Still, it did get me up and running quickly.
cv::Mat
OpenCV is typically used for image processing but it is a more general purpose library than that. It actually works with matrices using the class cv::Mat.
However, to do any image processing we first need to create a cv::Mat instance for our image.
For example, if we have the typical 8 bit RGBA image we can create the cv::Mat for it using the constructor:
Mat::Mat(int rows, int cols, int type, void* data, size_t step=AUTO_STEP)
#include <opencv2/opencv.hpp>
void *first_pixel = <pointer to start of 8 bit RGBA image data>;
int rows = <height of image>;
int cols = <width of image>;
cv::Mat frame = cv::Mat(rows, cols, CV_8UC4, first_pixel);
|
CV_8UC4 tells OpenCV that each entry in the matrix is made up of 4 consecutive unsigned 8 bit values (i.e. 0 – 255).
Converting Color Space to HSV
Our image format is in 24 bit RGBA for each pixel, i.e. an unsigned byte (0-255) for red, green, blue and alpha components – in this case we ignore alpha as the image is coming from a camera.
The first step is to convert the input frame from RGB format to HSV thus:
cv::Mat rgb_frame = get_frame_from_video();
cv::Mat hsv_frame;
cv::cvtColor(rgb_frame, hsv_frame, CV_RGB2HSV);
|
The HSV format is much more useful for doing based color processing than using RGB because we get a single channel (H) that holds the color value of the pixel and two other channels (S and V) that hold the saturation level and brightness level of the pixel.
What is HSV?
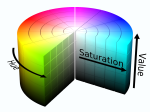 HSV is a three value format for describing a color with the properties “hue”, “saturation” and “value”.
The first property “Hue” is given as an angle from 0° to 360° of a color wheel where 0° is pure red, 120° is pure green and 240° is pure blue. For example, purple would be half way between blue and red, i.e. 300°
The other two properties are a little harder to describe but we can think of “saturation” as saying how strong or pale the color is, and “value” says how bright or dark the color is. You can get the technical low-down here: http://en.wikipedia.org/wiki/HSL_and_HSV
In OpenCV the HSV format is stored as 3 unsigned 8 bit values. For saturation and value the ranges 0-255 are used. For the hue component we also have a maximum range of 0 to 255 but hue is a value from 0 to 360 so OpenCV stores the hue as half the angle, i.e. range 0 to 180.
Color Thresholding
Thresholding is a fundamental image processing technique whereby we replace each pixel in an image with a “yes” or “no” value depending on whether that pixel meets some criteria. We effectively create a black and white version of the original image where “white”, i.e. value 255, means “yes” and “black” (0) means “no”.
In our case we are going to use a function called cv::inRange()
cv::Scalar min(hueMinValue, satMinValue, volMinValue);
cv::Scalar max(hueMaxValue, satMaxValue, volMaxValue)
cv::Mat threshold_frame;
cv::inRange( hsv_frame, min, max, threshold_frame);
|
The cv::inRange() operation simply compares each HSV value in the frame and replaces it with the value 0 if it is outside the min/max values or with 255 if it is inside the range.
Here is an example:
cv::Scalar min(220/2, 0, 0);
cv::Scalar max(260/2, 255, 255)
cv::Mat threshold_frame;
cv::inRange( hsv_frame, min, max, threshold_frame);
|
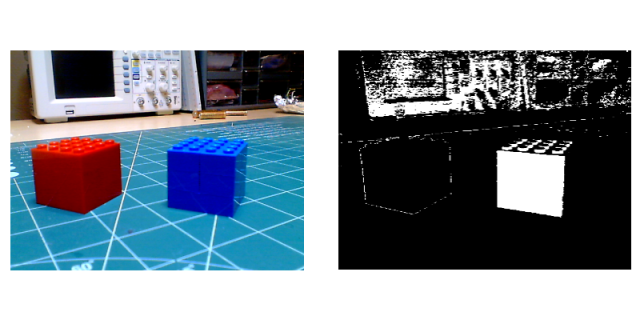
In this case we are using a Hue range of 220 to 260 which is a range of blues, and saturation and volume range of 0 – 255, which basically means any saturation and any volume.
In the black and white image the white areas are pixels that fall into the hue range we set. You can see that the blue brick shows up but so does a lot of other blueish surfaces.
In this case our blue brick has a very strong color so we can adjust the saturation min range higher so that we can remove paler blues from the threshold. If we set the saturation range to be 190 to 255:
cv::Scalar min(220/2, 190, 0);
cv::Scalar max(260/2, 255, 255)
cv::Mat threshold_frame;
cv::inRange( hsv_frame, min, max, threshold_frame);
|
We get the following threshold image:
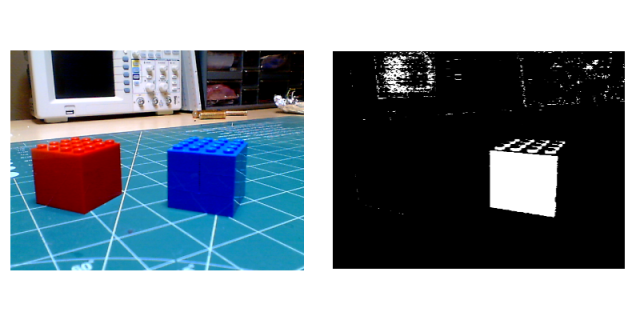
As you can see we’ve isolated the blue brick more. Our brick is also fairly well lit so we can remove the darker areas from the threshold image by increase the minimum threshold for value to say 80, so we have a range of 80 to 255:
cv::Scalar min(220/2, 190, 80);
cv::Scalar max(260/2, 255, 255)
cv::Mat threshold_frame;
cv::inRange( hsv_frame, min, max, threshold_frame);
|
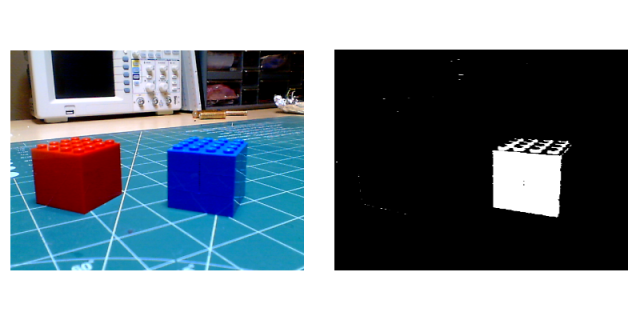
We’ve pretty much isolated the brick now. There are still some noise in the image but we can remove them by doing the following trick:
cv::Mat str_el = cv::getStructuringElement(cv::MORPH_RECT, cv::Size(3, 3));
morphologyEx(threshold_frame, threshold_frame, cv::MORPH_OPEN, str_el);
morphologyEx(threshold_frame, threshold_frame, cv::MORPH_CLOSE, str_el);
|
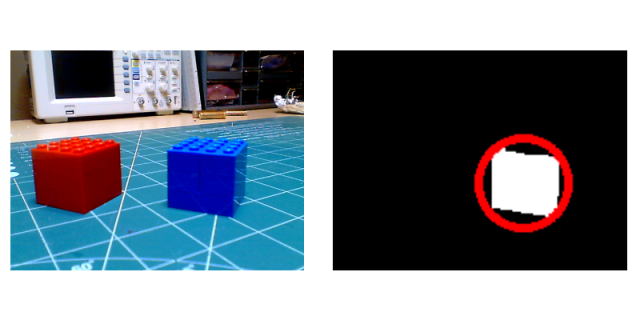
And we get the final result:

Finding the Objects
As is the threshold image is not much use to our robot. We need to somehow find the positions of the white areas and their size. We can do this by finding the circles that enclose each of the white areas. This would provide us with an array of positions and radii which our robot can actually use to track objects.
OpenCV has the function cv::findContours() that finds all the “contours” or edges of an image as an array of points. In fact it creates an array of these arrays of points, each set of points represents a distinct region in the image. Using another function called cv::minEnclosingCircle() we can convert these arrays of points into arrays of center points and radii:
cv::vector<cv::vector<cv::Point> > contours;
cv::vector<cv::Vec4i> heirarchy;
cv::vector<cv::Point2i> center;
cv::vector<int> radius;
cv::findContours( threshold_frame.clone(), contours, heirarchy, CV_RETR_TREE, CV_CHAIN_APPROX_NONE);
size_t count = contours.size();
for( int i=0; i<count; i++)
{
cv::Point2f c;
float r;
cv::minEnclosingCircle( contours[i], c, r);
if (!enableRadiusCulling || r >= minTargetRadius)
{
center.push_back(c);
radius.push_back(r);
}
}
|
In the code I’ve also put in logic to reject circles with radii less than some minimum value. This way I can cull out any remaining noise or small objects. In my particular case the objects I’m detecting are going to be largish compared to the field of view of the camera.
To verify the code is working correctly we can then use the cv:circle() function to draw in the possible targets as a red circle:
size_t count = center.size();
cv::Scalar red(255,0,0);
for( int i = 0; i < count; i++)
{
cv::circle(threshold_frame, center[i], radius[i], red, 3);
}
|
So now we have a pipeline that takes images from the camera and outputs possible object targets as an array of x and y image positions and radii.
Resizing the Source Image
Because I’m going to be dealing with largish areas of color, the resolution of the image does not need to be very high. In fact, as all this image processing will be happening on the Raspberry Pi it is doubly important to minimize the amount of work it has to do.
A very simple method is to just reduce the amount of data by either setting the camera up to capture low resolution images and/or resizing the image before we process it.
To do the latter we simply use the cv::resize() function:
float s = 0.5;
cv::resize( frame, frame, cv::Size(), s, s, cv::INTER_NEAREST);
|
This will scale the x and y axis by 50%.
OpenCVDetect App
To be better able to develop the image processing code I ended up creating an app for my Mac that lets me experiment with all the settings in realtime on a live video stream.
The source for the app is on GitHub: https://github.com/solderspot/OpenCVDetect
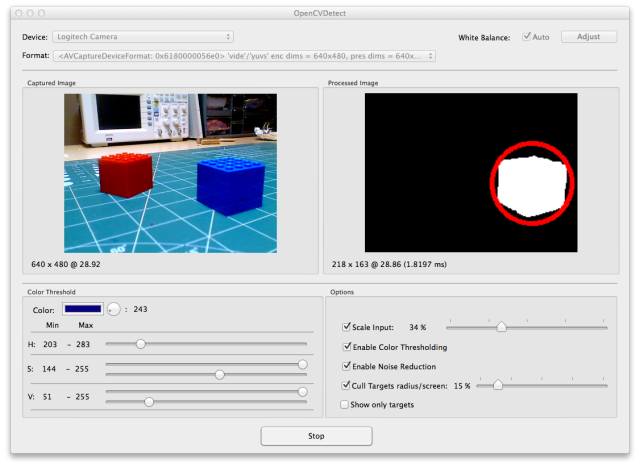
Note that if you want to build this app yourself you’ll need to install OpenCV V2 on your machine. I used home brew to do that.
The controls are relatively straight forward. First select a capture device and format, and then click start. The left image view is of the live video without any processing. The right image view is of the processed image.
Below the image views are two control panels. The right hand one has the following options:
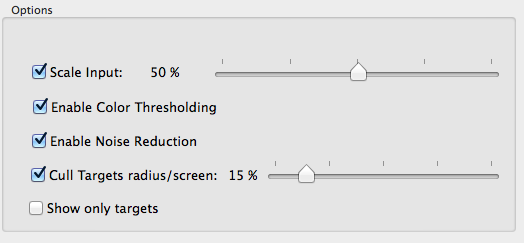
Use the checkboxes to enable and disable features and adjust sliders accordingly.
The culling option lets you specify a minimum radius size as a percentage of the screen size.
The left hand panel has the controls for setting the color thresholding values:
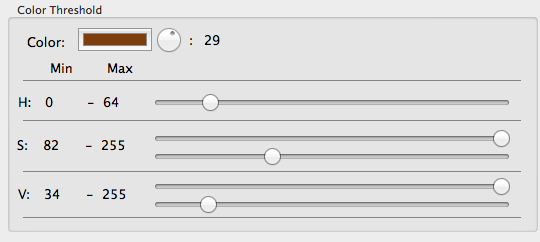
One of the limitations with the thresholding range for hue is that we can’t have ranges that span 0° without adding more logic and doing two thresholding passes. For now I have found that having hue clipped at 0 and 360 is not a problem.
I also made a quick video showing the app in action.
Conclusion
I’ve have a lot of fun playing with OpenCV on my Mac. Next step is to get it and camera capture working on the Raspberry Pi, which is proving to be laborious as this is my first time dealing with the Pi and I’m all thumbs at present.
I should clarify that what I’m doing here is not true object detection. I’m relying on the fact that the objects I’m dealing with in the challenge are the only things of their color.
Also, the color thresholding values are very dependent on ambient lighting conditions so I’ll need to calibrate the values specifically for the conditions at the time of the challenge. Basically it’s all a hack to do the minimum amount of processing possible on the Pi and it might not turn out too well.