转自
http://www.codeproject.com/KB/system/driverdev4asp.aspx
Introduction
This is the fourth edition of the Writing Device Drivers articles. This article will introduce the idea of device stacks and how devices interact with each other. We will use the previously created example device driver to demonstrate this topic. To do this we will introduce the idea of a �filter� driver in which we will create to attach to our own driver�s device stack.
What is a Device Stack?
A stack is general terminology that can be envisioned as a pile of objects that just sit on top of each other. There is also an algorithm implementation that defines a stack as a method to store temporary objects in which the last object in is the first object out (also known as LIFO). Both descriptions are related. However, a device stack is not an algorithm nor does it have anything to do with temporary objects. Thus the simple description of a pile of objects that simply sit on top of each other is more related.
The best example of a device stack would be in relation to a stack of plates. The plates sit on top of each other just like a stack of devices. The other detail to remember is that we say �device stack� not �driver stack�. In the third tutorial we remember that, a single driver can actually implement multiple devices. This means that a stack of devices could all be implemented in a single physical driver. This article and many others however do refer to �device� and �driver� interchangeably even though they are basically separate but related entities.
Filter Drivers
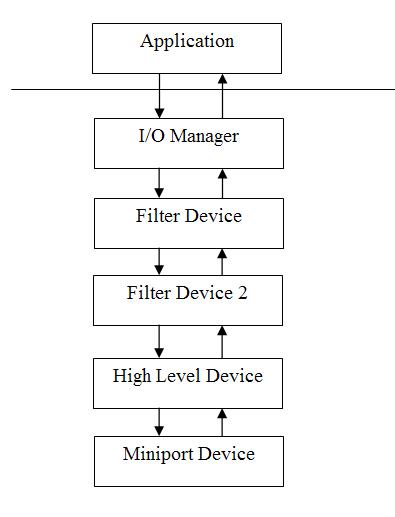
This is a very commonly used buzz word and I�m sure just about anyone who programs has heard of this. A filter driver is a driver that attaches to the top of a stack of devices in an effort of �filter� processing of requests to a device before they reach the device.
You may assume that all devices in a device stack are filters except for the last one but this is not the case. The devices in a device stack aside from filters generally depend on the architecture of that particular device. For example, you usually have higher level drivers that are near the top of the stack. In the most general case these higher level drivers communicate and interact with user mode requests. The devices in the stack start to break down the request for the next level device until the last device in the chain processes the request. Near the bottom of the device stack lie the lower level drivers like �miniport drivers� which may communicate to actual hardware for example.
The best example could be that of the file system. The higher level drivers maintain the notion of files and file system. They understand where the files are stored on the disk perhaps. The lower level drivers know nothing of files and simply understand requests to read sectors on a disk. They also understand how to queue these requests and optimize disk seeks but they have no knowledge of what is actually on the disk or how to interpret the data.
Every filter device that attaches to a device stack is put at the top. This means that, if another filter device attaches to the device stack after yours then it is now on top of you. You are never guaranteed to be at the top of the stack.
To attach to a device stack we will be using the following API implementation.
 Collapse
 Copy Code
RtlInitUnicodeString(&usDeviceToFilter, L"\\Device\\Example");
NtStatus = IoAttachDevice(pDeviceObject,
&usDeviceToFilter,
&pExampleFilterDeviceContext->pNextDeviceInChain);
This API will actually open a handle to the device in order to attach and then close the handle. When this API attempts to close the handle our driver will be attached to the device stack so we must ensure that the IRP_MJ_CLEANUP and IRP_MJ_CLOSE can be correctly handled and do not cause a problem since they will be called!
There are a few other APIs one is called IoAttachDeviceToStack. This is actually what IoAttachDevice calls after opening a handle to the device.
IRP Handling
The next thing we need to talk about further is IRP handling. The IRP is created and sent to the first device in the device stack. This device can then process the IRP and complete it or pass it down to the next device in the stack. The general rules of an IRP are that when you receive the IRP you own it. If you then pass it down to the next device you no longer own it and can no longer access it. The last device to process the IRP must complete it.
In this example we will be creating IRPs simply for demonstration purposes. The demonstration will be quite simple and we will be sending IRPs to our own driver. There are some aspects of our implementation here which are omitted in our implementation and things done in a non-standard fashion simply because we control all end points. This is a demonstration and very simple. Owning all end points allows us to be more flexible in what we actually implement since we are in total control and can ensure that nothing goes wrong.
There are a number of simple steps that need to be followed when creating an IRP. Depending on the handling of the IRP these can vary a little however we will be going over a very simple case step by step.
Step One � Create the IRP
This is the obvious first step we need to create an IRP. This is very simple you can simply use a function named IoAllocateIrp. The following is a simple code example using the API.
Collapse Copy Code
MyIrp = IoAllocateIrp(pFileObject->DeviceObject->StackSize, FALSE);
There are other APIs and macros which can also create an IRP for you. These are quicker ways to help create the IRP and set the parameters. The one thing to watch out for is to make sure that the function you use to create the IRP is able to be called at the IRQL level you will be using. The other part to check is, who is allowed to free the IRP. If the I/O Manager will manage and free the IRP or if you have to do it yourself.
The following is an example of one that sets parameters for us.
Collapse Copy Code
MyIrp = IoBuildAsynchronousFsdRequest(IRP_MJ_INTERNAL_DEVICE_CONTROL,
pTopOfStackDevice,
NULL,
0,
&StartOffset,
&StatusBlock);
Step Two � Set the Parameters
This step depends on what functionality you want to do. You would need to setup the FILE_OBJECT, and the IO_STACK_PARAMETER and everything else. In our example we cheat. We don�t provide a FILE_OBJECT and we set minimal parameters. Why? Well, this is just a simple example and we own all end points. Since we are in control of all end points we can essentially do whatever we want with the parameters. However, if you read up on IRP_MJ_xxx and the specific functionality for that driver, such as IOCTL, you will know what you need to set when sending IRPs around. We actually should comply with these mandates as well so other drivers could talk to us but I attempted to just keep this example very simple.
The following code is how we set our IRP parameters.
Collapse Copy Code
PIO_STACK_LOCATION pMyIoStackLocation = IoGetNextIrpStackLocation(MyIrp);
pMyIoStackLocation->MajorFunction = IRP_MJ_INTERNAL_DEVICE_CONTROL;
pMyIoStackLocation->Parameters.DeviceIoControl.IoControlCode =
IOCTL_CREATE_NEW_RESOURCE_CONTEXT;
pMyIoStackLocation->Parameters.DeviceIoControl.InputBufferLength =
sizeof(FILE_OBJECT);
pMyIoStackLocation->Parameters.DeviceIoControl.OutputBufferLength = 0;
MyIrp->AssociatedIrp.SystemBuffer = pFileObject;
MyIrp->MdlAddress = NULL;
As you notice, we set the �SystemBuffer� to point to our File Object. This is not exactly how we really should have done this. We should have allocated a buffer and copied the data there. That way we could safely have the I/O Manager free the buffer or we could have freed the buffer when we destroy the IRP. Instead though, we did this quick example and we simply don�t allow the I/O Manager to free the IRP and we don�t free the SystemBuffer obviously.
Step Three � Send the IRP down
You need to send the IRP down to the driver. To do this, you simply specify the DEVICE_OBJECT and the IRP in the IoCallDriver API. You can essentially use whatever DEVICE_OBJECT you have. However, if you want to start at the top of the device stack, it�s best to find the top level device object using API�s such as IoGetRelatedDeviceObject. In our example, we have one that does the call to get the top level device and one that simply uses the Device Object we already have. If you read the debug output, you will notice that in the one we don�t go through the filter driver. This is because IoCallDriver is very simple. It just takes the Device Object and finds the appropriate function to call.
Collapse Copy Code
NtStatus = IoCallDriver(pFileObject->DeviceObject, MyIrp);
Step Four � Process & Clean up the IRP
The one thing we did before we sent the IRP down was to create a �Completion Routine�. This is a routine that will get notified when the IRP has been completed. We can do a few things in this case, we can allow the IRP to continue so we can do processing on its parameters or we can destroy it. We can also let the I/O Manager free it. This is actually dependent on how you created the IRP. To answer the question of "who should free it", you should read the DDK documentation on the API you used to allocate it. Implementing the wrong method can lead to disaster!
This is a simple example and we simply free it ourselves.
Collapse Copy Code
IoSetCompletionRoutine(MyIrp, Example_SampleCompletionRoutine,
NULL, TRUE, TRUE, TRUE);
...
NTSTATUS Example_SampleCompletionRoutine(PDEVICE_OBJECT DeviceObject,
PIRP Irp, PVOID  Context)
{
DbgPrint("Example_SampleCompletionRoutine \n");
IoFreeIrp(Irp);
return STATUS_MORE_PROCESSING_REQUIRED;
}
You may notice that, sometimes you see code that checks the �STATUS_PENDING� and may wait on an event. In our case we own all end points and this will not happen in this simple example. This is why some of these details are simply being omitted for simplicity. In the next articles, we will expand on these ideas and fill in the missing pieces. It�s important to just digest one piece at a time.
Handling IRPs in your driver
Once you get an IRP, you own that IRP. You can do whatever you want with it. If you process it you must then either complete it when you are done or pass it down to another driver. If you pass it down to another driver you must forget about it. The driver you passed it to is now responsible for completing it.
The example filter driver we have implemented though is a bit different. It wants to process the parameters after we have provided the example driver with the IRP. To do this we must catch the completion and stop it from being completed. This is because we know the lower level driver should and will complete it. So, by setting our own completion routine, we can stop this. This is done with the following code.
Collapse Copy Code
pIoStackIrp = IoGetCurrentIrpStackLocation(Irp);
IoCopyCurrentIrpStackLocationToNext(Irp);
IoSetCompletionRoutine(Irp,
PIO_COMPLETION_ROUTINE) ExampleFilter_CompletionRoutine, NULL,
TRUE, TRUE, TRUE);
NtStatus = IoCallDriver(
pExampleFilterDeviceContext->pNextDeviceInChain, Irp);
if(NT_SUCCESS(NtStatus)
{
if(Irp->IoStatus.Information)
{
if(DeviceObject->Flags & DO_BUFFERED_IO)
{
DbgPrint("ExampleFilter_Read - Use Buffered I/O \r\n");
pReadDataBuffer = (PCHAR)Irp->AssociatedIrp.SystemBuffer;
if(pReadDataBuffer
&& pIoStackIrp->Parameters.Read.Length > 0)
{
ExampleFilter_FixNullString(pReadDataBuffer,
(UINT)Irp->IoStatus.Information);
}
}
else
{
if(DeviceObject->Flags
& DO_DIRECT_IO)
{
DbgPrint("ExampleFilter_Read - Use Direct I/O \r\n");
if(pIoStackIrp && Irp->MdlAddress)
{
pReadDataBuffer = MmGetSystemAddressForMdlSafe(
Irp->MdlAddress, NormalPagePriority);
if(pReadDataBuffer &&
pIoStackIrp->Parameters.Read.Length)
{
ExampleFilter_FixNullString(pReadDataBuffer,
(UINT)Irp->IoStatus.Information);
}
}
}
else
{
DbgPrint("ExampleFilter_Read - Use Neither I/O \r\n");
__try {
if(pIoStackIrp->Parameters.Read.Length >
0 && Irp->UserBuffer)
{
ProbeForWrite(Irp->UserBuffer,
IoStackIrp->Parameters.Read.Length,
TYPE_ALIGNMENT(char));
pReadDataBuffer = Irp->UserBuffer;
ExampleFilter_FixNullString(pReadDataBuffer,
(UINT)Irp->IoStatus.Information);
}
} __except( EXCEPTION_EXECUTE_HANDLER ) {
NtStatus = GetExceptionCode();
}
}
}
}
}
Irp->IoStatus.Status = NtStatus;
IoCompleteRequest(Irp, IO_NO_INCREMENT);
....
NTSTATUS ExampleFilter_CompletionRoutine(
PDEVICE_OBJECT DeviceObject, PIRP Irp, PVOID Context)
{
DbgPrint("ExampleFilter_CompletionRoutine Called \r\n");
return STATUS_MORE_PROCESSING_REQUIRED;
}
The IRP will then not be completed because we returned to the I/O Manager that more processing needs to be done. Now we can manipulate the IRP after the IoCallDriver, however we must now complete it when we are done. This is because we stopped the completion of the IRP. Remember our example does not take into account STATUS_PENDING because we own all end points and we are trying to keep this example as simple as possible.
The Filter Example
The example filter driver in this article attaches itself to the driver�s stack that we created in article 3. If you remember that implementation, we were able to communicate between two user mode applications. One problem with doing this is that, if you typed in a number of strings, the user mode application only prints one string while it may have read three. This could have been fixed in the user mode application easily however how much fun would that be?
Instead we have created a filter driver that simply intercepts the IRP after the read and manipulates the IRP return parameters. It removes all the NULL terminators from the string and replaces them with spaces. It then simply NULL terminates the end of the string. It�s not a perfect example obviously, since we overwrite the last character and don�t attempt to even see if we need to, but this is just a simple example.
These examples just do the minimum necessary, so they work and try not to trap (in the simplest case). I would rather provide some explanation with a simple example than a full fledged example with all the bells and whistles. Those can already be found in the DDK and long articles on MSDN which explain everything all at once.
Using the example
To use the example you simply do the same as you did with article 3. The only difference is that, there is now another loader program that you can run after you have already loaded example.sys. This one will load examplefilter.sys and it will attach to example.sys. The user mode programs can run with or without examplefilter.sys. You can run it both ways and see the differences. Entry points all have debug statements so you can follow the code paths.
Conclusion
In this article we learned a little more about IRP handling (for the purpose of understanding device stacks) and device stacks. We also learned how to implement a very simple filter driver. In each article we will attempt to build upon these basic ideas, so that we can further understand how drivers work and how to develop drivers.
The next article in the series will attempt to combine everything learned over these 4 articles and further explain IRP Handling.