https://www.cnblogs.com/scotoma/p/3330190.html
作者:杨鑫奇
关注Openresty很久了,期待支持websocket终于出来了,看到Aapo Talvensaari同学写的文章https://medium.com/p/1778601c9e05,兴奋下也来测试下,之前用websocket做即时通讯,还是基于socket.io的例子,现在用nginx来做...初尝试下,竟然报错了,章哥的解答在这里:
https://github.com/agentzh/lua-resty-websocket/issues/2 ,现在配置成功了,将自己的配置过程写下来,希望对大家有所帮助.
主要原因是:
websocket依赖于 lua-nginx-module,得用最新版本的,下面是章哥给的配置.
我用最新的1.4.2.7编译并测试成功的了.
到自己的目录下:
下载最新版本的 openresty 和 lua-nginx-module 然后安装:
wget http://openresty.org/download/ngx_openresty-1.4.2.7.tar.gz
tar zxvf ngx_openresty-1.4.2.7.tar.gz
git clone https://github.com/chaoslawful/lua-nginx-module.git
cd lua-nginx-module
git checkout -b websocket origin/websocket
cd ../ngx_openresty-1.4.2.7/bundle
rm -Rf ngx_lua-0.8.9
ln -s ../../lua-nginx-module ngx_lua-0.8.9
cd ..
./configure -with-luajit -prefix=/usr/local
gmake && gmake install
安装完成后
cd ../
git clone https://github.com/agentzh/lua-resty-websocket.git
拷贝websocket到lualib目录下
cp -r lua-resty-websocket/lib/resty/websocket /usr/local/lualib/resty/
配置自己的nginx conf的内容
在nginx.conf中添加lualib的路径
lua_package_path "/usr/local/lualib/resty/websocket/?.lua;;";
我这里是独立开的yagamiko.conf,添加websocket:
在server段内,修改添加以下内容:
listen 80 default so_keepalive=2s:2s:8;
这个是Aapo Talvensaari同学写的测试代码:
location /1.0/websocket {
lua_socket_log_errors off;
lua_check_client_abort on;
content_by_lua '
local server = require "resty.websocket.server"
local wb, err = server:new{
timeout = 5000, -- in milliseconds
max_payload_len = 65535,
}
if not wb then
ngx.log(ngx.ERR, "failed to new websocket: ", err)
return ngx.exit(444)
end
while true do
local data, typ, err = wb:recv_frame()
if wb.fatal then
ngx.log(ngx.ERR, "failed to receive frame: ", err)
return ngx.exit(444)
end
if not data then
local bytes, err = wb:send_ping()
if not bytes then
ngx.log(ngx.ERR, "failed to send ping: ", err)
return ngx.exit(444)
end
elseif typ == "close" then break
elseif typ == "ping" then
local bytes, err = wb:send_pong()
if not bytes then
ngx.log(ngx.ERR, "failed to send pong: ", err)
return ngx.exit(444)
end
elseif typ == "pong" then
ngx.log(ngx.INFO, "client ponged")
elseif typ == "text" then
local bytes, err = wb:send_text(data)
if not bytes then
ngx.log(ngx.ERR, "failed to send text: ", err)
return ngx.exit(444)
end
end
end
wb:send_close()
';
}
然后重新启动nginx就可以了...
使用 这个哥们提到的测试html,就可以了 https://medium.com/p/1778601c9e05
<html>
<head>
<script>
var ws = null;
function connect() {
if (ws !== null) return log('already connected');
ws = new WebSocket('ws://ko.local.freeflare.com/1.0/websocket');
ws.onopen = function () {
log('connected');
};
ws.onerror = function (error) {
log(error);
};
ws.onmessage = function (e) {
log('recv: ' + e.data);
};
ws.onclose = function () {
log('disconnected');
ws = null;
};
return false;
}
function disconnect() {
if (ws === null) return log('already disconnected');
ws.close();
return false;
}
function send() {
if (ws === null) return log('please connect first');
var text = document.getElementById('text').value;
document.getElementById('text').value = "";
log('send: ' + text);
ws.send(text);
return false;
}
function log(text) {
var li = document.createElement('li');
li.appendChild(document.createTextNode(text));
document.getElementById('log').appendChild(li);
return false;
}
</script>
</head>
<body>
<form onsubmit="return send();">
<button type="button" onclick="return connect();">
Connect
</button>
<button type="button" onclick="return disconnect();">
Disconnect
</button>
<input id="text" type="text">
<button type="submit">Send</button>
</form>
<ol id="log"></ol>
</body>
</html>
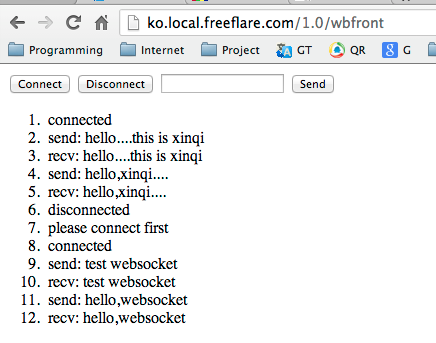
测试....这里注意在同一个域名下就好了....
测试成功了....
posted on 2018-05-04 11:15
思月行云 阅读(2450)
评论(0) 编辑 收藏 引用 所属分类:
Nginx\Openresty