时间过的真快,断断续续做Android的事情也一年多了,刚开始为了参加Google的Android比赛和我哥们Zeaster一起做了一个软件Zinfo,这个是一个SNS的构思,信息共享平台,更多的内容可以去访问我们的网站infosword ,不过去年就已经就停止开发了(木有赚到"刀了",只能先做点别的养家糊口咯-.-),如果有哪位兄弟对他感兴趣,或者有更多更好的想法欢迎给我写Email [haric.zhu@gmail.com],将来也许能重新整理整理继续开发。
一直想写博客分享一下自己学习心得和开发经验,却一直因为懒惰而没能坚持。因为一直在网上从各种大虾那学习经验,再潜水下去自己都觉得良心不安,所以打算在这里把自己对Android的一些经验和想法跟大家分享,也督促自己好好学习,天天向上。
[正文]
闲话少说,先来个加强版的HelloWorld介绍一下Android的概况和程序结构吧,这个HelloWorld程序很简单很简单,界面如图所示:

按一下按钮,弹出一个对话框,里面写着Hello World! -.-
下面就按步骤走一下开发流程,在这个流程中我会详细解释Android的项目结构
1 安装开发环境:
google推荐我们使用(Eclipse with the ADT plugin),ADT就是Android的开发插件,提供了一些调试工具什么的,在google code的android站点有详细的介绍,按他标准来,我就不多嘴了[ http://code.google.com/android/intro/installing.html ]
2 新建项目:
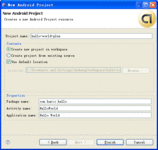
打开eclipse,新建项目->其他->然后选择Android Project,这时候弹出来一个Title叫New Android Project的对话框,填写如下图所示:
3 介绍项目结构:
大家看下面的项目结构图示 :
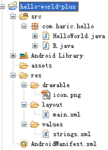
src里com.haric.hello下有一个HelloWorld.java,他的名字就来自于我们新建项目的时候填写的Acivity name, 这个HelloWorld就继承自Activity(Android Framework里面最重要的一个类,详细信息可以参考 -> (Activity ), 我们简单地理解为它是一个UI的容器,直接跟用户打交道最前端的类。
还有一个R.java,这个类是系统根据res文件夹中的内容自动为你生成的,我们先讲一下res文件夹,res是resources的缩写,顾名思义,你程序中所需要的文字,图片,布局文件等等资源都是放在这个文件夹下面的,你现在看到这个文件夹下面有
drawable - 这个是放图片的
layout - 这个是放布局文件的
values - 下面放字符串(strings.xml ),颜色(colors.xml ),数组(arrays.xml )
(res下的东东不止这些,更多关于Resouces的相容请参考(Resources ))
Android 帮我们把这些资源都管理起来,内容资源化的作用是很明显的,做国际化方便了,使用同一个资源的时候也方便也更节省空间(全局的引用),res文件夹中内容变化,R.java都会重新编译同步更新,所以这个类不需要你去手动更新了。
最后是AndroidManifest.xml. 你每次添加一个Acivity都需要在这个文件中描述一下,这个文件很重要东东还比较多,将来会详细讲述这个文件的。(To Me:这个地方留个链接到时候链过去-.-)
4 设计界面布局:
接下来咱们要使用R.java了,首先我们在layout里新建一个文件hello_ world.xml, 编辑内容如下:
- <?xml version="1.0" encoding="utf-8"?>
- <LinearLayout xmlns:android="http://schemas.android.com/apk/res/android"
- android:orientation="vertical"
- android:layout_width="fill_parent"
- android:layout_height="fill_parent"
- >
-
- <Button android:id="@+id/Button01"
- android:text="@string/click_me"
- android:layout_width="wrap_content"
- android:layout_height="wrap_content">
- </Button>
- </LinearLayout>
<?xml version="1.0" encoding="utf-8"?>
<LinearLayout xmlns:android="http://schemas.android.com/apk/res/android"
android:orientation="vertical"
android:layout_width="fill_parent"
android:layout_height="fill_parent"
>
<Button android:id="@+id/Button01"
android:text="@string/click_me"
android:layout_width="wrap_content"
android:layout_height="wrap_content">
</Button>
</LinearLayout>
有同学问了那个main.xml呢,我建议你把它的名字改成hello_world.xml或者删删掉新加一个hello_world.xml,[tips] 因为项目中会有很多个Activity,最好让你的layout文件的名字跟相应的Activity挂上钩,方便将来编辑和使用。
做完这一步啦,结果是啥?肯定编译不过呗,嘿嘿,认真的同学肯定注意到
"android:text="@string/click_me" 这行,这个是指定你Button上显示的文字,我们需要在res/values/strings.xml中加一行<string name="click_me">Click me</string>这样就能在layout文件中引用这个string资源了,好了布局弄完了,该在程序中使用它了
5 在程序中使用布局:
打开HelloWorld.java,编辑内容如下
- public void onCreate(Bundle savedInstanceState) {
- super.onCreate(savedInstanceState);
- setContentView(R.layout.hello_world);
- }
public void onCreate(Bundle savedInstanceState) {
super.onCreate(savedInstanceState);
setContentView(R.layout.hello_world);
}
R.layout.hello_world 就指向 hello_world.xml,同理 R.string.click_me就向"Click
me", 运行一下(右键点击你的项目,run as -> Android Application)看到一个按钮了吧
6 为按钮添加点击事件:
要为按钮添加点击事件,我们需要先得到这个对象,然后设置监听器,再编写onClick事件
完成后代码如下:
- import android.app.Activity;
- import android.app.AlertDialog;
- import android.os.Bundle;
- import android.view.View;
- import android.view.View.OnClickListener;
- import android.widget.Button;
-
- public class HelloWorld extends Activity {
- /** Called when the activity is first created. */
- @Override
- public void onCreate(Bundle savedInstanceState) {
- super.onCreate(savedInstanceState);
- setContentView(R.layout.main);
-
- Button button = (Button)findViewById(R.id.Button01);
- button.setOnClickListener(new OnClickListener(){
- public void onClick(View arg0) {
- openDialog();
- }
- });
- }
-
- private void openDialog(){
- AlertDialog.Builder builder = new AlertDialog.Builder(this);
- builder.setTitle("Hello");
- builder.setMessage("Hello World \n");
- builder.setNegativeButton("OK",null);
- builder.show();
- }
- }
import android.app.Activity;
import android.app.AlertDialog;
import android.os.Bundle;
import android.view.View;
import android.view.View.OnClickListener;
import android.widget.Button;
public class HelloWorld extends Activity {
/** Called when the activity is first created. */
@Override
public void onCreate(Bundle savedInstanceState) {
super.onCreate(savedInstanceState);
setContentView(R.layout.main);
Button button = (Button)findViewById(R.id.Button01);
button.setOnClickListener(new OnClickListener(){
public void onClick(View arg0) {
openDialog();
}
});
}
private void openDialog(){
AlertDialog.Builder builder = new AlertDialog.Builder(this);
builder.setTitle("Hello");
builder.setMessage("Hello World \n");
builder.setNegativeButton("OK",null);
builder.show();
}
}
Button button = (Button)findViewById(R.id.Button01);这句话就是用来获取layout中设置的界面控件对象的,这个id是在button中指定的android:id="@+id/Button01" 。
Android的UI用起来跟SWT是很像的,以后我会挑一些常用的,有趣的UI控件详细地介绍一下。今天先写到这里,每次我都会把相应项目的源代码贴到最下面。
源代码下载
posted on 2012-04-11 10:48
Bluesea 阅读(514)
评论(0) 编辑 收藏 引用 所属分类:
Android