
2016年2月15日
对于一个扎根于Windows的开发者来说,很难离开图形界面,如直接使用无图形界面的Linux(以下使用的是CentOS)进行编码,会严重影响该开发者的工作效率。本文描述了如何在Windows下面搭建Linux开发平台,以用于Linux服务器开发。这里使用的工具是Source insight、Virtualbox、Samba、XShell,其中Source insight用来编辑代码(代码是放在CentOS下面的),Virtualbox用来安装CentOS虚拟机,这里使用的是没有图形界面的CentOS7,Samba用来共享Windows与Linux的目录,XShell用来远程登录CentOS
虚拟机,这个工具比原始的Linux终端好用,提供了诸多类似于Windows图形界面支持的操作,如选择、复制和粘贴等。
从前面的描述可以看到,我们只是在Windows下面编写代码,而构建与调试,都是在CentOS下面完成的,本文不涉及在Windows下面构建与调试Linux程序。
安装Source insight、Virtualbox、XShell是非常简单的。
安装与配置CentOS虚拟机。
1、安装CentOS。这里需要注意的是,CentOS默认安装的是最小安装,最小安装里面只包含少量的工具,没有gcc,gdb等常用的开发工具,因此要选择合适自己的安装方式,最好把要使用的工具都装上。
2、配置网络。因为我们在开发的时候要将CentOS的目录共享到Windows,所以我们要保证两边都能够通信,所以这里我们选择使用桥接网络,然后根据具体情况进行CentOS的网络配置。
3、安装Samba。Samba安装在CentOS中,用以共享CentOS的目录。
4、映射共享目录。Source insight使用网络路径时,会出现一些莫名其妙的错误,因此我们最后将CentOS的共享目录映射为一个驱动器,如B盘。
安装XShell。XShell提供了丰富的界面交互功能,可以根据自己的爱好选择不同的主题元素,如字体、背景等。
既然使用了XShell,那么Virtualbox的终端界面就可以不要了,我们可以使用Virtualbox提供的管理工具将CentOS隐藏到后台运行。
posted @
2016-02-15 11:53 weigtcs 阅读(311) |
评论 (0) |
编辑 收藏
2015年7月29日
很多时候想使用字符串格式化输出,但是std::wstring偏偏没有提供这个方法。CString只存在于ATL/MFC,使用Win32平台没有CString可用,使用底层的spintf之类的函数,又时常担心buffer越界,写重复的越界检测之类的代码...所以这里把CString的Format方法搬了过来:
String.h
1 class String :
public std::wstring
2 {
3 public:
4 void Format(
const wchar_t* pszFormat,

);
5 protected:
6 void FormatV(
const wchar_t* pszFormat, va_list args);
7 int GetFormattedLength(
const wchar_t* pszFormat, va_list args);
8 int Format(wchar_t* pszBuffer, ULONG nLength,
const wchar_t* pszFormat, va_list args);
9 };
String.cpp
std::wstring StrFormat(
const wchar_t* pstrFormat,
)
{
WCHAR szBuffer[300] = { 0 };
va_list args;
va_start(args, pstrFormat);
::wvnsprintf(szBuffer, lengthof(szBuffer) - 2, pstrFormat, args);
wcscat_s(szBuffer, 300, L"\n");
va_end(args);
return szBuffer;
}
void String::Format(
const wchar_t* pszFormat,
)
{
va_list arglist;
va_start(arglist, pszFormat);
FormatV(pszFormat, arglist);
va_end(arglist);
}
int String::Format( wchar_t* pszBuffer, ULONG nLength,
const wchar_t* pszFormat, va_list args )
{
return vswprintf_s(pszBuffer, nLength, pszFormat, args);
}
void String::FormatV(
const wchar_t* pszFormat, va_list args )
{
if (pszFormat == NULL)
{
return;
}
ULONG nLength = GetFormattedLength(pszFormat, args);
wchar_t* pszBuffer =
new wchar_t[nLength + 1];
::ZeroMemory(pszBuffer, nLength + 1);
Format(pszBuffer, nLength + 1, pszFormat, args);
std::wstring::
operator=(std::wstring(pszBuffer));
delete []pszBuffer;
}
int String::GetFormattedLength(
const wchar_t* pszFormat, va_list args )
{
return _vscwprintf(pszFormat, args);
}
以上代码在VS2008编译通过。

posted @
2015-07-29 18:23 weigtcs 阅读(1356) |
评论 (0) |
编辑 收藏
2015年4月27日
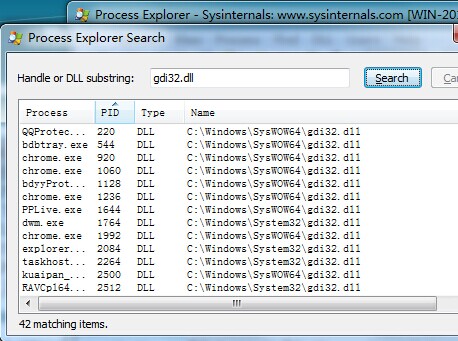
通过使用Sysinternals的procexp.exe工具提供的Process Explorer Search(菜单->Find->Find Handle or Dll或Ctrl+F)功能,我们可以看到某个文件正在被哪些进程使用。这个功能在你想删除某个文件,而系统提示“该文件正在被占用,不能删除”的时候非常有用。

posted @
2015-04-27 23:28 weigtcs 阅读(429) |
评论 (0) |
编辑 收藏
2015年3月19日
在使用Gdiplus的功能之前,要先进行初始化,对应的函数是Gdiplus::GdiplusStartup,在使用完Gdiplus的功能之后,要进行反初始化,对应的函数则是Gdiplus::GdiplusShutdown。
为了简化编程,这里实现了一个简单的Gdiplus初始化类,作为全局对象使用,类似于MFC的theApp对象。代码如下:
#pragma once
#include <GdiPlus.h>
class GdiPlusHelper
{
public:
GdiPlusHelper()
{
Gdiplus::GdiplusStartupInput gdiplusStartupInput;
Gdiplus::GdiplusStartup(&m_nGdiPlusToken, &gdiplusStartupInput, NULL);
}
~GdiPlusHelper()
{
Gdiplus::GdiplusShutdown(m_nGdiPlusToken);
}
ULONG_PTR m_nGdiPlusToken;
};

posted @
2015-03-19 15:14 weigtcs 阅读(289) |
评论 (0) |
编辑 收藏
2015年3月18日
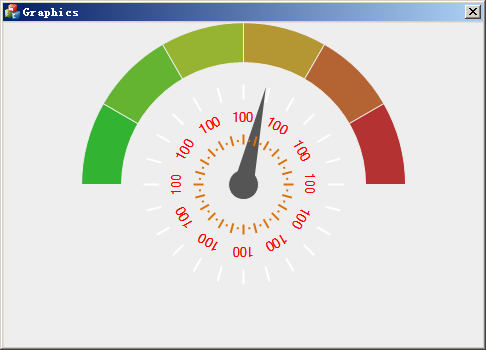
用Gdiplus::Matrix对图形进行简单的旋转,可以免除繁琐的数学计算。
这里主要用到了Gdiplus::Matrix::RotateAt和Gdiplus::Graphics::SetTransForm实现图形旋转。
1、类GdiPlus::Matrix的RotateAt方法,原型如下:
Status RotateAt( REAL angle,
const PointF ¢er,
MatrixOrder order
);
参数angle为需要旋转的角度,center为旋转的中心,order为旋转Matrix的顺序。order的取值有两个:Gdiplus::MatrixOrderPrepend和Gdiplus::MatrixOrderAppend,默认取值为Gdiplus::MatrixOrderPrepend。
2、类Gdiplus::Graphics的SetTransForm方法,原型如下:
Status SetTransform( const Matrix *matrix
);
参数matrix就是上面的Gdiplus::Matrix对象指针。
示例代码如下:
VOID Example_Rotate(HDC hdc)
{
Gdiplus::Graphics graphics(hdc);
Gdiplus::Pen pen(Color(255, 0, 0, 255));
Gdiplus::Matrix matrix;
Gdiplus::PonitF P(50, 50); // 旋转中心
matrix.RotateAt(100.0f, P); // 旋转100度
graphics.SetTransform(&matrix);
graphics.DrawEllipse(&pen, 0, 0, 100, 50);
}
效果展示:
参考资料:MSDN

posted @
2015-03-18 15:34 weigtcs 阅读(520) |
评论 (0) |
编辑 收藏
2015年1月11日
在开发图形界面(GUI)程序时,对于无句柄的图形控件的框架,在编写响应消息的代码时,可以采用虚函数的方法,在界面框架基类里面调用这些函数,而在子类重写这些虚函数,就可以得到消息的响应。但是,由于windows的消息众多,对应需要编写的虚函数就有很多,这样无疑加大了资源开销,效率也降低。而在MFC消息映射框架里,没有使用虚函数,而是使用了一大堆宏,减少了内存开销,提高了效率。本文提取了MFC消息映射框架,将窗口(CWnd)换成自己的图元(Element),实现了与MFC相同形式的消息映射。
在本代码中,Element是所有界面元素的基类,地位相当与MFC的CWnd。
消息响应函数类型定义的枚举:
enum ESig
{
ESig_end = 0,
// [marks end of message map]
ESig_b_D_v,
// BOOL (CDC*)
ESig_b_b_v,
// BOOL (BOOL)
ESig_b_u_v,
// BOOL (UINT)
ESig_b_h_v,
// BOOL (HANDLE)
ESig_b_W_uu,
// BOOL (CWnd*, UINT, UINT)
ESig_b_W_COPYDATASTRUCT,
// BOOL (CWnd*, COPYDATASTRUCT*)
ESig_b_v_HELPINFO,
// BOOL (LPHELPINFO);
ESig_CTLCOLOR,
// HBRUSH (CDC*, CWnd*, UINT)
ESig_CTLCOLOR_REFLECT,
// HBRUSH (CDC*, UINT)
ESig_i_u_W_u,
// int (UINT, CWnd*, UINT) // ?TOITEM
ESig_i_uu_v,
// int (UINT, UINT)
ESig_i_W_uu,
// int (CWnd*, UINT, UINT)
ESig_i_v_s,
// int (LPTSTR)
ESig_l_w_l,
// LRESULT (WPARAM, LPARAM)
ESig_l_uu_M,
// LRESULT (UINT, UINT, CMenu*)
ESig_v_b_h,
// void (BOOL, HANDLE)
ESig_v_h_v,
};
这里只列举了部分响应函数类型。
基类消息映射函数回调函数定义:
typedef void (Element::*pEMsgFun)(void);
消息映射入口结构体,各个域的含义与MFC类似。
struct EMsgMap_Entery
{
UINT nMessage;
UINT nCode;
UINT nID;
UINT nLastID;
UINT_PTR nSig;
pEMsgFun pfn;
};
消息映射列表结构体。
struct EMsgMap
{
const EMsgMap* (*pfnGetMessageMap)();
const EMsgMap_Entery* lpEnteries;
};
消息映射声明与定义。
#define BEGIN_EMSG_MAP(theClass)\
const EMsgMap* theClass::GetMessageMap() const\
{ return GetThisMessageMap(); }\
const EMsgMap* theClass::GetThisMessageMap()\
{\
typedef theClass ThisClass;\
static const EMsgMap_Entery _messageEntries[]=\
{
#define END_EMSG_MAP()\
{0, 0, 0, 0, ESig_end, (pEMsgFun)0}\
};\
static const EMsgMap messageMap=\
{ 0, &_messageEntries[0] };\
return &messageMap;\
\
}
部分已经实现的消息映射。
#define ON_EM_PAINT() \
{ WM_PAINT, 0, 0, 0, ESig_vv, \
(pEMsgFun) \
(static_cast< void (Element::*)(void) > ( &ThisClass :: OnPaint)) },
#define ON_EM_LBUTTONDOWN()\
{WM_LBUTTONDOWN, 0, 0, 0, ESig_vwp,\
(pEMsgFun)\
(static_cast<void(Element::*)(UINT, POINT)>(&ThisClass::OnLButtonDown))},
#define ON_EM_LBUTTONUP() \
{ WM_LBUTTONUP, 0, 0, 0, ESig_vwp, \
(pEMsgFun) \
(static_cast< void ( Element::*)(UINT, POINT) > ( &ThisClass :: OnLButtonUp)) },
#define ON_EM_MOUSEMOVE() \
{ WM_MOUSEMOVE, 0, 0, 0, ESig_vwp, \
(pEMsgFun) \
(static_cast< void ( Element::*)(UINT, POINT) > ( &ThisClass :: OnMouseMove)) },
#define ON_EM_MOUSELEAVE() \
{ WM_MOUSELEAVE, 0, 0, 0, ESig_vv, \
(pEMsgFun) \
(static_cast< void (Element::*)(void) > ( &ThisClass :: OnMouseLeave)) },
#define ON_EM_SIZE() \
{ WM_SIZE, 0, 0, 0, ESig_vwii, \
(pEMsgFun) \
(static_cast< void ( Element::*)(UINT, int, int) > ( &ThisClass :: OnSize)) },
#define efx_msg
消息处理过程函数,只实现了部分。
LRESULT Element::HandleMessage( UINT uMsg, WPARAM wParam, LPARAM lParam )
{
const EMsgMap* pMsgMap = GetMessageMap();
if (pMsgMap == NULL)
return false;
const EMsgMap_Entery* pEntry = pMsgMap->lpEnteries;
int i = 0;
while(pEntry[i].nSig != ESig_end)
{
if (pEntry[i].nMessage == uMsg)
{
switch(pEntry[i].nSig)
{
case ESig_vwp:
{
POINT pt;
pt.x = LOWORD(lParam);
pt.y = HIWORD(lParam);
(this->*(reinterpret_cast<void(Element::*)(UINT, POINT)>(pEntry[i].pfn)))((UINT)wParam, pt);
break;
}
case ESig_vv:
{
(this->*(reinterpret_cast<void(Element::*)()>(pEntry[i].pfn)))();
break;
}
case ESig_vwii:
{
(this->*(reinterpret_cast<void(Element::*)(UINT, int, int)>(pEntry[i].pfn)))((UINT)wParam, LOWORD(lParam), HIWORD(lParam));
break;
}
default:
;
}
}
i++;
}
return 1;
}
使用方法。
声明:
class Element
{
//
DECLARE_EMSG_MAP();
//
protected:
efx_msg
void OnPaint();
efx_msg
void OnMouseMove(UINT nFlag, POINT pt);
efx_msg
void OnMouseLeave();
efx_msg
void OnLButtonDown(UINT uFlag, POINT pt);
efx_msg
void OnLButtonUp(UINT uFlag, POINT pt);
//
};
实现:
BEGIN_EMSG_MAP(Element)
//{
ON_EM_PAINT()
ON_EM_MOUSEMOVE()
ON_EM_MOUSELEAVE()
ON_EM_LBUTTONDOWN()
ON_EM_LBUTTONUP()
//}
END_EMSG_MAP()
void Element::OnMouseMove( UINT nFlag, POINT pt )
{
TRACE(TEXT("%ld::Element::OnMouseMove"), this);
}
void Element::OnMouseLeave()
{
TRACE(TEXT("%ld::Element::OnMouseLeave"), this);
}
void Element::OnLButtonDown( UINT uFlag, POINT pt )
{
TRACE(TEXT("%ld::Element::OnLButtonDown"), this);
}
void Element::OnLButtonUp( UINT uFlag, POINT pt )
{
TRACE(TEXT("%ld::Element::OnLButtonUp"), this);
}
这样可以按照以上的思路,不断完善消息映射函数类型。
由于Element是无窗口的图元元素,没有系统的窗口消息的分发支持,所以要想真正实现这些功能,还需要一个图元管理器,用于度量的坐标,消息的分发等等。

posted @
2015-01-11 20:00 weigtcs 阅读(241) |
评论 (0) |
编辑 收藏