一、系统安装
目前centos官方只有32位的版本,64位还没有推出,下载地址:
http://mirror.centos.org/altarch/7/isos/armhfp/
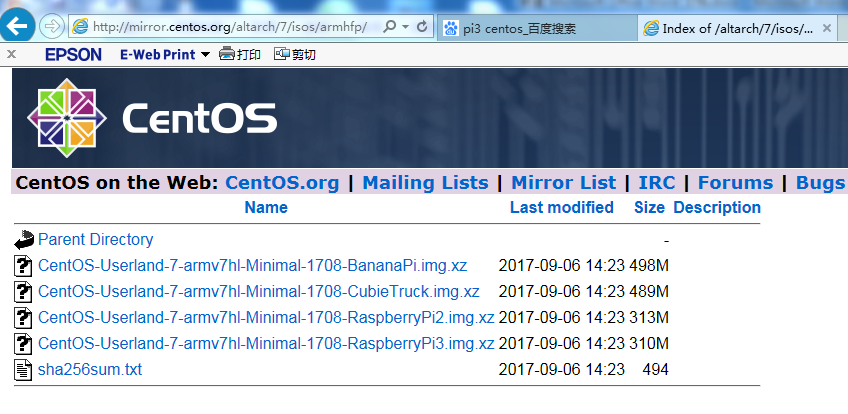
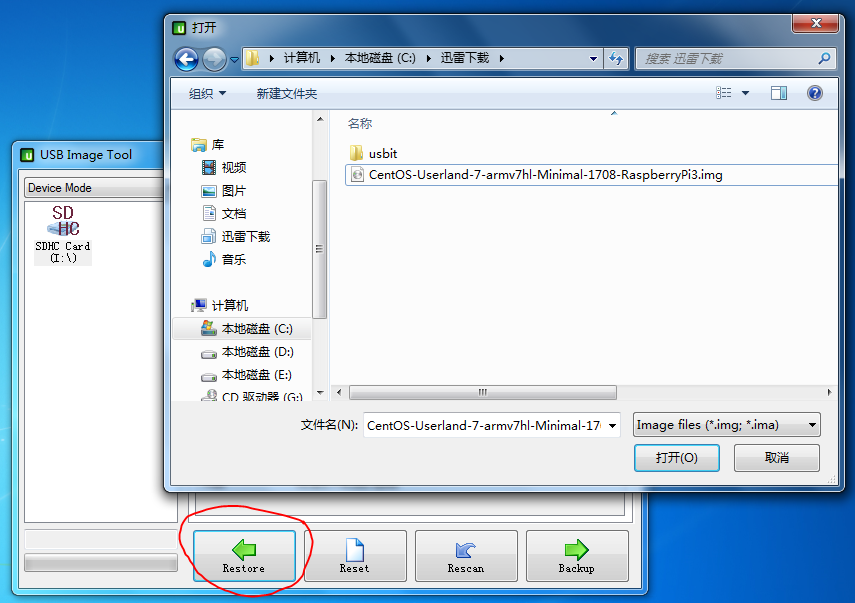
最新版本为CentOS Linux release 7.4.1708 (Core)。选择Pi3的版本,压缩包格式为XZ,下载后使用7-Zip解压。解压后为一个3GB 的img格式的映像文件,使用USB Image Tool软件,将文件写入TF卡中,至少为4GB。
打开软件后点击Restore,选择映像文件。
用tf卡启动机器,默认的root密码为centos。
二、系统配置
执行#/usr/bin/rootfs-expand,使用系统可以使用整个卡的空间。
关闭防火墙和selinux:
#systemctl disable firewalld
#vi /etc/selinux/config
SELINUX=disabled
修改主机名:
#vi /etc/hostname
创建缺失文件,使network服务正常启动:
#touch /etc/sysconfig/network
配置网卡地址,有线和无线网卡:
#cat ifcfg-eth0
TYPE=Ethernet
PROXY_METHOD=none
BROWSER_ONLY=no
DEFROUTE=yes
IPV4_FAILURE_FATAL=no
NAME=eth0
DEVICE=eth0
ONBOOT=yes
BOOTPROTO=static
IPADDR=192.168.4.2
GATEWAY=192.168.4.1
NETMASK=255.255.255.0
#vi ifcfg-wlan0
DEVICE=wlan0
NAME=wlan0
TYPE=Ethernet
ONBOOT=yes
NM_CONTROLLED=no
BOOTPROTO=static
IPADDR=192.168.5.1
NETMASK=255.255.255.0
配置DNS服务器地址:
[root@rpi3 etc]# cat resolv.conf
# Generated by NetworkManager
nameserver 192.168.4.1
设置地区和时区,时间同步:
[root@rpi3 etc]#localectl set-locale LANG=zh_CN.UTF-8
[root@rpi3 etc]#ln -sf /usr/share/zoneinfo/Asia/Shanghai /etc/localtime
systemctl disable NetworkManager
systemctl disable kdump 当前内核不支持
#yum update
#reboot
三、配置网络打印机
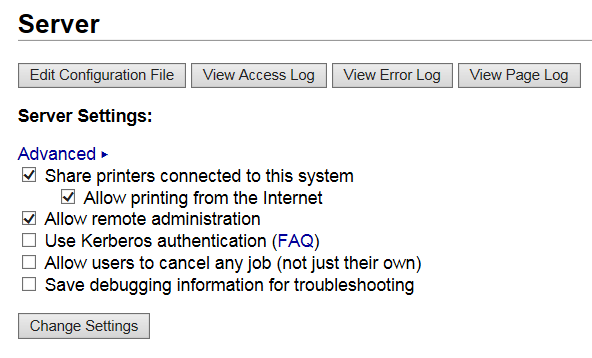
安装cups软件,共享打印机:
#yum install cups
发现https无法访问,则需要安装openssl。
#yum install openssl
修改配置文件:
vi /etc/cups/cupsd.conf
#Listen localhost:631
Port 631
在/,/admin和/admin/conf下添加:
Allow From 192.168.4.0/24 或
Allow all
用浏览器打开进行配置:https://192.168.4.2:631/admin
选中共享打印机和Internet打印。
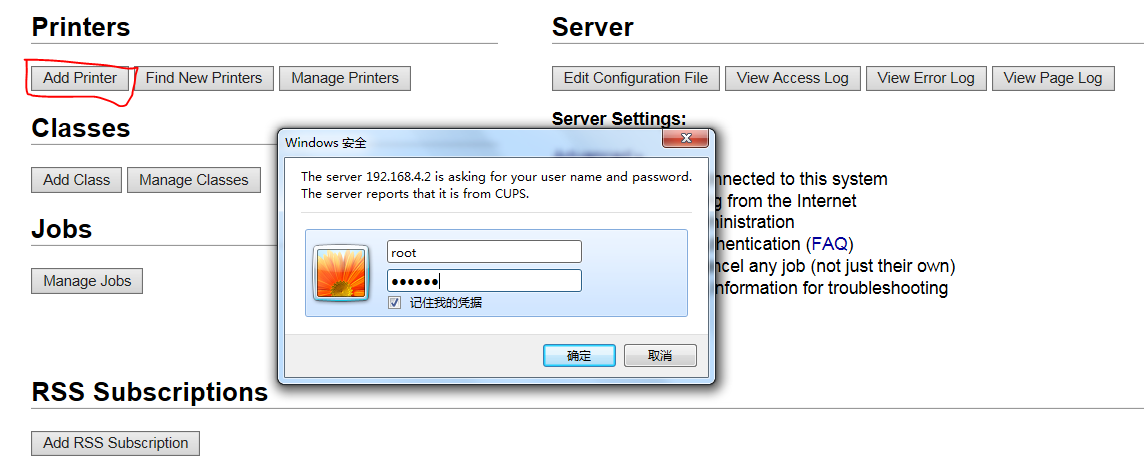
输入root用户名和密码,
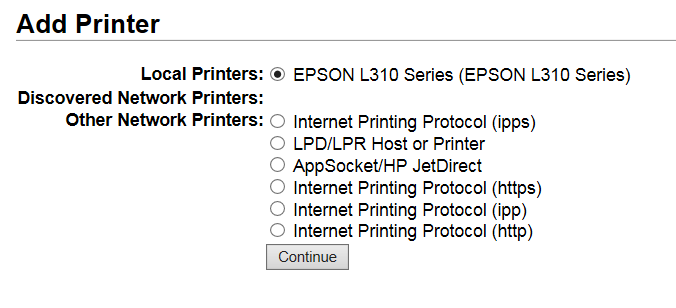
继续,
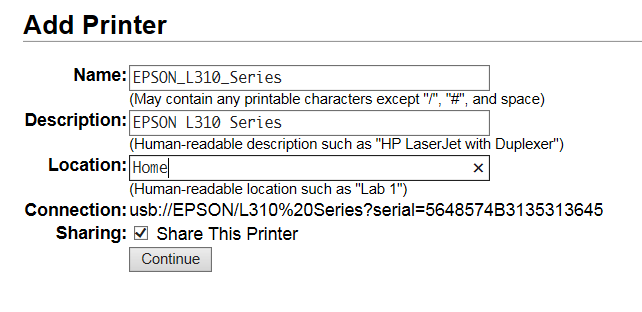
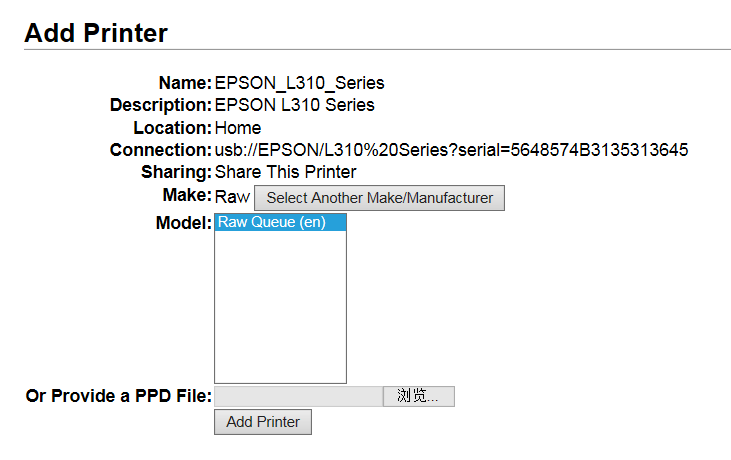
继续,由于仅仅通过网络进行打印,Make选择Raw,客户端需要自行安装打印机的驱动程序。
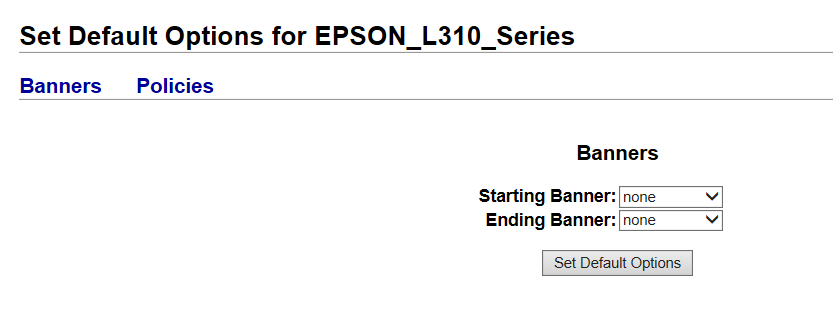
点击“Add Printer”,下一页会提供默认选项,这个不需设置:
打印机配置文件,存放在/etc/cups/printers.conf 中,可备份。
可以在Windows客户端使用
http://192.168.4.2:631/printers/EPSON_L310_Series
添加网络打印机。
四、配置随身WIFI:
#yum install hostapd-2.5-5.fc25.armv7hl.rpm
#yum install dnsmasq
然后在/etc/dnsmasq.conf末加入(自己修改IP和网段,这个文件是已存在的,很详细的配置文件,但是所有行都加入了#号注释掉)
interface=wlan0
dhcp-range=192.168.5.50,192.168.5.150,12h
修改hostapd配置:
#cd /etc/hostapd
#mv hostapd.conf hostapd.conf.bak
#cp /usr/share/doc/hostapd/hostapd.conf ./
#vi hostapd.conf
driver=nl80211
ssid=rpi3-ap
channel=11
auth_algs=1
wpa=2
wpa_passphrase=wifi_mimaXXXX
wpa_key_mgmt=WPA-PSK
rsn_pairwise=CCMP
开启IP包转发:
#cat /proc/sys/net/ipv4/ip_forward
#echo "net.ipv4.ip_forward = 1" >>/usr/lib/sysctl.d/50-default.conf
# sysctl -p ###如不生效重启一下OS
开启内核防火墙转发:
yum install iptables-services
systemctl enable iptables
iptables -t nat -A POSTROUTING -o eth0 -j MASQUERADE
iptables -A FORWARD -i eth0 -o wlan0 -m state --state RELATED,ESTABLISHED -j ACCEPT
iptables -A FORWARD -i wlan0 -o eth0 -j ACCEPT
iptables-save > /etc/sysconfig/iptables
systemctl start iptables
iptables --list
开启服务:
systemctl enable hostapd
systemctl enable dnsmasq
reboot
五、配置ftp,samba
#yum install samba
vi /etc/security/limits.conf
添加行: * - nofile 16384
cd /etc/samba
cp -a smb.conf smb.conf.bak
cat smb.conf.example | grep -v '^#' | grep -v '^$' > smb.conf
vi smb.conf
printcap name = /etc/printcap
虚拟用户配置:
在全局下写入username map = /etc/samba/usermap这条参数
echo 'root = administrator admin' >> usermap
[share]
comment = Share Directories
path = /mnt/share
public = no
writable = yes
valid users = root
# smbpasswd -a root 设置密码即可从windows访问共享。
配置vs-ftp
yum install vsftpd
创建虚拟用户:
[root@rpi3 vsftpd]# cat v_ftpuser.txt
ftpuser
123456
#db_load -T -t hash -f /etc/vsftpd/v_ftpuser.txt v_ftpuser.db
chmod 700 v_ftpuser.db
配置PAM认证文件,/etc/pam.d/vsftpd行首加入如下两行(注释其他行):
auth required pam_userdb.so db=/etc/vsftpd/v_ftpuser
account required pam_userdb.so db=/etc/vsftpd/v_ftpuser
创建虚拟用户的权限和根目录:
#mkdir v_user_conf
#cd v_user_conf
[root@rpi3 v_user_conf]# cat ftpuser
local_root=/mnt/share
write_enable=YES
anon_world_readable_only=YES
anon_upload_enable=YES
anon_mkdir_write_enable=YES
anon_other_write_enable=YES
修改vsftp配置文件:
[root@rpi3 vsftpd]# cat vsftpd.conf | grep -v '#'
anonymous_enable=NO
local_enable=YES
write_enable=YES
local_umask=022
dirmessage_enable=YES
xferlog_enable=YES
connect_from_port_20=YES
xferlog_std_format=YES
ftpd_banner=Welcome to blah FTP service.
chroot_local_user=YES
allow_writeable_chroot=YES
listen=YES
listen_ipv6=NO
pam_service_name=vsftpd
userlist_enable=NO
userlist_file=/etc/vsftpd/user_list
tcp_wrappers=YES
guest_enable=YES
guest_username=root
user_config_dir=/etc/vsftpd/v_user_conf
virtual_use_local_privs=YES
pasv_enable=YES
pasv_min_port=60000
pasv_max_port=60100
其他文件:
[root@rpi3 vsftpd]# cat ftpusers
# Users that are not allowed to login via ftp
#root
bin
daemon
adm
lp
sync
shutdown
halt
mail
news
uucp
operator
games
nobody
[root@rpi3 vsftpd]# cat user_list
# vsftpd userlist
# If userlist_deny=NO, only allow users in this file
# If userlist_deny=YES (default), never allow users in this file, and
# do not even prompt for a password.
# Note that the default vsftpd pam config also checks /etc/vsftpd/ftpusers
# for users that are denied.
root
#bin
#daemon
#adm
#lp
#sync
#shutdown
#halt
#mail
#news
#uucp
#operator
#games
#nobody
六、配置Nginx和PHP
安装nginx:
#yum install nginx-1.10.1-1.fc25.armv7hl.rpm nginx-filesystem-1.10.1-1.fc25.noarch.rpm nginx-mimetypes-2.1.47-1.fc25.noarch.rpm
#systemctl enable nginx
#systemctl start nginx
#cd /etc/nginx
#cp -a nginx.conf nginx.conf.bak
#vi nginx.conf
location ~ \.php$ {
root /usr/share/nginx/html;
fastcgi_pass 127.0.0.1:9000;
fastcgi_index index.php;
fastcgi_param SCRIPT_FILENAME $document_root$fastcgi_script_name;
include fastcgi_params;
}
安装PHP插件:
yum install php-fpm php php-mbstring
systemctl start php-fpm
systemctl enable php-fpm
安装MYSQL插件:
使用MySQL Native Driver,替代 MySQL (Original) — Original MySQL API
yum remove php-mysql
yum install php-mysqlnd
默认的WEB网站目录:
/usr/share/nginx/html
php-fpm 默认采用tcp的协议,对于负载较小的网站,也可以采用unix socket方式,需要修改/etc/php-fpm.d/www.conf,
将listen = 127.0.0.1:9000改为
listen = /var/run/php-fpm.sock
同时,nginx.conf也要讲将
fastcgi_pass 127.0.0.1:9000; 改为:
fastcgi_pass unix:/var/run/php-fpm.sock;
七、配置MariaDB数据库
#yum install mariadb mariadb-server
#systemctl enable mariadb
#systemctl start mariadb
MariaDB的相关简单配置
#mysql_secure_installation
首先是设置密码,会提示先输入密码
Enter current password for root (enter for none):<–初次运行直接回车
设置密码
Set root password? [Y/n] <– 是否设置root用户密码,输入y并回车或直接回车
New password: <– 设置root用户的密码
Re-enter new password: <– 再输入一次你设置的密码
其他配置回车即可。
#mysql -u root -p 测试。
直接创建用户并授权的命令
mysql>grant all privileges on *.* to username@localhost indentified by 'password';
授予外网登陆权限
mysql>grant all privileges on *.* to username@'%' identified by 'password';
授予权限并且可以授权
mysql>grant all privileges on *.* to username@'hostname' identified by 'password' with grant option;
create user 'test'@'%' identified by '123456';
mysql -u root -p 登陆root帐号:
create user dbuser@localhost identified by 'db123';
create user dbuser@% identified by 'db123';
grant all privileges on *.* to dbuser@'%' identified by 'db123';
grant all privileges on *.* to dbuser@localhost identified by 'db123';
show grants for 'dbuser'@'%';
create database mydb;
create table person(id int not null, name varchar(30), constraint pk__person primary key(id));
insert into person values(2,'coco');
测试PHP访问数据库:
使用mysqli有面向过程和面向对象两种方式。
[root@rpi3 test]# cat mysqli.php
<?php
$db_host = 'localhost';
$db_name = 'mydb';
$db_user = 'dbuser';
$db_pwd = 'db123';
//use object style
$mysqli = new mysqli($db_host, $db_user, $db_pwd, $db_name);
if ($mysqli->connect_errno) {
echo "Sorry, this website is experiencing problems.";
echo "Error: Failed to make a MySQL connection, here is why: \n";
echo "Errno: " . $mysqli->connect_errno . "\n";
echo "Error: " . $mysqli->connect_error . "\n";
exit;
}
$mysqli->set_charset("utf8");
//或者 $mysqli->query("set names 'utf8'")
// Perform an SQL query
$sql = "SELECT * FROM person";
if (!$result = $mysqli->query($sql)) {
echo "Sorry, the website is experiencing problems.";
echo "Query: " . $sql . "\n";
echo "Errno: " . $mysqli->errno . "\n";
echo "Error: " . $mysqli->error . "\n";
exit;
}
if ($result->num_rows === 0) {
echo "We could not find a result ";
}
$actor = $result->fetch_assoc();
echo "Sometimes I see " . $actor['id'] . " " . $actor['name'] . " .";
// Now, let's fetch five random actors and output their names to a list.
$sql = "SELECT id, name FROM person ORDER BY rand() LIMIT 5";
if (!$result = $mysqli->query($sql)) {
echo "Sorry, the website is experiencing problems.";
exit;
}
// Print our 5 random actors in a list, and link to each actor
echo "<ul>\n";
while ($actor = $result->fetch_assoc()) {
echo "<li><a href='" . $_SERVER['SCRIPT_FILENAME'] . "?aid=" . $actor['id'] . "'>\n";
echo $actor['name'] ;
echo "</a></li>\n";
}
echo "</ul>\n";
// The script will automatically free the result and close the MySQL
// connection when it exits, but let's just do it anyways
$result->free();
$mysqli->close();
//The old style:
$mysqli = mysqli_connect($db_host, $db_user, $db_pwd, $db_name);
if(!$mysqli ){
echo mysqli_connect_error();
exit;
}
echo "Connect Database Success! \n";
mysqli_close($mysqli);
?>
参考:
https://segmentfault.com/a/1190000003841357
端口触发,即外网计算机WAN1想访问内网某台机器LAN1的各种服务(端口范围),需要内网LAN1服务器先访问外网WAN1机器的触发端口提供的服务。之后,外网的WAN1就可以访问内网LAN1上的服务了。