Onway

我是一只菜菜菜菜鸟...
posts - 61, comments - 56, trackbacks - 0, articles - 34

2017年2月11日

一,matplotlib是什么

python中用于数据库可视化的2D绘图库。


二,安装

http://matplotlib.org/users/installing.html


三,交互模式与非交互模式

1,非交互模式

python shell里面执行

import matplotlib.pyplot as plt
plt.plot([12])
plt.show()

执行show之后会打开一个GUI窗口显示,同时交互命令会阻塞。


2,交互模式

matplotlib.is_interactive()可以查看当前是否在交互模式;

matplotlib.pyplot.ion()用于打开交互模式;

matplotlib.pyplot.ioff()用于关闭交互模式;

import matplotlib.pyplot as plt
plt.ion()
plt.plot([12])

执行plot之后打开了一个GUI窗口,交互命令没有阻塞,继续执行:

plt.plot([23])

可以看到在窗口里面再画了一条线。

也就是在非交互模式,需要一次画好再调用show显示;而交互模式在每次绘制后都能实时看到效果。


3,ipython的magic command 

在ipython的%matplotlib也可以打开交互模式。

在交互模式中如果某些修改没有自动刷新,可以调用matplotlib.pyplot.draw()刷新。


四,在jupyter notebook中使用matplotlib

1,%matplotlib

以交互模式打开独立的GUI窗口,对同一个figure的绘制都自动刷新到对应的GUI窗口。


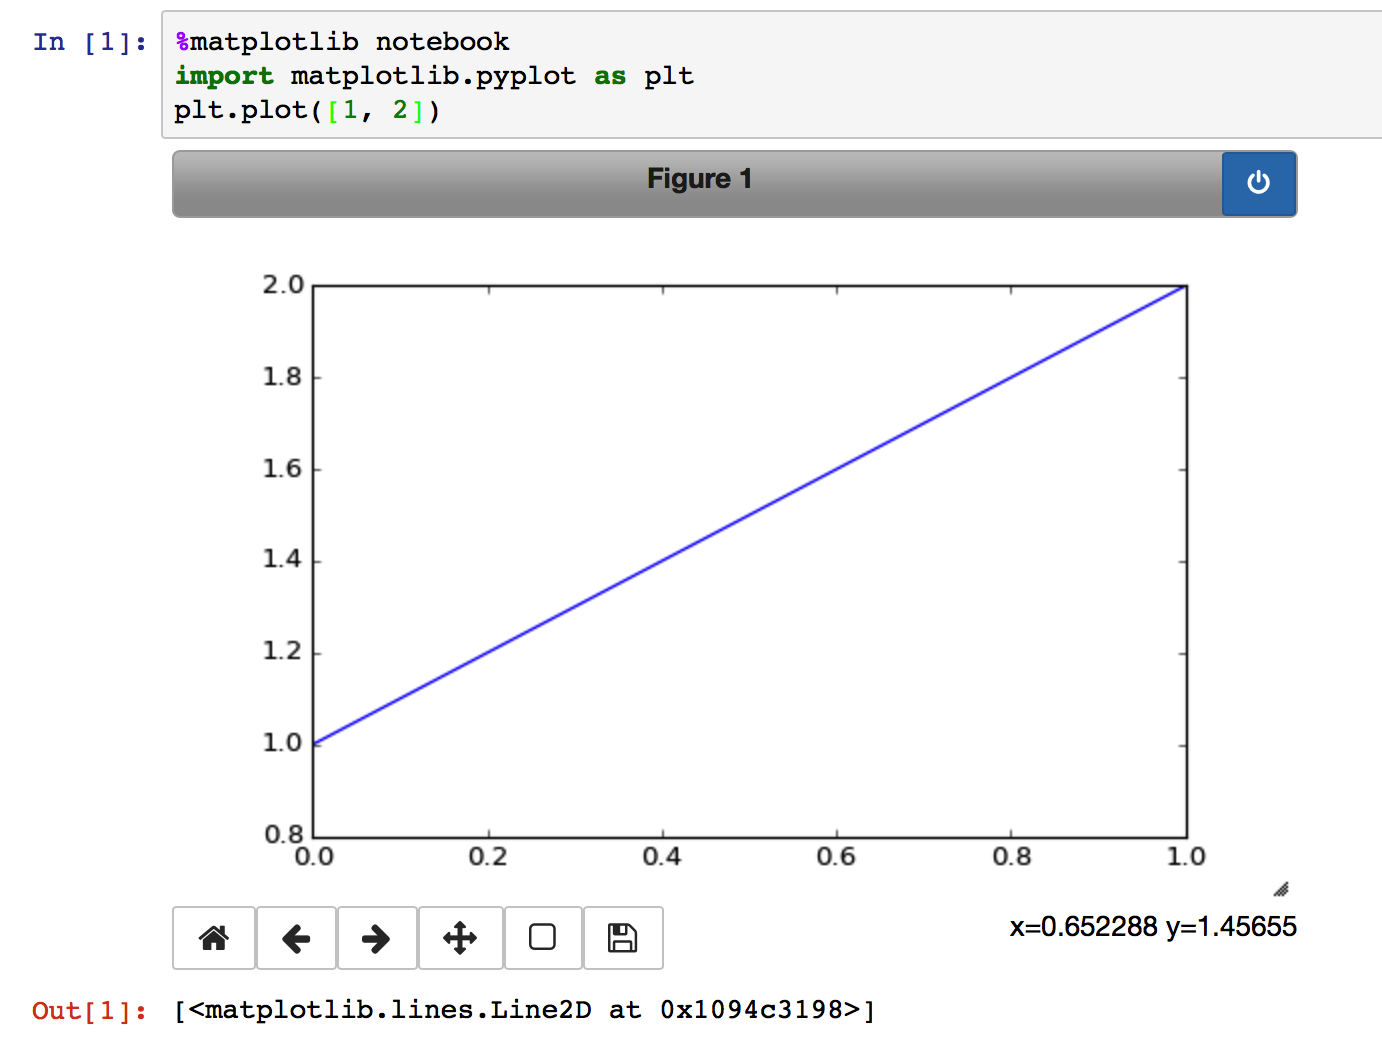
2,%matplotlib notebook

同%matplotlib,只是会将GUI窗口嵌入到cell的输出。


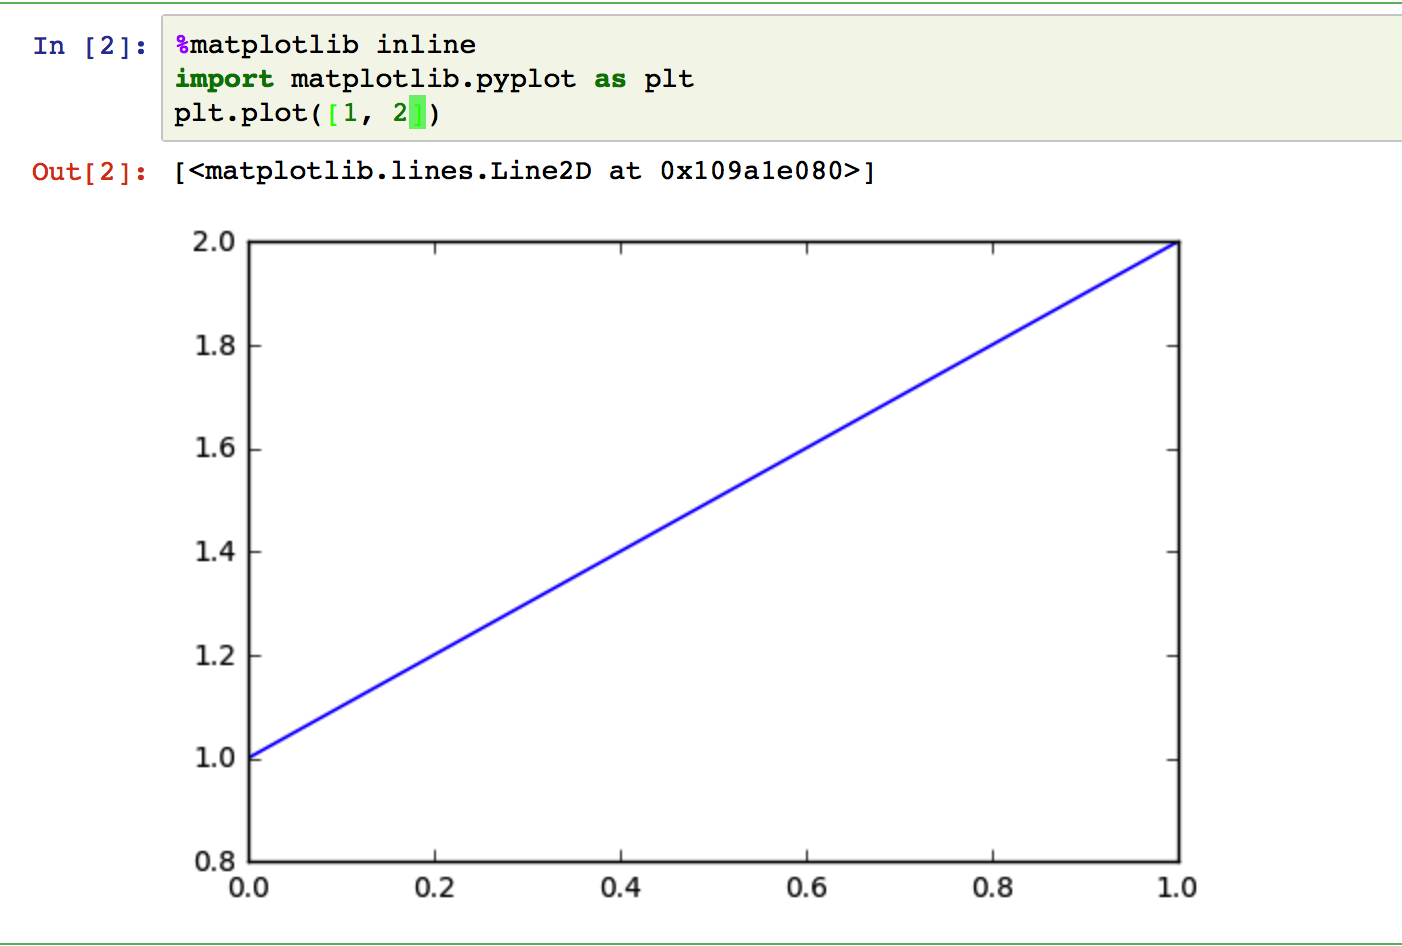
3,%matplotlib inline

将绘制的图转换为静态图片嵌入到cell的输出。在不同的cell进行绘制效果不会叠加。


五,figure的各个组成部分

http://matplotlib.org/faq/usage_faq.html#parts-of-a-figure


六,matplotlib的两种绘图接口

1matlab风格接口

所有的plt命令都会应用到自动创建的当前figureaxes对象。使用plt.gcfplt.gca获取当前figureaxes

调用plt.plot([1, 2])即绘制到自动创建的figureaxes

plt.plot([12])
plt.plot([21])


2,面向对象接口

显式获得绘制对象,在特定对象执行相应操作。

fig, ax = plt.subplots()
ax.plot([12])
ax.plot([21])


3,差别

对于简单绘制两种接口的差别不大,复杂情况面向对象接口会更合适。

另外plt的很多函数都可以直接转为ax的函数,例如plt.plot() -> ax.plot(),但某些会有差别,例如plt.xlabel() -> ax.set_xlabel()


七,各类图形demo

http://matplotlib.org/gallery.html


八,API

http://matplotlib.org/api/index.html


参考:

1http://matplotlib.org/index.html#

2http://matplotlib.org/faq/usage_faq.html#what-is-interactive-mode

3http://jupyter.org

4http://www.labri.fr/perso/nrougier/teaching/matplotlib/#introduction

5http://nbviewer.jupyter.org/github/jakevdp/PythonDataScienceHandbook/blob/master/notebooks/04.00-Introduction-To-Matplotlib.ipynb#Two-Interfaces-for-the-Price-of-One

posted @ 2017-02-11 15:12 Onway 阅读(1600) | 评论 (0)编辑 收藏

2016年2月15日

一晃N年过去了。

windows的有道词典都不知道升级到哪个版本了。
linux的有道词典官方版本也出来了。
goldendict已经1.5版本了。

博客上几个月前居然还有一条关于这个东西的评论。
将代码找回来试了一下居然还能跑,有道的api和xml格式还是真是稳定啊。

简单修改了一下install脚本,重写了README,收到github了:
原1.3版本:

posted @ 2016-02-15 19:57 Onway 阅读(1939) | 评论 (2)编辑 收藏

2016年2月12日

背景
前段时间在digitalocean租了vps搭建shadowsocks,简单看了一下socks5协议,决定自己也造一个小轮子玩玩。
春节在家整理了一下代码,大神轻拍。
功能
代码是c++,在linux基于perfork+select实现的,目前的功能有:
  • TCP代理
  • 远程DNS
  • 用户验证
  • 数据加密

过程
开发调试的过程发现两点比较有意思:
  1. 偶尔会收到RST的数据包,查看代码日志,用tcpdump在两端抓包并无发现异常
  2. 访问某些网站总是会收到RST数据包造成无法访问
对上述第二点加入了非常简单的数据加密后就解决了哈,shadowsocks的加密应该就是这么用的吧。

缺陷
功能上没有支持UDP,ie和chrome浏览器似乎都不支持socks5,只能先用着firefox了。
在windows也用c#做了一个客户端,但无暇顾及已经好久没更新了。

其他
可能跟所用宽带有关,访问digitalocean的时延超过300ms,网站只能打开首页,登录页面都加载不全,慎用。
前些天收到邮件说是vps出现流量异常被关闭了,还无法登录管理页面,用lantern也一直连不上。(T_T)

posted @ 2016-02-12 17:50 Onway 阅读(2042) | 评论 (0)编辑 收藏

2015年12月8日

1, 三个标准
1.1, ISO C标准由ISO/IEC维护开发
最新版本是C11,共有29个标准头文件。

1.2, POSIX是一系列由IEEE制定的标准
POSIX包括ISO C标准库函数。
POSIX标准的1988版本是IEEE 1003.1-1988,经过修改后作为IEEE Std.1003.1-1990提交ISO,成为国际标准ISO/IEC 9945-1:1990,该标准通常称为POSIX.1。
当前最新版本是POSIX.1-2008,由IEEE和Open Group共同开发。

1.3, SUS是POSIX的超集,其系统接口全集称为XSI
The core specifications of the SUS are developed and maintained by the Austin Group, which is a joint working group of IEEE, ISO JTC 1 SC22 and The Open Group.
只有遵循XSI的实现才能称为UNIX系统。
当前的最新版本是SUSv4。

1.4, 找到一些网址
C11
http://www.iso.org/iso/home/store/catalogue_tc/catalogue_detail.htm?csnumber=57853

POSIX.1-2008
http://pubs.opengroup.org/onlinepubs/9699919799/
https://standards.ieee.org/findstds/standard/1003.1-2008.html

SUSv4
https://www2.opengroup.org/ogsys/jsp/publications/PublicationDetails.jsp?publicationid=12310
https://en.wikipedia.org/wiki/Single_UNIX_Specification#cite_note-11

2, 限制
2.1 两种限制
编译时限制和运行时限制。
编译时限制通过头文件获取;
不与文件或目录相关的运行时限制通过sysconf函数获取;
与文件或目录相关的运行时限制通过pathconf和fpathconf函数获取。

2.2 ISO C限制
都是编译时限制,主要定义在<limits.h>里面。
http://en.cppreference.com/w/c/types/limits

2.3 POSIX限制和XSI限制
书中列出的都是实现中必须支持的各种最小值,特定系统实际支持的限制值需要通过头文件或者三个函数函数获取。
三个函数的name参数是限制名前面加_SC_或者_PC_前缀得到。
http://pubs.opengroup.org/onlinepubs/9699919799/basedefs/limits.h.html

2.4 书中代码
/*
 * If  name  is  invalid, -1 is returned, and errno is set to EINVAL.
 * Otherwise, the value returned is the value of the system resource and errno is not changed.
 * In the case of options, a positive value is returned if a queried option is available, and -1 if it is not.
 * In the case of limits, -1 means that there is no definite limit.
*/

#include 
"apue.h"
#include 
<errno.h>
#include 
<limits.h>

#ifdef OPEN_MAX
static long openmax = OPEN_MAX;
#else
static long openmax = 0;
#endif

/*
 * If OPEN_MAX is indeterminate, we're not
 * guaranteed that this is adequate
 
*/
#define OPEN_MAX_GUESS 256

long
open_max(
void)
{
    
if (openmax == 0) { /* first time through */
        errno 
= 0;
        
if ((openmax = sysconf(_SC_OPEN_MAX)) < 0) {
            
if (errno == 0)
                openmax 
= OPEN_MAX_GUESS; /* it's indeterminate */
            
else
                err_sys(
"sysconf error for _SC_OPEN_MAX";)
        }
    }

    
return(openmax);
}

3, 选项
3.1, 选项确定方式
编译时选项定义在<unistd.h>中;
与文件或目录无关的选项用sysconf确定;
与文件或目录有关的选项用pathconf或者fpathconf确定;
http://pubs.opengroup.org/onlinepubs/9699919799/basedefs/unistd.h.html

3.2, 选项确定流程
如果符号常量未定义,
对_POSIX前缀的选项,将_POSIX前缀替换为_SC或_PC前缀,
对_XOPEN前缀的选项,在_XOPEN前面加上_SC或_PC前缀,
然后调用sysconf, pathconf或fpathconf函数。
如果符号常量已经定义,则有三种可能:
值为-1,不支持相应的选项;
值大于0,支持相应的选项;
值为0,需调用函数确定选项是否支持。
注:某些系统可能出现定义了符号常量,但没有定义值的情况。

3.4, 代码示例
先占坑。

4, 功能测试宏
Feature test macros allow the programmer to control the definitions that are exposed by system header files when a program is compiled.
NOTE:  In  order  to be effective, a feature test macro must be defined before including any header files.  This can be done either in the compilation command (cc -DMACRO=value) or by defining the macro within the source code before including any headers.
see man page feature_test_macros(7).

posted @ 2015-12-08 22:35 Onway 阅读(402) | 评论 (0)编辑 收藏

2015年12月6日

1, shadowsocks home page
https://shadowsocks.org/en/index.html

2, install shadowsocks server
$ sudo apt-get install python-pip
$ sudo pip install shadowsocks
https://shadowsocks.org/en/download/servers.html

3, shadowsocks server config file
$ vi /etc/shadowsocks.json
{
    "server":"my_server_ip",
    "server_port":8388,
    "local_port":1080,
    "password":"barfoo!",
    "timeout":600,
    "method":"table"
}
https://shadowsocks.org/en/config/quick-guide.html

4, shadowsocks server command
$ ssserver -h // help message
$ ssserver -c /etc/shadowsocks.json -d start // start in daemon mode
$ ssserver -d stop // stop the server

5, shadowsocks-qt5 client for ubuntu 14.04
$ sudo add-apt-repository ppa:hzwhuang/ss-qt5
$ sudo apt-get update
$ sudo apt-get install shadowsocks-qt5
https://github.com/shadowsocks/shadowsocks-qt5/wiki/Installation

6, install genpac to generate PAC file from gfwlist
$ sudo pip install genpac // install
$ genpac --init // generate config.ini and user-rules.txt
-- modify config.ini
$ vi config.ini
[config]
proxy = SOCKS5 127.0.0.1:1080
gfwlist-url = https://raw.githubusercontent.com/gfwlist/gfwlist/master/gfwlist.txt
user-rule-from = /path/to/user-rules.txt
output = /path/to/proxy.pac
$ genpac -c config.ini // generate pac file
https://github.com/JinnLynn/genpac
https://github.com/gfwlist/gfwlist

7, using a PAC file in Firefox
about:preferences#advanced -> Network -> Settings
check 'Automatic proxy configuration URL:'
file:///path/to/proxy.pac
enable 'Remote DNS'
https://www.youtube.com/watch?v=nKB4FoPw15k

posted @ 2015-12-06 17:18 Onway 阅读(233) | 评论 (0)编辑 收藏

2015年8月1日

     摘要: 1,最先学会的是,继承了IEnumerable接口的类都可以使用foreach遍历,但一直没有多想。2,IEnumerable和IEnumerable<out T>的定义:Code highlighting produced by Actipro CodeHighlighter (freeware)http://www.CodeHighlighter.com/-->  &nb...  阅读全文

posted @ 2015-08-01 14:00 Onway 阅读(521) | 评论 (1)编辑 收藏

2015年7月29日

1,两个链接里面已经解析完Dispose模式了,其他的只是自己的一些理解。

2,如果自定义类型封装了非托管资源,或者引用了一个封装了非托管资源的对象时(比如引用了SqlConnection对象),应该实现Dispose模式。

3,如果自定义类型继承的基类需要Dispose,但该对象本身并没有需要Dispose的资源时(比如只是附加了一些简单类型),无需考虑Dispose模式。

4,如果基类实现了Dispose,则其派生类只需重写protected级别的Dispose方法,释放本类型的使用到的资源。
public级别的Dispose和Finalize方法都来自继承。
重写的Dispose方法,记得最后调用基类带参的Dispose。

5,附加的Close方法都是直接调用public无参的Dispose方法。

6,类型的析构函数会被编译器改为Finalize方法,不要重载这个方法。
基类的Finalize方法总是会被自动调用的。
Finalize方法都不应该引用任何对象。

7,不懂这段话,既然基类没有需要释放的资源,为何要实现Dispose模式,而为了性能考虑,又不写析构函数?
那我的派生类,还要先看一下基类,再决定要不要写析构函数?
Implement the dispose design pattern on a base type that commonly has derived types that hold onto resources, even if the base type does not. If the base type has a Close method, often this indicates the need to implement Dispose. In such cases, do not implement a Finalize method on the base type. Finalize should be implemented in any derived types that introduce resources that require cleanup.

8,对象在调用Dispose之后,除了Dispose以外,都应该抛出ObjectDisposedException异常。

9,实现了Finalize的对象,在第一次垃圾回收的时候,不会释放对象,而只是调用其Finalize方法,第二次回收才会真正释放对象。

posted @ 2015-07-29 22:50 Onway 阅读(670) | 评论 (0)编辑 收藏

因为某些原因,一直用的都是.NET2,但渣也总得有些追求是不,说不定哪天就用上了呢?

using System;
using System.Collections.Generic;
using System.Text;

namespace ConsoleApplicationTest
{
    /*
     * 变体泛型
     *
     * .NET4,在泛型接口类型或者泛型委托类型里面,
     * 被关键字in声明的泛型参数,其类型可以从父类向子类逆变,只能用作输入参数
     * 被关键字out声明的泛型参数,其类型可以从子类向父类协变,只能用于返回值
     * 整个泛型类型是不限于用作输入参数还是作为返回值
     *
     * interface IType_IN_OUT<in T1, out T2>
     * IType_IN_OUT<Farmer, Person> farmerPersonType = null;
     * IType_IN_OUT<Person, Farmer> personfarmerType = null;
     * farmerPersonFinder = personFarmerFinder;
     *
     * 为什么不支持“变体”class呢?跟字段有关系么?
     
*/

    class Program
    {
        static void Main(string[] args)
        {
            IType_IN<Person> person_in = null;
            IType_IN<Farmer> farmer_in = null;
            farmer_in = person_in;
            Greeting(person_in);
            Console.WriteLine(GetTypeIn() == null);

            IType_OUT<Person> person_out = null;
            IType_OUT<Farmer> farmer_out = null;
            person_out = farmer_out;
            Greeting(farmer_out);
            Console.WriteLine(GetTypeOut() == null);

            Finder_IN<Person> personFinderIn = p => Console.WriteLine(p.GetType());
            Finder_IN<Farmer> farmerFinderIn = f => Console.WriteLine(f.GetType());
            farmerFinderIn = personFinderIn;
            Greeting(personFinderIn);
            Console.WriteLine(GetFarmerFinder().GetType());

            Finder_OUT<Person> personFinderOut = () => new Person();
            Finder_OUT<Farmer> farmerFinderOut = () => new Farmer();
            personFinderOut = farmerFinderOut;
            Greeting(personFinderOut);
            Console.WriteLine(GetPersonFinder().GetType());

            Finder_IN_OUT<Farmer, Person> farmerPersonFinder = f => new Person();
            Finder_IN_OUT<Person, Farmer> personFarmerFinder = p => new Farmer();
            farmerPersonFinder = personFarmerFinder;

            // interface IType_IN_OUT<in T1, out T2>
            IType_IN_OUT<Farmer, Person> farmerPersonType = null;
            IType_IN_OUT<Person, Farmer> personfarmerType = null;
            farmerPersonType = personfarmerType;

            Console.ReadKey();
        }

        static void Greeting(IType_OUT<Person> person)
        {
            Console.WriteLine(person == null);
        }

        static void Greeting(IType_IN<Farmer> farmer)
        {
            Console.WriteLine(farmer == null);
        }

        static IType_OUT<Person> GetTypeOut()
        {
            IType_OUT<Farmer> farmer = null;
            return farmer;
        }

        static IType_IN<Farmer> GetTypeIn()
        {
            IType_IN<Person> person_IN = null;
            return person_IN;
        }

        static void Greeting(Finder_OUT<Person> personFinder)
        {
            Console.WriteLine(personFinder().GetType());
        }

        static void Greeting(Finder_IN<Farmer> farmerFinder)
        {
            Console.WriteLine(farmerFinder.GetType());
        }

        static Finder_OUT<Person> GetPersonFinder()
        {
            Finder_OUT<Farmer> farmerFinder = () => new Farmer();
            return farmerFinder;
        }

        static Finder_IN<Farmer> GetFarmerFinder()
        {
            Finder_IN<Person> person = p => Console.WriteLine(p.GetType());
            return person;
        }
    }

    interface IType_OUT<out T>
    {
    }

    interface IType_IN<in T>
    {
    }

    interface IType_IN_OUT<in T1, out T2>
    {
    }

    delegate T Finder_OUT<out T>();

    delegate void Finder_IN<in T>(T t);

    delegate T2 Finder_IN_OUT<in T1, out T2>(T1 t1);

    class Person
    {
    }

    class Farmer : Person
    {
    }
}

posted @ 2015-07-29 20:23 Onway 阅读(343) | 评论 (0)编辑 收藏

2015年7月19日

需求:
地图上Grid对象表示一个40*40的栅格,除了经纬度以外,还有一个指标值如信号强度,以及一个根据指标值确定的渲染颜色。
Road对象是一条矢量道路,由多个经纬度点组成。
如果道路穿过某个栅格,则将穿过栅格的那一小段道路按栅格的颜色值画出来,没有穿过栅格的其他道路部分,用黑色渲染。

第一次做法:
对道路进行预处理,将道路上的各个点归类到其所属的栅格内。
然后将栅格内的点用线连起来。
完成后一看地图,掉坑里面了。
1,一条道路穿过某个栅格,栅格内可能只有一个点,连不成线;
2,一条直线道路,只记录了开头和结尾,中间穿过的栅格就没点了
后来想到用补点的方式,两个点超过20米就补一个
简单试了一下,效果不好就开始用第二种方法

第二次做法:
先将道路在空白bitmap上画出来,颜色用黑色;
再将栅格在另一空白的bitmap上画出来,颜色用原本的栅格颜色;
对比两张bitmap,像素同时不为0的就是相交像素,用栅格的像素颜色复制到道路的像素里面;
效果杠杠的。

其他方法:
在讨论组里面说了以后,发现另一种是预处理做法
判断两点之间跟栅格的相交,将相交点记录到所在栅格里面,这比较适合后台。

以后还是默默写博客吧!

posted @ 2015-07-19 13:31 Onway 阅读(661) | 评论 (0)编辑 收藏

2015年7月11日

说明
用于多人开发的项目且在不提交项目文件的情况下,自动将新增的源码文件加入到项目中或者将删除的文件从项目中移除。
https://github.com/Onway/AutoProjectFiles

使用
安装后在资源管理器中右键项目名称节点,会看到“自动更新项目”和“创建快照...”两个选项。  
“创建快照”是对项目中指定的源码目录建立一份已有文件列表,以便后续知道新增或者删除的文件。  
“自动更新项目”之后,将会对新增或删除文件更新至项目,同时刷新文件快照列表。

效果图


posted @ 2015-07-11 19:39 Onway 阅读(310) | 评论 (0)编辑 收藏