创建wingide的扩展脚本
1. 在脚本目录中创建脚本
c:\Users\${username}\AppData\Roaming\Wing Pro 7
~/.wingpro7
wing6
/Applications/WingIDE.app/Contents/Resources/scripts
2. 执行脚本
Edit->Command By Name (ctrl+/)
在最下面出现一个Edit框, 输入scripts目录里的py文件里函数的名称, 系统会给出自动完成提示
3. 在scripts目录里存入自己的文件
一个例子, 获取编辑框, 在当前光标插入日期
import wingapi
import time
def insert_date():
editor = wingapi.gApplication.GetActiveEditor()
txt = time.strftime('%Y-%m-%d')
fields = [(0,1)]
editor.PasteSnippet(txt, fields)
4. 绑定快捷键, 快捷键设置里的自定义快捷键, insert-date
posted @
2019-11-10 15:39 wangkang 阅读(236) |
评论 (0) |
编辑 收藏
git bash提交github
跟着网上的教程进行了一次github的提交, 发现中间还是碰到了一些问题, 因此再记录一次
环境只针对windows
1. 安装好git后不能直接使用git, 而是要使用git bash
2. 注册好github并创建一个新的仓库
3. 运行gitbash.bat, 产生一个类似cmd的窗口, 以下命令行全部在gitbash中执行
4. 产生ssh使用的公钥
ssh-keygen.bat -t rsa -C "youemail"
默认产生在C:\Users\Administrator\.ssh
打开id_rsa.pub拷贝里面的内容到github里的ssh key里
ssh -T git@github.com
验证密钥是否生效
配置git
git config --global user.name "youname"
git config --global user.email "youemail"
5. 用资源管理器创建一个空目录作为代码目录, 例如c:\test
6. 下载代码
cd c:/test
git init
git remote add origin git@github.com:youname/yourep.git
下载仓库
git pull origin master
7. 在windows环境中把需要提交的代码拷贝至test
8. 添加代码,提交代码
git add .
添加代码或提交代码时会跑出一个vim界面, 用:q退出
git commit -m "first commit"
这里必须要写注释, 不写提示 aborting commit due to empty commit message
git push -u origin master
这里开始出现上传的百分比, 100%后代码提交成功
9. github页面刷新, 可以看见提交已经生效
posted @
2017-02-05 16:51 wangkang 阅读(318) |
评论 (0) |
编辑 收藏
简单说下步骤吧
1. 需要收集分红送股的数据, 姑且称之为分红表,给一个例子
600617的分红表, 股数,现金,除权日
0 1 2
0 7 0 2015-04-20
0 0 0.26 2001-07-19
0 0 0.2 2000-08-24
0 0 0.4 1998-07-29
0 0 0.38 1996-06-25
0 2 1.5 1995-05-31
0 0 3 1994-06-06
2. 当然需要有日k线数据, 转换为pd.DataFrame格式, 最高价最低价等对应的col名称为ohlcv
3. 根据除权数据, 按倒序来复权, 就是先复权日期早的
def calc_fuquan_use_fenhong(df, df_fenhong):
"""获取复权后的历史数据, 用分红表来计算复权 , 前复权
df: 日k线
df_fenhong: 分红表
return: df"""
#日期早的在前面
df_fenhong = df_fenhong.sort_index(by=2)
for i in range(len(df_fenhong)):
gu, money, date = df_fenhong.irow(i)
if len(df.ix[:date]) < 2:
continue
date = agl.df_get_pre_date(df, date)
if money > 0:
money = money * 0.1
df['o'].ix[:date] -= money
df['h'].ix[:date] -= money
df['c'].ix[:date] -= money
df['l'].ix[:date] -= money
if gu > 0:
# x = cur / (1+y/10)
gu = 1+gu/10
df['o'].ix[:date] /= gu
df['h'].ix[:date] /= gu
df['c'].ix[:date] /= gu
df['l'].ix[:date] /= gu
return df
4. 结果
o h l c v
2010-06-01 6.158824 6.458824 6.158824 6.158824 1922980
2010-06-02 5.941176 6.294118 5.941176 6.235294 837740
经过测试, 前复权结果与同花顺,通达信的计算相同
posted @
2015-04-25 09:28 wangkang 阅读(2882) |
评论 (0) |
编辑 收藏
关键字: png bmp txt pil
下面的代码可以把图像转换成文本, 是从网上的一段程序改的, 本来是想在控制台使用的, 但输出的文本过大, 缩放过小又会造成像素丢失的情况。
先贴出来. 这个版本适用于文件输出, 可以保持更好的显示效果
from PIL import Imageimport os
def PngToTxt(f):
Palette={'000':'#'#榛�
,'010':'@'#鏆楃豢
,'020':'/'#缁�
,'001':'$'#娣辫摑
,'011':'<'#闈�
,'021':'"'#浜�豢鑹�
,'002':'='#钃�
,'012':'\\'#闂�摑鑹�
,'022':'_'#娴呯豢
,'100':'>'#鏆楃孩
,'110':'*'#鏆楅粍
,'120':'~'#榛勭豢鑹�
,'101':'%'#鏆楃传
,'111':'+'#鐏�
,'121':'^'#娴呯豢鑹�
,'102':'|'#绱�綏鍏�
,'112':'!'
,'122':'-'
,'200':'&'#绾�
,'210':';'#姗欒壊
,'220':"'"#榛�
,'201':')'#娣辩矇鑹�
,'211':'.'#绮夌孩鑹�
,'221':'`'
,'202':']'#绱�
,'212':','
,'222':' '#鐧�
}
img = Image.open(f)
if 0: img = Image.Image
#缩小, 结果比较模糊, 还是用原比例较好
#img = img.resize((80,60))
w,h = img.size[:2]
print w,h
result = []
for i in range(h):
result1 = []
for j in range(w):
pixel = img.getpixel((j,i))[:3]
result1.append(Palette[''.join([str(int(x//85.3)) for x in pixel])])
result.append(result1)
r="\n".join(["".join(x) for x in result])
print r
object_file=os.path.splitext(f)[0]+".txt"
open(object_file,'w').write(r)
经过一些改进, 下面的代码可以适用于控制台输出
def PngToTxt(f):
Palette={'000':'#'#榛�
,'010':'@'#鏆楃豢
,'020':'/'#缁�
,'001':'$'#娣辫摑
,'011':'<'#闈�
,'021':'"'#浜�豢鑹�
,'002':'='#钃�
,'012':'\\'#闂�摑鑹�
,'022':'_'#娴呯豢
,'100':'>'#鏆楃孩
,'110':'*'#鏆楅粍
,'120':'~'#榛勭豢鑹�
,'101':'%'#鏆楃传
,'111':'+'#鐏�
,'121':'^'#娴呯豢鑹�
,'102':'|'#绱�綏鍏�
,'112':'!'
,'122':'-'
,'200':'&'#绾�
,'210':';'#姗欒壊
,'220':"'"#榛�
,'201':')'#娣辩矇鑹�
,'211':'.'#绮夌孩鑹�
,'221':'`'
,'202':']'#绱�
,'212':','
,'222':' '#鐧�
}
img = Image.open(f)
if 0: img = Image.Image
#缩小, 结果比较模糊, 还是用原比例较好
img = img.resize((60,20))
w,h = img.size[:2]
#print w,h
result = []
for i in range(h):
result1 = []
is_empty_line = True
for j in range(w):
pixel = img.getpixel((j,i))[:3]
#result1.append(Palette[''.join([str(int(x//85.3)) for x in pixel])])
if pixel==(255,255,255):
s = '222'
else:
s = '110'
is_empty_line = False
result1.append(Palette[s])
#去除空行
if is_empty_line == False:
result.append(result1)
r="\n".join(["".join(x) for x in result])
print r
object_file=os.path.splitext(f)[0]+".txt"
open(object_file,'w').write(r)
图例:


posted @
2014-03-20 09:36 wangkang 阅读(1851) |
评论 (2) |
编辑 收藏
关键词: 用python仿造matlab发布报告, html
经常用matlab的人有时候会用到publish发布报告的功能, 也就是生成一个html的浏览页, 而python中貌似就没有这种功能。现在本人做了一个简单的类似功能,大概的样式如下:
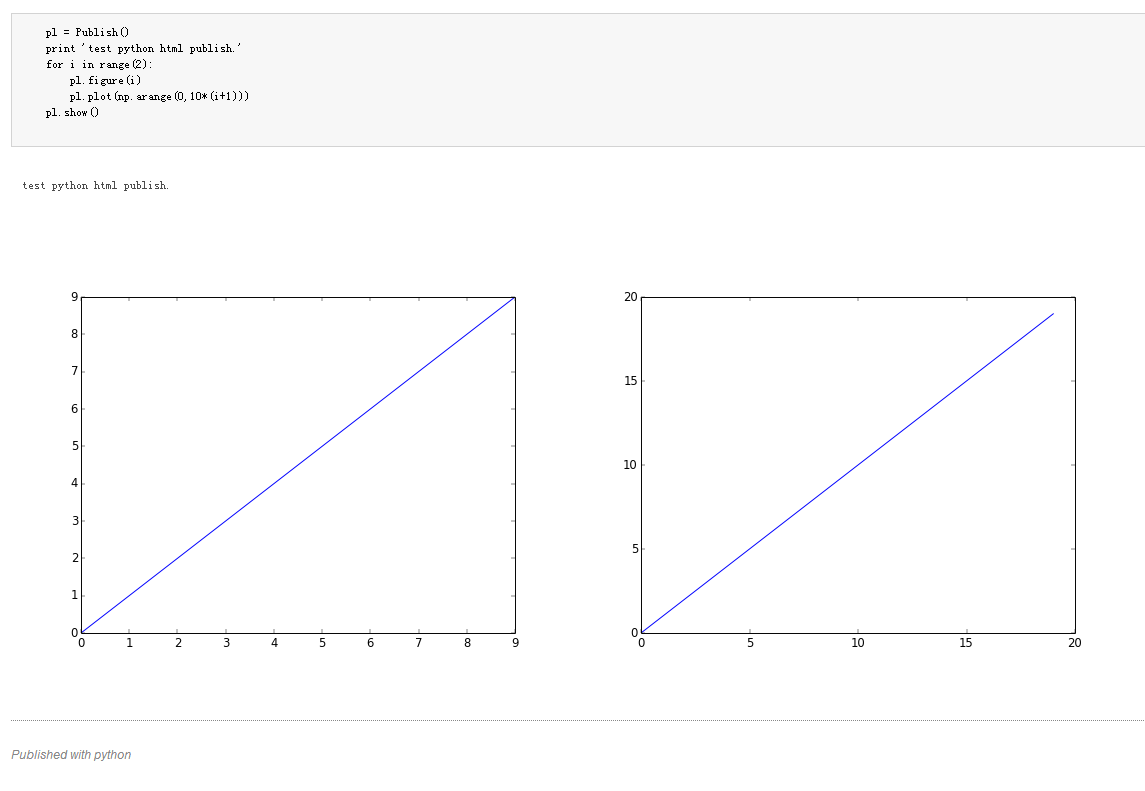
虽然比较简陋,但至少可以在浏览器中看了。
大概的原理是用发布类替换pl, 因此如果您的pl使用了较多的函数, 那么需要相应的在Publish中加入类似的代码。
1 def figure(self, id=1):
2 pl.figure(id)
3
4 def plot(self, *args, **kwargs):
5 pl.plot(*args, **kwargs)
6
7 def subplot(self, *args, **kwargs):
8 pl.subplot(*args, **kwargs)
9
10 def title(self, s, *args, **kwargs):
11 pl.title(s, *args, **kwargs)
对于要发布的代码, 只需要在前面加上Publish类就可以了
1 from pypublish.publish
import *
1 #不发布把该行注销
2 pl = Publish()
3 print 'test python html publish.'
4 for i in range(2):
5 pl.figure(i)
6 pl.plot(np.arange(0,10*(i+1)))
7 pl.show()
当然以上假设您用的都是import pylab as pl
如果不是这种情况该方式就不适用了。
/Files/wangkang2009/pypublish.rar
posted @
2014-03-07 19:32 wangkang 阅读(549) |
评论 (0) |
编辑 收藏
python调用c dll api
关键字: python dll调用 np类型转换 double
关于python调用dll的文章有很多, 本篇主要描述对double数组传参的实现, 本人还没有发现类似的文章, 因此书写本文档加以说明。
本文实现主要参考《用python进行科学计算》一书, 因此对环境有要求, 环境需要安装python(x,y), 该软件可以很好的支持numpy库,
否则用sf上下载的numpy安装包直接在python里安装貌似装了不生效, 也就是import numpy失败
下面简单讲下实现过程
1. 制作dll, 假设dll中有如下的导出函数, dll名为smooth
// @param: n 数组长度
// @param: x [input/output] 一维数组
// @param: y [input/output]
// @param: weights [input] 可为0
// @param: s [input/output] 单值,返回新的x,y长度
int smooth(int n, double* x, double* y, double* weights, double* s);
2. 加载dll
import numpy as np
from ctypes import *
dll = np.ctypeslib.load_library('smooth', '.')
3. 执行函数
c里的double是64位的, 因此简单的传参会是32位的, 比如用下面的实现就会有这样的问题
smooth = dll.smooth
#[Warning:下面是一个错误的演示]
#描述参数类型
smooth.argtypes = [c_int, POINTER(c_double), POINTER(c_double), POINTER(c_double), POINTER(c_double)]
#返回值类型
smooth.restype = c_int
x = [3.2, 3.9, 5.4, 5.9]
x = np.array(x)
y = np.array(x)
w = np.array(0)
s = np.array(10)
smooth(len(x), x.ctypes.data_as(POINTER(c_double)), y.ctypes.data_as(POINTER(c_double)), w.ctypes.data_as(POINTER(c_double)), s.ctypes.data_as(POINTER(c_double)) )
调用后python没有报错, 但不能得到正确的结果, 进入vc附加python进程, 在函数头加上断点, 查看参数内存, 可看出其是以int*方式传入的
要让python以真正的64位double*传入可使用下面的实现
#正确的调用
smooth.argtypes = [
c_int,
np.ctypeslib.ndpointer(dtype=np.float64, ndim=1, flags="C_CONTIGUOUS"), #一维数组,且内存连续的
np.ctypeslib.ndpointer(dtype=np.float64, ndim=1, flags="C_CONTIGUOUS"),
np.ctypeslib.ndpointer(dtype=np.float64),
np.ctypeslib.ndpointer(dtype=np.float64)
]
smooth.restype = c_int
m = [3.2, 3.9, 5.4, 5.9]
x = np.arange(4, dtype=np.float64)
y = np.arange(4, dtype=np.float64)
w = np.cast["float64"](0)
s = np.cast["float64"](10)
for i in range(0, len(m)):
x[i] = m[i]
y[i] = m[i]
smooth(len(x), x, y, w, s)
题外话: python的参数基本可以看为指针, 类似引用等操作都可以轻松完成
本人对numpy不是很熟, 可能对于np的参数初始化有更好的方式, 此处就算抛砖引玉吧,
posted @
2013-08-27 11:34 wangkang 阅读(2975) |
评论 (0) |
编辑 收藏
编辑框的背景色一般是白色的, 时间长了看起来比较费劲, 用vc自带的也可以改背景色, 这里提供一个更快捷的方案.
注意,for vc2010
1. 用vc2010建一个扩展项目
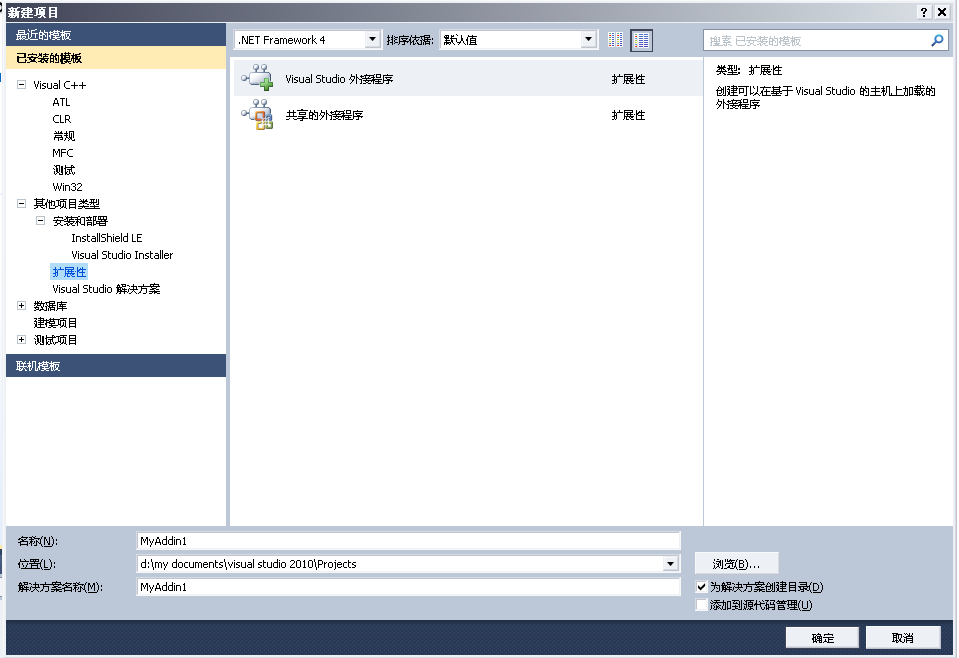
2. 创建该项目,按照下面图示走完向导。
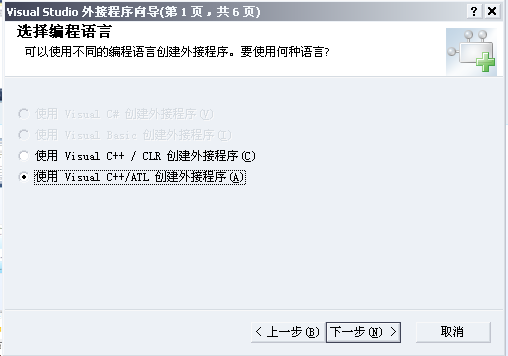
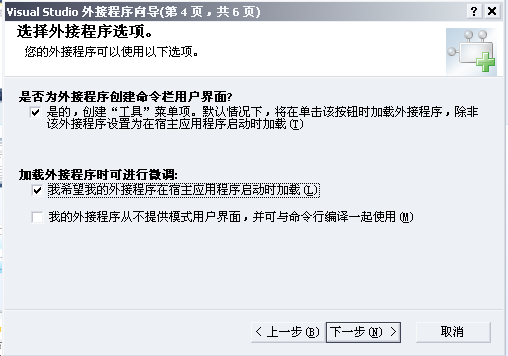
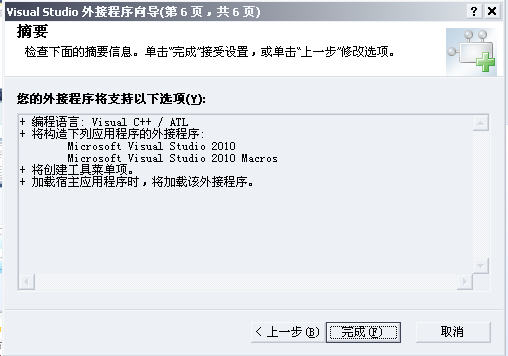
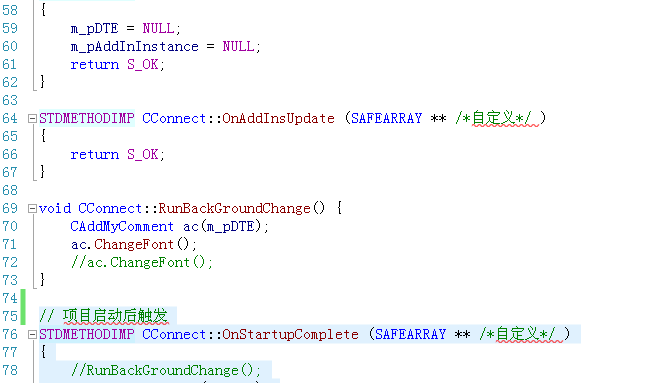
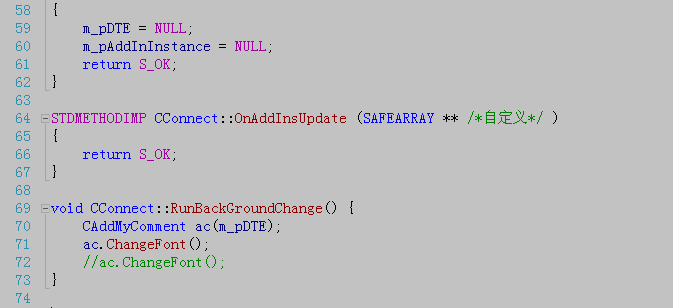
3. 完成后项目建立, 依次修改
STDMETHODIMP CConnect::OnStartupComplete (SAFEARRAY ** /*自定义*/ ) // 项目加载后触发
和
STDMETHODIMP CConnect::Exec(BSTR bstrCmdName, vsCommandExecOption ExecuteOption, VARIANT * /*pvarVariantIn*/, VARIANT * /*pvarVariantOut*/, VARIANT_BOOL *pvbHandled) // 选择命令后触发
1 // 项目启动后触发
2 STDMETHODIMP CConnect::OnStartupComplete (SAFEARRAY ** /*自定义*/ )
3 {
4 //RunBackGroundChange();
5 CAddMyComment ac(m_pDTE);
6 COLORREF clrBlack = 0x00c2c2c2; // 银色
7 ac.SetColor(clrBlack);
8 ac.SetColor(clrBlack);
9
10 return S_OK;
11 }
STDMETHODIMP CConnect::Exec(BSTR bstrCmdName, vsCommandExecOption ExecuteOption, VARIANT * /*pvarVariantIn*/, VARIANT * /*pvarVariantOut*/, VARIANT_BOOL *pvbHandled)
{
*pvbHandled = VARIANT_FALSE;
if(ExecuteOption == vsCommandExecOptionDoDefault)
{
if(!_wcsicmp(bstrCmdName, L"backgroundchange.Connect.backgroundchange"))
{
RunBackGroundChange();
*pvbHandled = VARIANT_TRUE;
return S_OK;
}
}
return S_OK;
}
1
2 // 改变编辑器背景颜色
3 void CAddMyComment::ChangeFont(void)
4 {
5 CComPtr<EnvDTE::Properties> spProperties;
6
7 // Modify font size
8 m_spDTE->get_Properties(CComBSTR("FontsAndColors"), CComBSTR("TextEditor"), &spProperties);
9 CComPtr<EnvDTE::Property> spProperty;
10 spProperties->Item(CComVariant(L"FontSize"), &spProperty); // FontSize
11 ATLASSERT(spProperty);
12 spProperty->put_Value(CComVariant(11));
13
14 CComPtr<EnvDTE::Property> spProperty1;
15 spProperties->Item(CComVariant(CComBSTR(L"FontsAndColorsItems")), &spProperty1); // FontsAndColorsItems
16 ATLASSERT(spProperty1);
17 CComPtr<IDispatch> spDispatch;
18 spProperty1->get_Object(&spDispatch);
19 CComPtr<EnvDTE::FontsAndColorsItems> spFontsAndColorsItems;
20 spFontsAndColorsItems = spDispatch;
21 ATLASSERT(spFontsAndColorsItems);
22 #if 0
23 // 显示颜色命名
24 long count ;
25 spFontsAndColorsItems->get_Count(&count);
26 for(long i=0; i<count; ++i) {
27 CComPtr<EnvDTE::ColorableItems> spColor;
28 spFontsAndColorsItems->Item(CComVariant(i), &spColor);
29 if(spColor) {
30 CComBSTR bstrName;
31 spColor->get_Name(&bstrName);
32 ATLTRACE(L"[%d]%s\n",i, bstrName);
33 }
34 }
35 #endif
36
37 #if 1
38 // Modify Plain Text Background
39 CComPtr<EnvDTE::ColorableItems> spColorableItems_PlainText;
40 spFontsAndColorsItems->Item(CComVariant(1), &spColorableItems_PlainText);
41 CComPtr<EnvDTE::ColorableItems> spColorableItems_LineNumber;
42 spFontsAndColorsItems->Item(CComVariant(5), &spColorableItems_LineNumber);
43 //CComPtr<EnvDTE::ColorableItems> spColorableItems_Identifier;
44 //spFontsAndColorsItems->Item(CComVariant(L"Identifier"), &spColorableItems_Identifier);
45
46 COLORREF clrWhite = #ffffff;
47 COLORREF clrBlack = #000000;
48 clrBlack = 0x00c2c2c2; // 银色
49 COLORREF clrWhite2 = 12632256;
50 clrWhite2 = clrWhite;
51 OLE_COLOR color;
52 spColorableItems_PlainText->get_Background(&color);
53 if(color == clrBlack) {
54 spColorableItems_PlainText->put_Background(clrWhite);
55 spColorableItems_LineNumber->put_Background(clrWhite);
56 //spColorableItems_PlainText->put_Foreground(clrBlack);
57 }else {
58 spColorableItems_PlainText->put_Background(clrBlack);
59 spColorableItems_LineNumber->put_Background(clrBlack);
60 //spColorableItems_PlainText->put_Foreground(clrWhite2);
61 }
62 #endif
63 }
64
4. 执行命令, 进入项目后, 在菜单工具下会创建一个菜单项
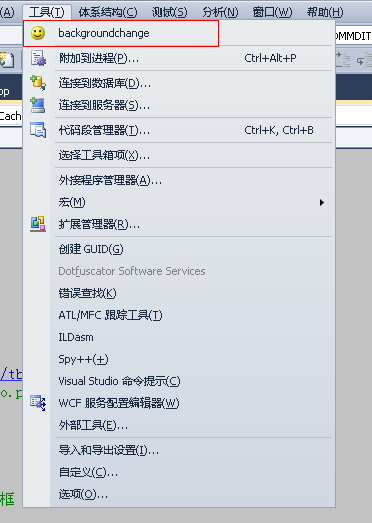
点选后, 会在白色背景和银色间切换, 初始会进入银色背景。
5. 可直接使用msi安装包安装该插件, 同时该附件包含源代码
/Files/wangkang2009/backgroundchange.rar
posted @
2013-04-17 14:55 wangkang 阅读(2246) |
评论 (0) |
编辑 收藏
今天又犯了一个低级错误, 情况是这样的, 编译好的代码下断点后总是与源代码不匹配, 弄了半天才想起来主项目没有编译。
对于这样的问题应该注意需要编译主项目, 最好的办法是设上依赖项。
posted @
2012-12-07 13:34 wangkang|
编辑 收藏
windows 下VC6制作php扩展dll
网上有很多该问题的文章, 之所以再写一遍, 是因为我根据他们的文章没有跑通, 综合了多人的文章加上一些自己的理解
最终解决了这个问题。
1. 下载带source的php(v5.2)包及同版本编译好的包(php最好使用同版本的), 这是vc6编译的, 在php.net可下载
2. 解压source包后找到ext\skeleton, 复制出一份新的, 目录改名为hello
3. 打开目录里面的.dsp, .c, .h, 把里面extname全部替换为hello
4. 把php5ts.lib拷贝至开发目录, 修改lib里的依赖php5ts_debug.lib 至php5ts.lib, 修改dll输出到php的ext目录
5. f7编译, 不出意外应编译通过。 注意, 一定要使用release编译, 用debug加载时不认, 我就因为这个问题卡住了很久。
6. php.ini里加入extension=php_hello.dll, 没设置扩展目录的话加上extension_dir = "d:/Progra~1/Apache/PHP/ext/",
重启apache
7. 不出意外, 在phpinfo()中可以看见hello模块了。
8. 写一个php, 内容如下
<?
echo confirm_hello_compiled("kdskf");
?>
页面执行后可看见string输出。
参考
http://blog.csdn.net/cyberhero/article/details/5966920
http://blog.csdn.net/php_boy/article/details/6456603
posted @
2012-08-15 11:00 wangkang 阅读(989) |
评论 (0) |
编辑 收藏