2013年6月19日

http://www.codeproject.com/Articles/31382/Memory-Leak-Detection-Using-Windbg


Introduction

Memory leak is a time consuming bug often created by C++ developers. Detection of memory leaks is often tedious. Things get worst if the code is not written by you, or if the code base is quite huge.

Though there are tools available in the market that will help you in memory leak detection, most of these tools are not free. I found Windbg as a freeware powerful tool to solve memory leak bugs. At least, we get an idea about the code location which might be suspected to cause memory leaks. COM Interface leaks are out of the scope of this article.

Windbg is a powerful user/kernel space debugger from Microsoft, which can be downloaded and installed from here.

Using Windbg

To start working with Windbg:

  1. Configure the symbol file path to the Microsoft symbol server “SRV*d:\symbols*http://msdl.microsoft.com/download/symbols”.
  2. Add your program EXE/DLL PDB (program database) path to the symbol file path.
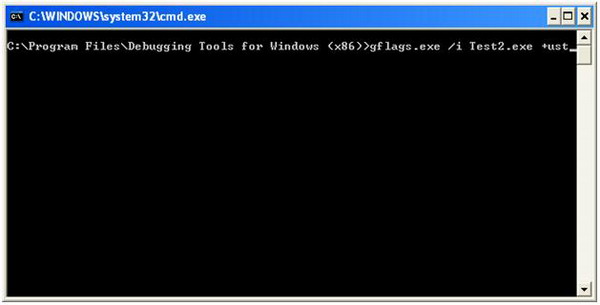
  3. You also need to to configure the Operating System's flag to enable user stack trace for the process which has memory leaks. This is simple, and can be done with gflags.exe. Gflags.exe is installed during Windbg's installation. This can also be done through command line, using the command “gflags.exe /i MemoryLeak.exe +ust”. My program name is Test2.exe; hence, for the demo, I will be using Test2.exe rather than MemoryLeak.exe. The snapshot below shows the setting of OS flags for the application Test2.exe.

cmd.JPG

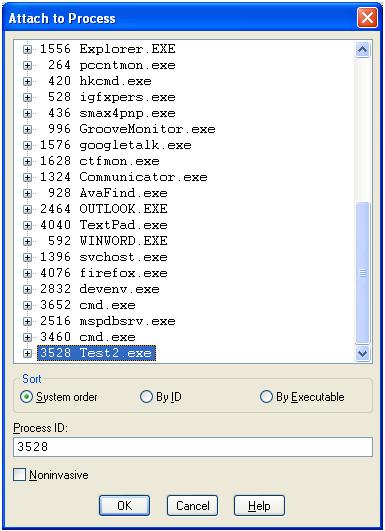
Once we have configured Windbg for the symbol file path, start the process which is leaking memory, and attach Windbg to it. The Attach option in Windbg is available under the File menu, or can be launched using the F6 shortcut. The snapshot below shows the same:

attach.JPG

The !heap command of Windbg is used to display heaps. !heap is well documented in the Windbg help.

I have developed a small program which leaks memory, and will demonstrate further using the same.

Collapse | Copy Code
int _tmain(int argc, _TCHAR* argv[]) {   while(1)       {          AllocateMemory();       }       return 0;  }  void AllocateMemory()  {       int* a = new int[2000];       ZeroMemory(a, 8000);       Sleep(1);  }

The above program leaks an integer array of size 2000*4 bytes.

After attaching Windbg to the process, execute the !heap –s command. -s stands for summary. Below is the output of the !heap -s for the leaking process:

Collapse | Copy Code
0:001> !heap -s NtGlobalFlag enables following debugging aids for new heaps:     validate parameters     stack back traces   Heap     Flags   Reserv  Commit  Virt   Free  List   UCR  Virt  Lock  Fast                      (k)     (k)    (k)     (k) length      blocks cont. heap  -----------------------------------------------------------------------------    00150000 58000062    1024     12     12      1     1     1    0      0   L      00250000 58001062      64     24     24     15     1     1    0      0   L      00260000 58008060      64     12     12     10     1     1    0      0          00330000 58001062   64576  47404  47404     13     4     1    0      0   -----------------------------------------------------------------------------

Let the process execute for some time, and then re-break in to the process, and execute !heap -s again. Shown below is the output of the command:

Collapse | Copy Code
0:001> !heap -s NtGlobalFlag enables following debugging aids for new heaps:    validate parameters    stack back traces    Heap     Flags   Reserv  Commit  Virt   Free  List   UCR  Virt  Lock  Fast                       (k)     (k)    (k)     (k) length      blocks cont. heap     -----------------------------------------------------------------------------     00150000 58000062    1024     12     12      1     1     1    0      0   L       00250000 58001062      64     24     24     15     1     1    0      0   L       00260000 58008060      64     12     12     10     1     1    0      0           00330000 58001062  261184 239484 239484     14     4     1    0      0          -----------------------------------------------------------------------------

Lines marked in bold show the growing heap. The above snapshot shows a heap with the handle 00330000 growing.

Execute “!heap -stat –h 00330000” for the growing heap. This command shows the heap statistics for the growing heap. Shown below is the command's output.

Collapse | Copy Code
0:001> !heap -stat -h 00330000 heap @ 00330000 group-by: TOTSIZE max-display: 20     size     #blocks     total     ( %) (percent of total busy bytes)     1f64 76c6 - e905f58  (99.99)     1800 1 - 1800  (0.00)     824 2 - 1048  (0.00)     238 2 - 470  (0.00)     244 1 - 244  (0.00)     4c 5 - 17c  (0.00)     b0 2 - 160  (0.00)     86 2 - 10c  (0.00)     50 3 - f0  (0.00)     74 2 - e8  (0.00)     38 4 - e0  (0.00)     48 3 - d8  (0.00)     c4 1 - c4  (0.00)     62 2 - c4  (0.00)     be 1 - be  (0.00)     b8 1 - b8  (0.00)     ae 1 - ae  (0.00)     ac 1 - ac  (0.00)     55 2 - aa  (0.00)     a4 1 - a4  (0.00)

The above snapshot shows 0x76c6 blocks of size 1f64 being allocated (marked in bold). Such a huge number of blocks of the same size makes us suspect that these can be leaked blocks. Rest of the block allocations do not have growing block numbers.

The next step is to get the address of these blocks. Use the command !heap -flt s 1f64. This command filters all other blocks of heap and displays the details of blocks having size 1f64.

Shown below is the output for the command:

Collapse | Copy Code
0:001> !heap -flt s 1f64     _HEAP @ 150000     _HEAP @ 250000     _HEAP @ 260000     _HEAP @ 330000       HEAP_ENTRY Size Prev Flags    UserPtr UserSize - state         003360e0 03f0 0000  [07]   003360e8    01f64 - (busy)         00338060 03f0 03f0  [07]   00338068    01f64 - (busy)         00339fe0 03f0 03f0  [07]   00339fe8    01f64 - (busy)         0033bf60 03f0 03f0  [07]   0033bf68    01f64 - (busy)         0033dee0 03f0 03f0  [07]   0033dee8    01f64 - (busy)         01420040 03f0 03f0  [07]   01420048    01f64 - (busy)         01421fc0 03f0 03f0  [07]   01421fc8    01f64 - (busy)         01423f40 03f0 03f0  [07]   01423f48    01f64 - (busy)         01425ec0 03f0 03f0  [07]   01425ec8    01f64 - (busy)         01427e40 03f0 03f0  [07]   01427e48    01f64 - (busy)         01429dc0 03f0 03f0  [07]   01429dc8    01f64 - (busy)         0142bd40 03f0 03f0  [07]   0142bd48    01f64 - (busy)         0142dcc0 03f0 03f0  [07]   0142dcc8    01f64 - (busy)         0142fc40 03f0 03f0  [07]   0142fc48    01f64 - (busy)         01431bc0 03f0 03f0  [07]   01431bc8    01f64 - (busy)         01433b40 03f0 03f0  [07]   01433b48    01f64 - (busy)         01435ac0 03f0 03f0  [07]   01435ac8    01f64 - (busy)         01437a40 03f0 03f0  [07]   01437a48    01f64 - (busy)         014399c0 03f0 03f0  [07]   014399c8    01f64 - (busy)         0143b940 03f0 03f0  [07]   0143b948    01f64 - (busy)         0143d8c0 03f0 03f0  [07]   0143d8c8    01f64 - (busy)         0143f840 03f0 03f0  [07]   0143f848    01f64 - (busy)         014417c0 03f0 03f0  [07]   014417c8    01f64 - (busy)         01443740 03f0 03f0  [07]   01443748    01f64 - (busy)         014456c0 03f0 03f0  [07]   014456c8    01f64 - (busy)         01447640 03f0 03f0  [07]   01447648    01f64 - (busy)         014495c0 03f0 03f0  [07]   014495c8    01f64 - (busy)         0144b540 03f0 03f0  [07]   0144b548    01f64 - (busy)         0144d4c0 03f0 03f0  [07]   0144d4c8    01f64 - (busy)         0144f440 03f0 03f0  [07]   0144f448    01f64 - (busy)         014513c0 03f0 03f0  [07]   014513c8    01f64 - (busy)         01453340 03f0 03f0  [07]   01453348    01f64 - (busy)         014552c0 03f0 03f0  [07]   014552c8    01f64 - (busy)         01457240 03f0 03f0  [07]   01457248    01f64 - (busy)         014591c0 03f0 03f0  [07]   014591c8    01f64 - (busy)         0145b140 03f0 03f0  [07]   0145b148    01f64 - (busy)         0145d0c0 03f0 03f0  [07]   0145d0c8    01f64 - (busy)         0145f040 03f0 03f0  [07]   0145f048    01f64 - (busy)         01460fc0 03f0 03f0  [07]   01460fc8    01f64 - (busy)         01462f40 03f0 03f0  [07]   01462f48    01f64 - (busy)         01464ec0 03f0 03f0  [07]   01464ec8    01f64 - (busy)         01466e40 03f0 03f0  [07]   01466e48    01f64 - (busy)         01468dc0 03f0 03f0  [07]   01468dc8    01f64 - (busy)

Use any UsrPtr column value from the listed output, and then use the the command !heap -p -a UsrPtr to display the call stack for UsrPtr. I have selected 0143d8c8 marked in bold.

Upon execution of !heap -p -a 0143d8c8, we get the call stack shown below:

Collapse | Copy Code
0:001> !heap -p -a 0143d8c8      address 0143d8c8 found in     _HEAP @ 330000       HEAP_ENTRY Size Prev Flags    UserPtr UserSize - state         0143d8c0 03f0 0000  [07]   0143d8c8    01f64 - (busy)         Trace: 0025         7c96d6dc ntdll!RtlDebugAllocateHeap+0x000000e1         7c949d18 ntdll!RtlAllocateHeapSlowly+0x00000044         7c91b298 ntdll!RtlAllocateHeap+0x00000e64         102c103e MSVCR90D!_heap_alloc_base+0x0000005e         102cfd76 MSVCR90D!_heap_alloc_dbg_impl+0x000001f6         102cfb2f MSVCR90D!_nh_malloc_dbg_impl+0x0000001f         102cfadc MSVCR90D!_nh_malloc_dbg+0x0000002c         102db25b MSVCR90D!malloc+0x0000001b         102bd691 MSVCR90D!operator new+0x00000011         102bd71f MSVCR90D!operator new[]+0x0000000f         4113d8 Test2!AllocateMemory+0x00000028         41145c Test2!wmain+0x0000002c         411a08 Test2!__tmainCRTStartup+0x000001a8         41184f Test2!wmainCRTStartup+0x0000000f         7c816fd7 kernel32!BaseProcessStart+0x00000023

The lines marked in bold shows the functions from our code.

Note: Sometimes, it might happen that the “!heap -s” command does not show a growing heap. In that case, use the “!heap -stat -h” command to list all the heaps with their sizes and number of blocks. Spot the growing number of blocks, and then use the “!heap –flt s SIZE” (SIZE = the size of the suspected block) command.

posted @ 2013-06-19 16:22 dyh 阅读(485) | 评论 (0)编辑 收藏

2013年6月11日

     摘要: 原文地址:http://www.vckbase.com/index.php/wv/1315简序 大学毕业前的最后一学期,在一家公司实习,当时的工作需要用到一些操作系统提供的组件。那时候只知道COM这个名词,并不知道到底是怎么回事,只知道上网 到处找别人的源码解决自己的问题;那段日子到现在回忆起来都是灰色的,每天呆坐在电脑前,一个网站一个网站的查找自己需要的源码。但...  阅读全文
posted @ 2013-06-11 15:24 dyh 阅读(836) | 评论 (0)编辑 收藏

2013年1月25日

ZZ from
http://www.xiuwz.com/site/tech-bloom-filter/

Bloom filter是 由 Howard Bloom在 1970 年提出的一种多哈希函数映射的快速查找算法,该算法能够在非常快速的判定某个元素是否在一个集合之外。这种检测只会对在集合内的数据错判,而不会对不是集 合内的数据进行错判,这样每个检测请求返回有“在集合内(可能错误)”和“不在集合内(绝对不在集合内)”两种情况。目前Bloom filter在分布式系统中有着广泛的使用,比如说GFS/HDFS/Cassandra/Bigtable/Squid

实例

为了说明Bloom filter存在的重要意义,举一个实例:

假设要你写一个网络蜘蛛(web crawler)。由于网络间的链接错综复杂,蜘蛛在网络间爬行很可能会形成“环”。为了避免形成“环”,就需要知道蜘蛛已经访问过那些URL。给一个URL,怎样知道蜘蛛是否已经访问过呢?稍微想想,就会有如下几种方案:

  1. 将访问过的URL保存到数据库。
  2. 用HashSet将访问过的URL保存起来。那只需接近O(1)的代价就可以查到一个URL是否被访问过了。
  3. URL经过MD5或SHA-1等单向哈希后再保存到HashSet或数据库。
  4. Bit-Map方法。建立一个BitSet,将每个URL经过一个哈希函数映射到某一位。

方法1~3都是将访问过的URL完整保存,方法4则只标记URL的一个映射位。

以上方法在数据量较小的情况下都能完美解决问题,但是当数据量变得非常庞大时问题就来了。

方法1的缺点:数据量变得非常庞大后关系型数据库查询的效率会变得很低。而且每来一个URL就启动一次数据库查询是不是太小题大做了?

方法2的缺点:太消耗内存。随着URL的增多,占用的内存会越来越多。就算只有1亿个URL,每个URL只算50个字符,就需要5GB内存。

方法3:由于字符串经过MD5处理后的信息摘要长度只有128Bit,SHA-1处理后也只有160Bit,因此方法3比方法2节省了好几倍的内存。

方法4消耗内存是相对较少的,但缺点是单一哈希函数发生冲突的概率太高。还记得数据结构课上学过的Hash表冲突的各种解决方法么?若要降低冲突发生的概率到1%,就要将BitSet的长度设置为URL个数的100倍。

实质上上面的算法都忽略了一个重要的隐含条件:允许小概率的出错,不一定要100%准确!也就是说少量url实际上没有没网络蜘蛛访问,而将它们错判为已访问的代价是很小的——大不了少抓几个网页呗。

Bloom Filter的算法

下面引入本篇的主角——Bloom filter。其实上面方法4的思想已经很接近Bloom filter了。方法四的致命缺点是冲突概率高,为了降低冲突的概念,Bloom filter使用了多个哈希函数,而不是一个

Bloom filter采 用的是哈希函数的方法,将一个元素映射到一个 m 长度的阵列上的一个点,当这个点是 1 时,那么这个元素在集合内,反之则不在集合内。这个方法的缺点就是当检测的元素量很多时候可能有冲突,解决方法就是使用 k 个哈希 函数对应 k 个点,如果所有点都是 1 的话,那么元素在集合内,如果有 0 的话,元素则不再集合内。

Bloom filter 特点

Bloom filter优点就是它的插入和查询时间都是常数,另外它查询元素却不保存元素本身,具有良好的安全性。它的缺点也是显而易见的,当插入的元素越多,错判“在集合内”的概率就越大了,另外 Bloom filter也不能删除一个元素,因为多个元素哈希的结果可能在 Bloom filter 结构中占用的是同一个位,如果删除了一个比特位,可能会影响多个元素的检测。

其实要做到能够删除一个元素,就需要修改下算法,把bitmap修改成计数,这会带来另外一个缺点:内存浪费

posted @ 2013-01-25 16:15 dyh 阅读(466) | 评论 (0)编辑 收藏

2012年11月30日

1. 抛出的异常对象不应该是指针类型
因为指针指向的对象的删除和析构由谁来处理,什么时候执行,都是无法确定的事情,C++也没有定义,比如堆和栈上的对象的处理方式必然不一样
2. 不能显式地把NULL作为异常对象抛出
因为throw(NULL)=tbrow(0),因此NULL会被当作整型捕获,而不是空指针常量,这可能与程序员的预期不一致
3. 如果一个函数声明时指定了具体的异常类型,那么它只能抛出指定类型的异常
函数的代码结构如下:返回值类型函数名(形参表)throw(类型名表){函数体}
int A() throw(myexception, int)  -- 只能抛出myexception和int两种类型的异常
int A() throw()                  -- 不抛出任何异常
int A()                          -- 可以抛出任何异常,也可以不抛出异常
函数原型中的异常声明要与实现中的异常声明一致,否则会引起异常冲突。由于异常机制是在运行出现异常时才发挥作用的,因此如果函数的实现中抛出了没有在其异常声明列表中列出的异常,编译器也许不能检查出来。当抛出一个未在其异常声明列表里的异常类型时,unexpected()函数会被调用,默认会导致std::bad_exception类型的异常被抛出。如果std::bad_exception不在异常声明列表里,又会导致terminate()被调用,从而导致程序结束
4. 异常只能在初始化之后而且程序结束之前抛出
5. throw语句中的表达式本身不能引发新的异常
6. 空的throw语句只能出现在catch语句块中
空的throw用来将捕获的异常再抛出,可以实现多个处理程序问异常的传递。然而,如果在catch语句外用,由于没有捕获到异常,也就没有东西可以再抛出,这样会导致程序以不定的方式终止(这依赖具体的编译器)
7. 典型的try-catch结构应该是派生派在最前面,基类在后,最后是...
8. catch的处理顺序为从上到下,只要找到一个匹配的异常类型,后面的异常处理都被忽略
9. 若异常对象为类的对象时,应该通过引用来捕获
若不是用引用,则派生类对象总是会被截断成为基类对象
posted @ 2012-11-30 15:58 dyh 阅读(422) | 评论 (0)编辑 收藏

2012年11月28日

复习一下<程序员面试攻略>,并记录一些心得.

链表:
1. 找到单链表中倒数第m个元素
方法:使用两个指针,这两个指针相距m个元素,然后使得两个指针同步前进,当后一个指针到空时,前一个指针即为倒数第m个元素
实现:
elem* FindMToLastElem(elem* head, int m)
{
    elem* current, mbehind;
    current = head;
    for(int i=0; i<m; i++)
    {
        if(current->next)
        {
            current = current->next;
        }
        else
        {
            return NULL;
        }
    }
    
    mbehind = head;
    while(current->next)
    {
        current = current->next;
        mbehind = mbehind->next;
    }

    return mbehind;
}

2. 判断一个链表为循环链表还是非循环链表

方法:使用快慢指针,快指针每次走两步,慢指针每次走一步,若快指针到达NULL,则为非循环链表,若快指针超过了慢指针,则为循环链表
实现:
int determin_termination(node* head)
{
    node* fast, slow;
    if(!head || !(head->next))
    {
        return 0;
    }
    fast = head->next->next;
    slow = head->next;
    while(1)
    {
        if(!fast || !(fast->next))
        {
            return 0;
        }
        else if(fast == slow || fast->next == slow)
        {
            return 1;
        }
        else
        {
            fast = fast->next->next;
            slow = slow->next;
        }
    }
}

树和图:
1. 二叉树前序遍历的非递归算法
方法:使用堆栈
实现:
void PreorderTraversal(node* head)
{
    elem* stack;
    CreateStack(&stack);
    Push(&stack, head);
    
    node* pNode;
    while(Pop(&stack, &pNode)
    {
        if(NULL != pNode)
        {
            printf("%d\n", pNode->value);
            Push(&stack, pNode->right);
            Push(&stack, pNode->left);
        }
    }
    DeleteStack(&stack);
}

数组和字符串:
1. 高效删除特定字符
方法:每次删除字符时不在数组中移动字符串,而是直接拷贝到之前扫描过的位置中。另外采用数组来减少字符串比较次数。
void RemoveChars(char str[], char remove[])
{
    // create an array for remove characters
    char removeArray[256];
    for(int i=0; i<256; i++)
    {
        removeArray[i] = 0;
    }
    int src = 0;
    while(remove[src])
    {
        removeArray[remove[src]] = 1;
        src++;
    }
    int dest = 0;
    src = 0;
    do
    {
        if(!removeArray[remove[src]])
        {
            str[dest++] = str[src];
        }
    }while(str[src++]);
    
}

2. 颠倒单词出现的次序
Do or do not, there is no try. 转换为 try. no is there not, do or Do
方法:先将整个字符串颠倒,再将新字符串中的每个单词颠倒

3. 编写字符串和数字相互转换函数
int Str2Int(char* str)
{
    int num = 0, neg = 1, i = 0;
    if(str[0] == '-')
    {
        neg = -1;
        i = 1;
    }
    
    while(str[i])
    {
        num = num * 10 + str[i++] - '0';
    }
    num = num * neg;
    return num;
}

void Int2Str(int num, char str[])
{
    int neg = 1;
    if(num < 0)
    {
        num *= -1;
        neg = -1;
    }
    
    int i = 0;
    do
    {
        str[i++] = num % 10 + '0';
        num = num / 10;
    }while(num)

    if(neg == -1)
    {
        str[i++] = '-';
    }
    str[i] = 0;
    
    for(int j = 0; j < i/2; j++)
    {
        str[j] = str[i-1-j];
    }
    
}
posted @ 2012-11-28 15:47 dyh 阅读(256) | 评论 (0)编辑 收藏

2012年11月16日

From: http://www.cnblogs.com/wanghui9072229/archive/2011/11/22/2259391.html

两年前从网上看到一道面试题:用两个栈(Stack)实现一个队列(Queue)。觉得不错,就经常拿来面试,几年下来,做此题的应该有几十人了。通过对面试者的表现和反应,有一些统计和感受,在此做个小结。


C++描述,题目大致是这样的:


已知下面Stack类及其3个方法PushPop Count,请用2Stack实现Queue类的入队(Enqueue)出队(Dequeue)方法。


class Stack

{

public:

         void Push(int x); // Push an element in stack;

         int Pop();  // Pop an element out of stack;

         int Count() const;     // Return the number of the elements in stack;

};


class Queue

{

public:

         void Enqueue(int x);

         int Dequeue();


private:

         Stack s1;

         Stack s2;

};


这道题应该不算难,比起《编程之美》中微软那些什么“翻烙饼”的面试题,难度上差远了。况且,由于时间关系,我一般也不要求面试者写代码,只描述清楚思路即可。出这道题,主要考察3点:


1.       在短时间内,能不能找到解决这道题的足够清晰的思路(思维是否敏捷、清晰)。

2.       能不能在单向表述中,清楚地描述自己的思路和想法(表述能力是否达到要求)。

3.       对于某些具体细节,能不能考虑到(是否足够细致)。


总体上,以10人为例,实际的结果大致是:


1.       8个人可以找到解决答案,2个人无法找到答案(即使进行了必要的提示,曾经有位号称美国MIT深造2年,之后在Google美国公司工作过8个月的兄弟,也没做出来)。

2.       8个找到答案的人中,6个找到的方法相同,2个人找到其它变种。

3.       在这8个人中,有1个人可以不经提示,同时想到大众方法和变种。


大多数人的思路是:始终维护s1作为存储空间,以s2作为临时缓冲区。

入队时,将元素压入s1

出队时,将s1的元素逐个“倒入”(弹出并压入)s2,将s2的顶元素弹出作为出队元素,之后再将s2剩下的元素逐个“倒回”s1

见下面示意图:


2Stacks1Queue


上述思路,可行性毋庸置疑。但有一个细节是可以优化一下的。即:在出队时,将s1的元素逐个“倒入”s2时,原在s1栈底的元素,不用“倒入”s2(即只“倒”s1.Count()-1个),可直接弹出作为出队元素返回。这样可以减少一次压栈的操作。约有一半人,经提示后能意识到此问题。


上述思路,有些变种,如:

入队时,先判断s1是否为空,如不为空,说明所有元素都在s1,此时将入队元素直接压入s1;如为空,要将s2的元素逐个“倒回”s1,再压入入队元素。

出队时,先判断s2是否为空,如不为空,直接弹出s2的顶元素并出队;如为空,将s1的元素逐个“倒入”s2,把最后一个元素弹出并出队。

有些人能同时想到大众方法和变种,应该说头脑还是比较灵光的。


相对于第一种方法,变种的s2好像比较“懒”,每次出队后,并不将元素“倒回”s1,如果赶上下次还是出队操作,效率会高一些,但下次如果是入队操作,效率不如第一种方法。我有时会让面试者分析比较不同方法的性能。我感觉(没做深入研究),入队、出队操作随机分布时,上述两种方法总体上时间复杂度和空间复杂度应该相差无几(无非多个少个判断)。


真正性能较高的,其实是另一个变种。即:

入队时,将元素压入s1

出队时,判断s2是否为空,如不为空,则直接弹出顶元素;如为空,则将s1的元素逐个“倒入”s2,把最后一个元素弹出并出队。

这个思路,避免了反复“倒”栈,仅在需要时才“倒”一次。但在实际面试中很少有人说出,可能是时间较少的缘故吧。


以上几个思路乍看没什么问题了,但其实还是有个细节要考虑的。其实无论什么方法和情况,都要考虑没有元素可供出队时的处理(2个栈都为空的时候,出队操作一定会引起异常)。在实际写代码时,忽略这些判断或异常处理,程序会出现问题。所以,能不能考虑到这些细节,也体现了个人的素养。


个人感觉,这道题确实有助于我鉴别应聘的人。但对于面试,毕竟还是要看面试者的综合素质,一道(或几道)题定生死不可取。

posted @ 2012-11-16 16:12 dyh 阅读(306) | 评论 (0)编辑 收藏

2012年11月5日

好长一段时间没有用C++写程序了,记录下C++编程的一些常用的方法,以免再次忘记:
1. 模板类的定义和实现必须放在同一个头文件中

2. unary_function和binary_function是stl提供的一元和二元函数对象基类,子类需实现()操作符,这样的子类可以用在stl算法函数中,如sort, partition等。
   一元函数对象例子如下:
template <typename T> 
class FilterCriterion : public unary_function<T, bool>
{

public:
    bool operator()(const T& val) const
    {
        return (val.size() > 0);
    };

};

FilterCriterion<MyType> f;
partition(vec.begin(), vec.end(), f); //对MyType对象进行分类(size必须>0)
   二元函数对象例子如下:
template <class T> 
class RankCriterion : public binary_function<T, T, bool>
{
public:
bool operator()(const T& lhs, const T& rhs) const
{
return (lhs.size() > rhs.size());
};
}
RankCriterion<MyType> r;
sort(vec.begin(), vec.begin(), vec.end(), r); // 对MyType对象进行排序(按size大小排序)
3. C++处理表达式可以采用先转成逆波兰表达式,然后计算
http://www.cnblogs.com/adamxx/archive/2006/08/30/703267.html

4. Dll导出类或函数
#ifdef SIMPLEDLL_EXPORT
#define DLL_EXPORT __declspec(dllexport)
#else
#define DLL_EXPORT __declspec(dllimport)
#endif

5. const 成员函数
const 成员函数获得的能力:可以操作常量对象,如GetName函数定义为string GetName() const; 那么Const A a; a.GetName();是能编译通过的,若GetName不定义为const,那么上述调用编译会失败

const成员函数失去的能力:有得必有失,不能修改类的数据成员,不能在函数中调用其他非const的函数
posted @ 2012-11-05 16:37 dyh 阅读(393) | 评论 (0)编辑 收藏

2007年5月5日

     摘要: VC中为什么会出现LNK2005"符号已定义"的链接错误,本文详细介绍了VC链接的文件的过程,以及解决这个错误的方法  阅读全文
posted @ 2007-05-05 16:02 dyh 阅读(499) | 评论 (0)编辑 收藏

2007年5月2日

Homepage: http://www.grinninglizard.com/tinyxml/
download:http://sourceforge.net/projects/tinyxml

用mingw32-make前修改一下makefile文件,改为如下

# DEBUG can be set to YES to include debugging info, or NO otherwise(不是DEBUG)
DEBUG          := NO

# PROFILE can be set to YES to include profiling info, or NO otherwise
PROFILE        := NO

# TINYXML_USE_STL can be used to turn on STL support. NO, then STL
# will not be used. YES will include the STL files.(使用STL,选择的话,则可以使用std::string)
TINYXML_USE_STL := YES

一、      TinyXml的特点

TinyXml是一个基于DOM模型的、非验证的轻量级C++解释器。

1.      SAX和DOM

目前XML的解析主要有两大模型:SAX和DOM。

其中SAX是基于事件的,其基本工作流程是分析XML文档,当发现了一个新的元素时,产生一个对应事件,并调用相应的用户处理函数。这种方式占用内存少,速度快,但用户程序相应得会比较复杂。

而DOM(文档对象模型),则是在分析时,一次性的将整个XML文档进行分析,并在内存中形成对应的树结构,同时,向用户提供一系列的接口来访问和编辑该树结构。这种方式占用内存大,速度往往慢于SAX,但可以给用户提供一个面向对象的访问接口,对用户更为友好。


2.      验证和非验证

对于一个特定的XML文档而言,其正确性分为两个层次。首先是其格式应该符合XML的基本格式要求,比如第一行要有声明,标签的嵌套层次必须前后一致等等,符合这些要求的文件,就是一个合格的XML文件,称作well-formatted。但除此之外,一个XML文档因其内容的不同还必须在语义上符合相应的标准,这些标准由相应的DTD文件或者Schema文件来定义,符合了这些定义要求的XML文件,称作valid。

因此,解析器也分为两种,一种是验证的,即会跟据XML文件中的声明,用相应的DTD文件对XML文件进行校验,检查它是否满足DTD文件的要求。另一种是忽略DTD文件,只要基本格式正确,就可以进行解析。

就我所知,验证的解析器通常都是比较重量级的。TinyXml不支持验证,但是体积很小,用在解析格式较为简单的XML文件,比如配置文件时,特别的合适。


二、 TinyXml的构建和使用
1.      获取

TinyXml首页在http://www.grinninglizard.com/tinyxml/index.html,从这里可以找到最新版本的源代码,目前的版本是 2.4.3 (截至2006.5.17).

2.构建

TinyXml在构建时可以选择是否支持STL,选择的话,则可以使用std::string,所以通常应在Windows上,TinyXml的源码包里提供了VC6的工程文件,直接用它就可以生成两个静该打开这个选项。态库(带STL和不带STL),非常容易。唯一需要注意的是,默认生成的库是单线程的,如果用在多线程的项目中,需要改动一下配置,生成相应的多线程库。

在Unix平台上,TinyXml的源码包里只提供了一个Makefile,对于典型的Linux系统,或装了gcc和gmake的其他Unix,这个Makefile足够用了,我在RH9和RHEL4上测试,简单的make就成功了。需要注意的有以下几点:默认的编译是不支持STL的,可以通过编辑Makefile的TINYXML_USE_STL := NO那一行,把NO改成YES就可以支持STL了;还有默认只生成了一个测试程序,没有生成任何库,如果要生成静态库的话,可以用ar命令,将生成的几个目标文件打包就行了,如果要生成动态库,则需要加上-fpic参数重新编译。

3.      使用

构建了相应的库之后,在使用了它们的工程中,只要在连接时把他们连上就行了。需要注意的是,如果需要STL支持,在编译用到了TinyXml的文件时,需要定义一个宏TIXML_USE_STL,对gcc,可以使用参数-DTIXML_USE_STL,对cl.exe(VC),可以使用参数/DTIXML_USE_STL,如果嫌麻烦,可以直接定义在 tinyxml.h文件里。


三、 TinyXml的编程模型

1.类之间的关系

TinyXml实现的时DOM访问模型,因此提供了一系列的类对应XML文件中的各个节点。主要类间的关系如下图所示:


TiXmlBase:其它类的基类,是个抽象类

TiXmlNode:表示一个节点,包含节点的一般方法,如访问自节点、兄弟节点、编辑自身、编辑子节点

TiXmlDocument:表示整个XML文档,不对应其中某个特定的节点。

TiXmlElement:表示元素节点,可以包含子节点和TiXmlAttribute

TiXmlComment:表示注释

TiXmlDeclaration:表示声明

TiXmlText:表示文本节点

TiXmlUnknown:表示未知节点,通常是出错了

TiXmlAttribute:表示一个元素的属性

下面是一个简单的例子:

<?xml version="1.0" encoding="utf-8" ?>


<!-This is only a sample-->


<book>


       <name>TinyXml How To</name>


       <price unit=”RMB”>20</price>


       <description>Some words…</description>


</ book >


整个文档,对应TiXmlDocument

book,name,price, description,都对应TiXmlElement

第一行对应一个TiXmlDeclaration

第二行对应一个TiXmlComment

“TinyXml How To”对应一个TiXmlText

unit则是price的一个TiXmlAttribute

这些类与XML文件中的相应元素都有很好的对应关系,因此相信参照TinyXml的文档,可以很容易的掌握各个方法的使用。


2.  需要注意的问题

各类之间的转换


由于各个节点类都从TiXmlNode继承,在使用时常常需要将TiXmlNode*类型的指针转换为其派生类的指针,在进行这种转换时,应该首先使用由TiXmlNode类提供的一系列转换函数,如ToElement(void),而不是c++的dynamic_cast


检查返回值


由于TinyXml是一个非校验的解析器,因此当解析一个文件时,很可能文件并不包含我们预期的某个节点,在这种情况下,TinyXml将返回空指针。因此,必须要对返回值进行检查,否则将很容易出现内存访问的错误。


如何重头建立一个XML文件


先建立一个TiXmlDocument对象,然后,载入某个模板,或者直接插入一个节点作为根节点,接着就可以像打开一个已有的XML文件那样对它进行操作了。


四、总结

TinyXml最大的特点就是它很小,可以很方便的静态连接到程序里。对于像配置文件、简单的数据文件这类文件的解析,它很适合。但是由于它是非验证的,因此需要在程序里做许多检查工做,加重了程序编写的负担。因此对于复杂的XML文件,我觉得最好还是用验证的解析器来处理。

posted @ 2007-05-02 10:46 dyh 阅读(1023) | 评论 (0)编辑 收藏

2007年4月27日

     摘要: 经典的C++库
STLport-------SGI STL库的跨平台可移植版本,在以前有些编译器离符合
标准比较远的情况下 那时还是有用的,当然目前vc71已经比较接近标准了,
故目前不怎么用它了。
Boost---------准标准库, 功能强大 涉及能想的到的大部分非特别领域的算法,
有一个大的C++社区支持
WxWindows-----功能强大的跨平台GUI库 ,它的功能和结构都类似 MFC,故原则上
可以通过WxWindows把现有MFC程序移植到非Win平台下
Blitz---------高效率的数值计算函数库 ,你可以订制补充你需要的算法
Log4cpp-------日志处理 ,功能类似java中的log4j
ACE-----------自适应通讯环境, 重量级的通讯环境库。
Crypto++ -----加/解密算法库, 非常专业的C++ 密码学函式库
CppUnit --- 一个  阅读全文
posted @ 2007-04-27 20:48 dyh 阅读(5038) | 评论 (0)编辑 收藏
仅列出标题  下一页