| |
常用链接
留言簿
随笔分类
随笔档案
My Links
搜索
最新评论

阅读排行榜
评论排行榜
Powered by: 博客园
模板提供:沪江博客
|
|
|
|
|
发新文章 |
|
 | |
手机图像简单预处理(J2ME实现) 2009年5月27日星期三 最近看到以前的一本数字图像处理书,不禁想用j2me尝试一下简单的数字图像处理在手机上如何实现。于是便有本文。
1 package com.yuankai.ImageTest; package com.yuankai.ImageTest;
2
3import java.io.IOException;
4
5import javax.microedition.lcdui.Display;
6import javax.microedition.lcdui.Form;
7import javax.microedition.lcdui.Image;
8import javax.microedition.midlet.MIDlet;
9import javax.microedition.midlet.MIDletStateChangeException;
10
11import com.yuankai.j2me.image.ImageUtil;
12
13  public class ImageProcessMIDlet extends MIDlet public class ImageProcessMIDlet extends MIDlet  { {
14
15 Display display=null;
16 Image old_image=null;
17 Image new_image=null;
18 Form form=new Form("Image Processing");
19
20  public ImageProcessMIDlet() { public ImageProcessMIDlet() {
21 display=Display.getDisplay(this);
22 try {
23 old_image=Image.createImage("/1.png");
24 } catch (IOException e) {
25 e.printStackTrace();
26 } }
27
28 }
29 protected void destroyApp(boolean arg0) throws MIDletStateChangeException {
30 // TODO Auto-generated method stub
31
32 }
33
34 protected void pauseApp() {
35 // TODO Auto-generated method stub
36
37 }
38
39 protected void startApp() throws MIDletStateChangeException {
40
41 display.setCurrent(form);
42 form.append("处理前\n");
43 form.append(old_image);
44 //进行图像的预处理
45
46 form.append("\n灰度化处理后:\n");
47 new_image=ImageUtil.toGray(old_image);
48 form.append(new_image);
49
50 // form.append("\n边缘检测处理后:\n");
51 // new_image=ImageUtil.Sobel(new_image, new_image.getWidth());
52 // form.append(new_image);
53
54 form.append("\n二值化处理后:\n");
55 new_image=ImageUtil.Binarization(new_image,100);
56 form.append(new_image);
57
58 }
59
60 } }
61
上面这个文件是我写的一个MIDlet类文件,用来调用ImageUtil类图像处理方法.
1package com.yuankai.j2me.image;
2
3import javax.microedition.lcdui.Image;
4
5/** *//**
6 * 数字图像处理工具类型
7 * */
8public class ImageUtil {
9
10 public static final int RED=1;
11 public static final int GREEN=2;
12 public static final int BLUE=3;
13 public static final int ALPHA=4;
14 /** *//**
15 * 图像灰度化
16 * Image old_image:原始图像
17 * */
18 public static Image toGray(Image old_image)
19 {
20 Image image=null;
21 int []RGBArray;
22
23 int width=old_image.getWidth();
24 int height=old_image.getHeight();
25 RGBArray=new int[width*height];
26 old_image.getRGB(RGBArray, 0, width, 0, 0, width, height);
27 int size=RGBArray.length;
28
29 for(int i=0;i<size;i++)
30 {
31
32 int color=RGBArray[i];
33 int alpha=color2RGB(color,ALPHA);
34 int red=color2RGB(color,RED);
35 int green=color2RGB(color,GREEN);
36 int blue=color2RGB(color,BLUE);
37
38 //修改成灰度图象,采用的是权值平均值法
39 int temp=(int)(red*0.11+green*0.59+blue*0.3);
40
41 red=temp;
42 green=temp;
43 blue=temp;
44
45 color=RGB2color(red,green,blue,alpha);;
46 RGBArray[i]=color;
47
48
49 }
50 image=Image.createRGBImage(RGBArray, width, height,true);
51 return image;
52
53 }
54 /** *//**
55 * 图像二值化
56 * Image old_image:原始图像
57 * int level : 阀值
58 * */
59 public static Image Binarization(Image old_image,int level)
60 {
61 Image image=null;
62 int []RGBArray;
63
64 int width=old_image.getWidth();
65 int height=old_image.getHeight();
66 RGBArray=new int[width*height];
67 old_image.getRGB(RGBArray, 0, width, 0, 0, width, height);
68 int size=RGBArray.length;
69 for(int i=0;i<size;i++)
70 {
71
72 int color=RGBArray[i];
73 int alpha=color2RGB(color,ALPHA);
74 int red=color2RGB(color,RED);
75 int green=color2RGB(color,GREEN);
76 int blue=color2RGB(color,BLUE);
77
78 //修改成灰度图象
79 if(red>level)
80 red=255;
81 else
82 red=0;
83 if(green>level)
84 green=255;
85 else
86 green=0;
87 if(blue>level)
88 blue=255;
89 else
90 blue=0;
91
92
93 color=RGB2color(red,green,blue,alpha);
94 RGBArray[i]=color;
95
96
97 }
98 image=Image.createRGBImage(RGBArray, width, height,true);
99 return image;
100
101 }
102
103 /** *//**
104 * 图像边缘检测 Sobel 算子
105 * Image old_image:原始灰度图像
106 * int widthstep : 行大小
107 *
108 * g(x,y)=
109 * abs(f(x-1,y-1)+2*f(x-1,y)+f(x-1,y+1)-f(x+1,y-1)-2*f(x+1,y)-f(x+1,y+1))
110 * +abs(f(x-1,y-1)+2*f(x,y-1)+f(x+1,y-1)-f(x-1,y+1)-2*f(x,y+1)-f(x+1,y+1))
111 *
112 * -1 0 1 -1 -2 -1
113 * -2 0 2 0 0 0
114 * -1 0 1 1 2 1
115 * */
116 public static Image Sobel(Image old_image,int widthstep)
117 {
118 Image image=null;
119 int []RGBArray;
120
121 int width=old_image.getWidth();
122 int height=old_image.getHeight();
123 RGBArray=new int[width*height];
124 old_image.getRGB(RGBArray, 0, width, 0, 0, width, height);
125 for(int i=1;i<height-1;i++)
126 {
127
128
129 for(int j=1;j<width-1;j++)
130 {
131 //获得对应位置的灰度值
132 //f(x-1,y-1)
133 int color11=RGBArray[(i-1)*widthstep+j-1];
134 int gray11=color2RGB(color11,RED);
135 //f(x-1,y)
136 int color12=RGBArray[(i-1)*widthstep+j];
137 int gray12=color2RGB(color12,RED);
138 //f(x-1,y+1)
139 int color13=RGBArray[(i-1)*widthstep+j+1];
140 int gray13=color2RGB(color13,RED);
141
142 //f(x+1,y-1)
143 int color31=RGBArray[(i+1)*widthstep+j-1];
144 int gray31=color2RGB(color31,RED);
145 //f(x+1,y)
146 int color32=RGBArray[(i+1)*widthstep+j];
147 int gray32=color2RGB(color32,RED);
148 //f(x+1,y+1)
149 int color33=RGBArray[(i+1)*widthstep+j+1];
150 int gray33=color2RGB(color33,RED);
151
152 //f(x,y-1)
153 int color21=RGBArray[i*widthstep+j-1];
154 int gray21=color2RGB(color21,RED);
155 //f(x,y+1)
156 int color23=RGBArray[i*widthstep+j+1];
157 int gray23=color2RGB(color23,RED);
158
159
160
161 int Sx=gray11+2*gray12+gray13-gray31-2*gray32-gray33;
162 int Sy=gray11+2*gray21+gray31-gray12-2*gray13-gray33;
163 int temp=(int)Math.sqrt(Sx*Sx+Sy*Sy);
164
165 int color=RGBArray[i*widthstep+j-1];
166 int alpha=color2RGB(color,ALPHA);
167
168 RGBArray[i*widthstep+j-1]=RGB2color(temp,temp,temp,alpha);;
169 }
170
171 }
172 image=Image.createRGBImage(RGBArray, width, height,true);
173 return image;
174
175 }
176 /** *//**
177 * 获得一个颜色分量的值
178 * */
179 public static int color2RGB(int color,int type)
180 {
181 int temp=-1;
182 switch(type)
183 {
184 case BLUE:
185 temp=(color&0x000000ff);
186 break;
187 case GREEN:
188 temp=(color&0x0000ff00)>>8;
189 break;
190 case RED:
191 temp=(color&0x00ff0000)>>16;
192 break;
193 case ALPHA:
194 temp=0xff;
195 break;
196 }
197 return temp;
198 }
199 /** *//**
200 * 根据rgb获得color()
201 **/
202 public static int RGB2color(int red,int green,int blue,int alpha)
203 {
204 return (alpha<<24)+(red<<16)+(green<<8)+blue;
205 }
206}
207
上面代码,是我自己写的ImageUtil类型,它提供简单的图像处理的静态方法。 程序测试结果: 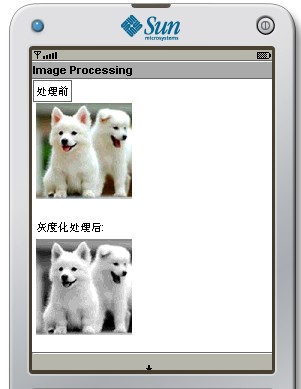 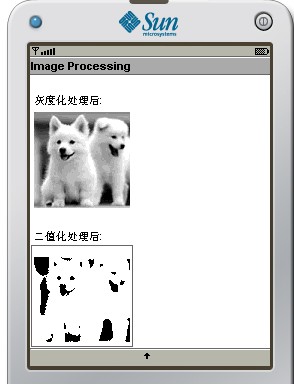 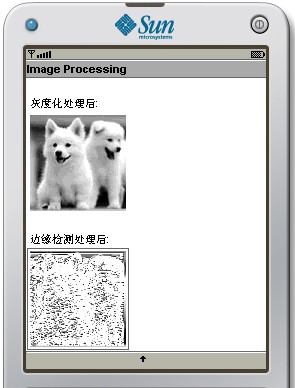 以上代码处理的图片格式是j2me最常见的.png格式.可以看到使用soble算子+j2me实现边缘检测效果明显比我们平时用VC实现的差,不知道如何进行修改,才可以提升在手机中处理效果。

|
|