 2009年8月13日
2009年8月12日
|
|
一、选择公司的形式:
普通的有限责任公司,最低注册资金3万元,需要2个或2个以上的股东,
从06年1月起新的公司法规定,允许1个股东注册有限责任公司,这种特殊的有限责任公司又称“一人有限公司”(但公司名称中不会有“一人”字样,执照上会注明“自然人独资”),最低注册资金10万元。如果只有你一个人作为股东,则选择一人有限公司,最低注册资金10万元;如果你和朋友、家人合伙投资创业,可选择普通的有限公司,最低注册资金3万元。建议你准备好注册资金3万元。
二、注册公司所需的注册资料:
(1)个人资料(身份证、法人户口本复印件或户籍证明、居住地址、电话号码)
(2)注册资金
(3)拟订注册公司名称若干
(4)公司经营范围
(5)租房房产证、租赁合同
(6)公司住所
(7)股东名册及股东联系电话、联系地址
(8)公司的机构及其产生办法、职权、议事规则
(9)公司章程
三、注册公司的步骤:
1.核名:到工商局去领取一张“企业(字号)名称预先核准申请表”,填写你准备取的公司名称,由工商局上工商局内部网检索是否有重名,如果没有重名,就可以使用这个名称,就会核发一张“企业(字号)名称预先核准通知书”。工商名称核准费是40元,交给工商局。 40元可以帮你检索5个名字,很多名字重复,所以一般常见的名字就不用试了,免得花冤枉钱。
2.租房: 去专门的写字楼租一间办公室,如果你自己有厂房或者办公室也可以,有的地方不允许在居民楼里办公。 你要交房租给所租办公室的房东(所有权人),假设办公室的房租是1000元/月,一般起租最少6个月,6个月的房租是6000元。
3.签订租房合同:你要与你所租的办公室的房东签定租房合同,并让房东提供房产证的复印件。租房合同打印费5份15元,房产证复印件5张2.5元。
4.买租房的印花税:你要到税务局去买印花税,按年租金的千分之一的税率购买,贴在房租合同的首页。例如你的每年房租是1.2万元,那就要买12元钱的印花税,后面凡是需要用到房租合同的地方,都需要是贴了印花税的合同复印件。
5.编写“公司章程”:可以在工商局网站下载“公司章程”的样本,修改一下就可以了。章程的最后由所有股东签名。 假设章程打印5份(股东2人各2份、工商局1份、银行1份、会计师事务所1份),章程打印费15元、下载公司章程的上网费2元。
6.刻私章: 去街上刻章的地方刻一个私章,给他们讲刻法人私章(方形的)。刻章费用20元。
7.到会计师事务所领取“银行询征函”:联系一家会计师事务所,领取一张“银行询征函”,必须是原件,会计师事务所盖鲜章。如果你不清楚,可以看报纸上的分类广告,有很多会计师事务所的广告。银行询征函10元。
8.去银行开立公司验资户: 所有股东带上自己入股的那一部分钱到银行,带上公司章程、工商局发的核名通知、法人代表的私章、身份证、用于验资的钱、空白询征函表格,到银行去开立公司帐户,你要告诉银行是开验资户。开立好公司帐户后,各个股东按自己出资额向公司帐户中存入相应的钱。 银行会发给每个股东缴款单、并在询征函上盖银行的章。公司验资户开户费20元。
注意:公司法规定,注册公司时,投资人(股东)必须缴纳足额的资本,可以以贷币形式(也就是人民币)出资,也可以以实物(如汽车、房产、知识产权等)出资。到银行办的只是货币出资这一部分,如果你有实物、房产等作为出资的,需要到会计师事务所鉴定其价值后再以其实际价值出资,比较麻烦,因此建议你直接拿钱来出资,公司法不管你用什么手段拿的钱,自己的也好、借的也好,只要如数缴足出资款即可。
9.办理验资报告:拿着银行出具的股东缴款单、银行盖章后的询征函,以及公司章程、核名通知、房租合同、房产证复印件,到会计师事务所办理验资报告,会计师事务师验资报告按注册资本收费。50万元以下注册资金验资费500元。
10.注册公司:到工商局领取公司设立登记的各种表格,包括设立登记申请表、股东(发起人)名单、董事经理监理情况、法人代表登记表、指定代表或委托代理人登记表。注册登记费,按注册资金的万分之8收取。填好后,连同核名通知、公司章程、房租合同、房产证复印件、验资报告一起交给工商局。大概3个工作日后可领取执照。注册公司手续费300元。
11.凭营业执照,到公安局特行科指定的刻章社,去刻公章、财务章。后面步骤中,均需要用到公章或财务章。公章50元,财务章50元。
12.办理企业组织机构代码证:凭营业执照到技术监督局办理组织机构代码证,费用是80元。办这个证需要半个月,技术监督局会首先发一个预先受理代码证明文件,凭这个文件就可以办理后面的税务登记证、银行基本户开户手续了。
13.去银行开基本户:凭营业执照、组织机构代码证,去银行开立基本帐号。最好是在原来办理验资时的那个银行的同一网点去办理,否则,会多收100元的验资帐户费用。 开基本户需要填很多表,你最好把能带齐的东西全部带上,要不然要跑很多趟,包括营业执照正本原件、身份证、组织机构代码证、公财章、法人章。
开基本户时,还需要购买一个密码器(从2005年下半年起,大多银行都有这个规定),今后你的公司开支票、划款时,都需要使用密码器来生成密码。公司基本帐号开户费20元,密码器280元。
14.办理税务登记:领取执照后,30日内到当地税务局申请领取税务登记证。一般的公司都需要办理2种税务登记证,即国税和地税。费用是各40元,共80元。
15.请兼职会计:办理税务登记证时,必须有一个会计,因为税务局要求提交的资料其中有一项是会计资格证和身份证。你可先请一个兼职会计,小公司刚开始请的兼职会计一般200元工资就可以了。
16.申请领购发票:如果你的公司是销售商品的,应该到国税去申请发票,如果是服务性质的公司,则到地税申领发票。 开始可先领购500元的发票。
最后就开始营业了。
四、注册公司的费用:
1、工商局工商名称核准,40元
2、公司办公室房租6个月,6000元
3、租房合同打印费5份15元,房产证复印件5张2.5元
4、租房的印花税12元
5、下载公司章程的上网费2元,公司章程打印费15元
6、刻法人私章20元
7、会计师事务所的银行询征函10元
8、银行开立公司验资户开户费20元
9、会计师事务所办理验资报告500元
10、工商局注册公司手续费300元,信息卡120元
11、公章2个120元,财务章1个60元
12、技术监督局办理组织机构代码证148元
13、银行开立公司基本帐号开户费20元、密码器280元
14、国税税务登记证60元,地税税务登记证60元
15、兼职会计工资,200元
16、申请领购发票,500元
合计:8502.5元
如果不算房租、会计工资、发票,则合计1802.5元。
注册资本最少3万元。
注册登记费按注册资本的0.08%(1000万以内),0.04%(1000万以上的超过部分)收取
营业税:销售商品的公司,按所开发票额的4%征收增殖税;提供服务的公司,按所开发票额的5%征收营业税。
所得税:对企业的纯利润征收18-33%的企业所得税。
利润收入在3万元(含3万元)以下的税率为18%,利润收入在3万元以上10万元(含10万元)的税率为27%,10万元以上的为33%。
五、注册公司的相关说明:
1.注册公司会不到半年时间,最快需要20天时间。地区不同注册公司的费用也有所不同。
2.要注册一个公司,首先想好经营什么,怎样经营好,再来注册。要不,注册了也没有用,注册了公司是需要很多成本的,不是一件“好玩”的事情。
3.注册个体简单易办;而注册公司要有章程、合同,要验资,程序挺多的。 在投入不是太多时,还是注册个体为好。
4.前期可行性分析调查,建议你自己认真的考虑一下
5.公司必须建立健全的会计制度,你可能担心自己不会,怎么办?刚开始成立的公司,业务少,对会计的工作量也非常小,你可以请一个兼职会计,每个月到你的公司帮你建帐,二、三天时间就够了,给他200-500左右的工资即可。
6.每个月1日-10日按时向税务申报税,即使没有开展业务不需要缴税,也要进行零申报,否则会被罚款的。罚款额度超过一天100元。营业执照办理下来后一个月内必须办理税务登记。每年3-6月年定时年检营业执照。
7.对企业所得税,做帐很关键,如果帐面上你的利润很多,那税率就高。所以,平常的购买设备都要开发票,你吃饭、坐车的票都留起来,可以做为你的企业运作成本。
8.营业税是对营业额征税,不管你赚没有赚钱,只有发生了交易,开了发票,就要征税;所得税,是对利润征税,利润就是营业额扣减各种成本后剩余的钱,只有赚了钱,才会征所得税。
9.有限责任公司可以注册分公司。
10.开办费是指企业在筹建期间发生的费用,包括筹建期人员工资、办公费、培训费、差旅费、印刷费、注册登记费以及不计入固定资产和无形资产购建成本的汇兑损益和利息支出。筹建期是指企业被批准筹建之日起至开始生产、经营(包括试生产、试营业)之日的期间。
|
2009年7月24日
c++中的explicit关键字用来修饰类的构造函数,表明该构造函数是显式的,既然有"显式"那么必然就有"隐式",那么什么是显示而什么又是隐式的呢?
如果c++类的构造函数有一个参数,那么在编译的时候就会有一个缺省的转换操作:将该构造函数对应数据类型的数据转换为该类对象,如下面所示:
class MyClass
{
public:
MyClass( int num );
}
....
MyClass obj = 10; //ok,convert int to MyClass
在上面的代码中编译器自动将整型转换为MyClass类对象,实际上等同于下面的操作:
MyClass temp(10);
MyClass obj = temp;
上面的所有的操作即是所谓的"隐式转换"。
如果要避免这种自动转换的功能,我们该怎么做呢?嘿嘿这就是关键字explicit的作用了,将类的构造函数声明为"显示",也就是在声明构造函数的时候前面添加上explicit即可,这样就可以防止这种自动的转换操作,如果我们修改上面的MyClass类的构造函数为显示的,那么下面的代码就不能够编译通过了,如下所示:
class MyClass
{
public:
explicit MyClass( int num );
}
....
MyClass obj = 10; //err,can't non-explict convert
class isbn_mismatch:public std::logic_error{
public:
explicit isbn_missmatch(const std::string &s):std:logic_error(s){}
isbn_mismatch(const std::string &s,const std::string &lhs,const std::string &rhs):
std::logic_error(s),left(lhs),right(rhs){}
const std::string left,right;
virtual ~isbn_mismatch() throw(){}
};
Sales_item& operator+(const Sales_item &lhs,const Sales_item rhs)
{
if(!lhs.same_isbn(rhs))
throw isbn_mismatch("isbn missmatch",lhs.book(),rhs.book());
Sales_item ret(lhs);
ret+rhs;
return ret;
}
Sales_item item1,item2,sum;
while(cin>>item1>>item2)
{
try{
sun=item1+item2;
}catch(const isbn_mismatch &e)
{
cerr<<e.what()<<"left isbn is:"<<e.left<<"right isbn is:"<<e.right<<endl;
}
}
用于用户自定义类型的构造函数,指定它是默认的构造函数,不可用于转换构造函数.因为构造函数有三种:1拷贝构造函数2转换构造函数3一般的构造函数(我自己的术语^_^)
另:如果一个类或结构存在多个构造函数时,explicit 修饰的那个构造函数就是默认的
class isbn_mismatch:public std::logic_error{
public:
explicit isbn_missmatch(const std::string &s):std:logic_error(s){}
isbn_mismatch(const std::string &s,const std::string &lhs,const std::string &rhs):
std::logic_error(s),left(lhs),right(rhs){}
const std::string left,right;
virtual ~isbn_mismatch() throw(){}
};
Sales_item& operator+(const Sales_item &lhs,const Sales_item rhs)
{
if(!lhs.same_isbn(rhs))
throw isbn_mismatch("isbn missmatch",lhs.book(),rhs.book());
Sales_item ret(lhs);
ret+rhs;
return ret;
}
Sales_item item1,item2,sum;
while(cin>>item1>>item2)
{
try{
sun=item1+item2;
}catch(const isbn_mismatch &e)
{
cerr<<e.what()<<"left isbn is:"<<e.left<<"right isbn is:"<<e.right<<endl;
}
}
这个 《ANSI/ISO C++ Professional Programmer's Handbook 》是这样说的
explicit Constructors
A constructor that takes a single argument is, by default, an implicit conversion operator, which converts its argument to
an object of its class (see also Chapter 3, "Operator Overloading"). Examine the following concrete example:
class string
{
private:
int size;
int capacity;
char *buff;
public:
string();
string(int size); // constructor and implicit conversion operator
string(const char *); // constructor and implicit conversion operator
~string();
};
Class string has three constructors: a default constructor, a constructor that takes int, and a constructor that
constructs a string from const char *. The second constructor is used to create an empty string object with an
initial preallocated buffer at the specified size. However, in the case of class string, the automatic conversion is
dubious. Converting an int into a string object doesn't make sense, although this is exactly what this constructor does.
Consider the following:
int main()
{
string s = "hello"; //OK, convert a C-string into a string object
int ns = 0;
s = 1; // 1 oops, programmer intended to write ns = 1,
}
In the expression s= 1;, the programmer simply mistyped the name of the variable ns, typing s instead. Normally,
the compiler detects the incompatible types and issues an error message. However, before ruling it out, the compiler first
searches for a user-defined conversion that allows this expression; indeed, it finds the constructor that takes int.
Consequently, the compiler interprets the expression s= 1; as if the programmer had written
s = string(1);
You might encounter a similar problem when calling a function that takes a string argument. The following example
can either be a cryptic coding style or simply a programmer's typographical error. However, due to the implicit
conversion constructor of class string, it will pass unnoticed:
int f(string s);
int main()
{
f(1); // without a an explicit constructor,
//this call is expanded into: f ( string(1) );
//was that intentional or merely a programmer's typo?
}
'In order to avoid such implicit conversions, a constructor that takes one argument needs to be declared explicit:
class string
{
//...
public:
explicit string(int size); // block implicit conversion
string(const char *); //implicit conversion
~string();
};
An explicit constructor does not behave as an implicit conversion operator, which enables the compiler to catch the
typographical error this time:
int main()
{
string s = "hello"; //OK, convert a C-string into a string object
int ns = 0;
s = 1; // compile time error ; this time the compiler catches the typo
}
Why aren't all constructors automatically declared explicit? Under some conditions, the automatic type conversion is
useful and well behaved. A good example of this is the third constructor of string:
string(const char *);
The implicit type conversion of const char * to a string object enables its users to write the following:
string s;
s = "Hello";
The compiler implicitly transforms this into
string s;
//pseudo C++ code:
s = string ("Hello"); //create a temporary and assign it to s
On the other hand, if you declare this constructor explicit, you have to use explicit type conversion:
class string
{
//...
public:
explicit string(const char *);
};
int main()
{
string s;
s = string("Hello"); //explicit conversion now required
return 0;
}
Extensive amounts of legacy C++ code rely on the implicit conversion of constructors. The C++ Standardization
committee was aware of that. In order to not make existing code break, the implicit conversion was retained. However, a
new keyword, explicit, was introduced to the languageto enable the programmer to block the implicit conversion
when it is undesirable. As a rule, a constructor that can be invoked with a single argument needs to be declared
explicit. When the implicit type conversion is intentional and well behaved, the constructor can be used as an
implicit conversion operator.
网上找的讲的最好的贴:
C++ 中 explicit 关键字的作用
在 C++ 中, 如果一个类有只有一个参数的构造函数,C++ 允许一种特殊的声明类变量的方式。在这种情况下,可以直接将一个对应于构造函数参数类型的数据直接赋值给类变量,编译器在编译时会自动进行类型转换,将对应于构造函数参数类型的数据转换为类的对象。 如果在构造函数前加上 explicit 修饰词, 则会禁止这种自动转换,在这种情况下,即使将对应于构造函数参数类型的数据直接赋值给类变量,编译器也会报错。
下面以具体实例来说明。
建立people.cpp 文件,然后输入下列内容:
class People
{
public:
int age;
explicit People (int a)
{
age=a;
}
};
void foo ( void )
{
People p1(10); //方式一
People* p_p2=new People(10); //方式二
People p3=10; //方式三
}
这段 C++ 程序定义了一个类 people ,包含一个构造函数, 这个构造函数只包含一个整形参数 a ,可用于在构造类时初始化 age 变量。
然后定义了一个函数foo,在这个函数中我们用三种方式分别创建了三个10岁的“人”。第一种是最一般的类变量声明方式。第二种方式其实是声明了一个people类的指针变量,然后在堆中动态创建了一个people实例,并把这个实例的地址赋值给了p_p2。第三种方式就是我们所说的特殊方式,为什么说特殊呢?我们都知道,C/C++是一种强类型语言,不同的数据类型是不能随意转换的,如果要进行类型转换,必须进行显式强制类型转换,而这里,没有进行任何显式的转换,直接将一个整型数据赋值给了类变量p3。
因此,可以说,这里进行了一次隐式类型转换,编译器自动将对应于构造函数参数类型的数据转换为了该类的对象,因此方式三经编译器自动转换后和方式一最终的实现方式是一样的。
不相信? 耳听为虚,眼见为实,让我们看看底层的实现方式。
为了更容易比较方式一和方式三的实现方式,我们对上面的代码作一点修改,去除方式二:
void foo ( void )
{
People p1(10); //方式一
People p3=10; //方式三
}
去除方式二的原因是方式二是在堆上动态创建类实例,因此会有一些额外代码影响分析。修改完成后,用下列命令编译 people.cpp
$ gcc -S people.cpp
"-S"选项是GCC输出汇编代码。命令执行后,默认生成people.s。 关键部分内容如下:
.globl _Z3foov
.type _Z3foov, @function
_Z3foov:
.LFB5:
pushl %ebp
.LCFI2:
movl %esp, %ebp
.LCFI3:
subl $24, %esp
.LCFI4:
movl $10, 4(%esp)
leal -4(%ebp), %eax
movl %eax, (%esp)
call _ZN6PeopleC1Ei
movl $10, 4(%esp)
leal -8(%ebp), %eax
movl %eax, (%esp)
call _ZN6PeopleC1Ei
leave
ret
看“.LCFI4” 行后面的东西,1-4行和5-8行几乎一模一样,1-4行即为方式一的汇编代码,5-8即为方式三的汇编代码。 细心的你可能发现2和6行有所不同,一个是 -4(%ebp) 而另一个一个是 -8(%ebp) ,这分别为类变量P1和P3的地址。
对于不可随意进行类型转换的强类型语言C/C++来说, 这可以说是C++的一个特性。哦,今天好像不是要说C++的特性,而是要知道explicit关键字的作用?
explicit关键字到底是什么作用呢? 它的作用就是禁止这个特性。如文章一开始而言,凡是用explicit关键字修饰的构造函数,编译时就不会进行自动转换,而会报错。
让我们看看吧! 修改代码:
class People
{
public:
int age;
explicit People (int a)
{
age=a;
}
};
然后再编译:
$ gcc -S people.cpp
编译器立马报错:
people.cpp: In function ‘void foo()’:
people.cpp:23: 错误:请求从 ‘int’ 转换到非标量类型 ‘People’
2009年7月22日
软件设计中会碰到这样的关系:一个对象依赖于另一个对象,必须根据后者的状态更新自己的状态,可以把后者称作目标对象,前者称作观察者对象。不但观察者依赖于目标,当目标的状态改变时也要通知观察者,这就出现了双向的依赖。两个对象互相依赖的后果是它们必须一起复用。如果一个目标有多个观察者,那么目标也依赖所有观察者,从而目标对象无法独立复用。如何消除目标和观察者之间的互相依赖呢?观察者模式帮助我们解决这个问题。
观察者模式把目标对观察者的依赖进行抽象:使目标只知道自己有若干观察者,但不知道这些观察者具体是谁,可能有多少个;当目标状态改变时只要给这些观察者一个通知,不必作更多的事情。这样目标对观察者的依赖就达到了抽象和最小,而目标对具体观察者的依赖被解除了。
类图如下:

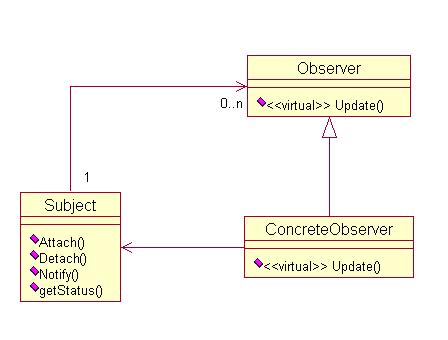
Subject 对象保存一个Observer引用的列表,当我们让一个ConcreteObserver对象观察Subject对象时,调用后者的Attach()方法,将前者的引用加入该列表中。当Subject对象状态改变时,它调用自身的Notify方法,该方法调用列表中每一个Observer的 Update()方法。一个ConcreteObserver只要重定义Update()就能收到通知,作为对通知的响应,Update()调用 Subject对象的getStatus()获取数据,然后更新自身。当不需要继续观察时,ConcreteObserver对象调用Subject对象的Detach()方法,其引用被从列表中移除。
解除目标对具体观察者的依赖以后,很容易增加新的具体观察者,因为不受依赖的方面就可以自由变化;而目标也可以独立地复用,因为无所依赖的方面就可以不受影响。
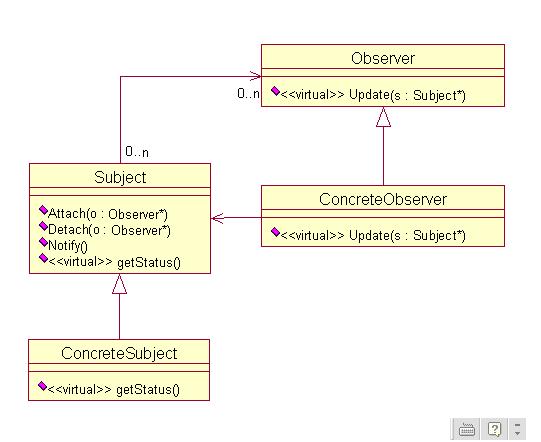
以上主要考虑了一个目标有多个观察者的情况,我们设法解除了目标对具体观察者的依赖,使具体观察者的种类和数目容易改变。有时候一个观察者观察多个目标也是有意义的,在前面的类图中,观察者对具体目标的依赖仍然存在,因此无法适应目标方面的变化。怎样抽象这种依赖呢?使观察者只知道若干个目标会向自己发出通知,而不知道这些目标具体是谁,可能有多少个;在目标向观察者发送通知时,将一个自身的引用作为参数,然后观察者调用其抽象方法就可以获得目标状态。这就使得观察者对目标的依赖是抽象的,观察者对具体目标的依赖被解除了。
类图如下:
参考资料:
1.《设计模式-可复用面向对象软件的基础》/Erich Gamma等著,李英军等译 机械工业出版社
起学习
NT/2000方法:
#include <windows.h>
#include <conio.h>
#include <stdio.h>
#define SystemBasicInformation 0
#define SystemPerformanceInformation 2
#define SystemTimeInformation 3
#define Li2Double(x) ((double)((x).HighPart) * 4.294967296E9 (double)((x).LowPart))
typedef struct
{
DWORD dwUnknown1;
ULONG uKeMaximumIncrement;
ULONG uPageSize;
ULONG uMmNumberOfPhysicalPages;
ULONG uMmLowestPhysicalPage;
ULONG uMmHighestPhysicalPage;
ULONG uAllocationGranularity;
PVOID pLowestUserAddress;
PVOID pMmHighestUserAddress;
ULONG uKeActiveProcessors;
BYTE bKeNumberProcessors;
BYTE bUnknown2;
WORD wUnknown3;
} SYSTEM_BASIC_INFORMATION;
typedef struct
{
LARGE_INTEGER liIdleTime;
DWORD dwSpare[76];
} SYSTEM_PERFORMANCE_INFORMATION;
typedef struct
{
LARGE_INTEGER liKeBootTime;
LARGE_INTEGER liKeSystemTime;
LARGE_INTEGER liExpTimeZoneBias;
ULONG uCurrentTimeZoneId;
DWORD dwReserved;
} SYSTEM_TIME_INFORMATION;
// ntdll!NtQuerySystemInformation (NT specific!)
//
// The function copies the system information of the
// specified type into a buffer
//
// NTSYSAPI
// NTSTATUS
// NTAPI
// NtQuerySystemInformation(
// IN UINT SystemInformationClass, // information type
// OUT PVOID SystemInformation, // pointer to buffer
// IN ULONG SystemInformationLength, // buffer size in bytes
// OUT PULONG ReturnLength OPTIONAL // pointer to a 32-bit
// // variable that receives
// // the number of bytes
// // written to the buffer
// );
typedef LONG (WINAPI *PROCNTQSI)(UINT,PVOID,ULONG,PULONG);
PROCNTQSI NtQuerySystemInformation;
void main(void)
{
SYSTEM_PERFORMANCE_INFORMATION SysPerfInfo;
SYSTEM_TIME_INFORMATION SysTimeInfo;
SYSTEM_BASIC_INFORMATION SysBaseInfo;
double dbIdleTime;
double dbSystemTime;
LONG status;
LARGE_INTEGER liOldIdleTime = {0,0};
LARGE_INTEGER liOldSystemTime = {0,0};
NtQuerySystemInformation = (PROCNTQSI)GetProcAddress(
GetModuleHandle("ntdll"),
"NtQuerySystemInformation"
);
if (!NtQuerySystemInformation)
return;
// get number of processors in the system
status = NtQuerySystemInformation(SystemBasicInformation,&SysBaseInfo,sizeof(SysBaseInfo),NULL);
if (status != NO_ERROR)
return;
printf("\nCPU Usage (press any key to exit): ");
while(!_kbhit())
{
// get new system time
status = NtQuerySystemInformation(SystemTimeInformation,&SysTimeInfo,sizeof(SysTimeInfo),0);
if (status!=NO_ERROR)
return;
// get new CPU's idle time
status = NtQuerySystemInformation(SystemPerformanceInformation,&SysPerfInfo,sizeof(SysPerfInfo),NULL);
if (status != NO_ERROR)
return;
// 本文转自 C Builder研究 - http://www.ccrun.com/article.asp?i=424&d=7jw23a// if it's a first call - skip it
if (liOldIdleTime.QuadPart != 0)
{
// CurrentValue = NewValue - OldValue
dbIdleTime = Li2Double(SysPerfInfo.liIdleTime) - Li2Double(liOldIdleTime);
dbSystemTime = Li2Double(SysTimeInfo.liKeSystemTime) - Li2Double(liOldSystemTime);
// CurrentCpuIdle = IdleTime / SystemTime
dbIdleTime = dbIdleTime / dbSystemTime;
// CurrentCpuUsage% = 100 - (CurrentCpuIdle * 100) / NumberOfProcessors
dbIdleTime = 100.0 - dbIdleTime * 100.0 / (double)SysBaseInfo.bKeNumberProcessors 0.5;
printf("\b\b\b\b=%%",(UINT)dbIdleTime);
}
// store new CPU's idle and system time
liOldIdleTime = SysPerfInfo.liIdleTime;
liOldSystemTime = SysTimeInfo.liKeSystemTime;
// wait one second
Sleep(1000);
}
printf("\n");
}
//-------------------------------------------------------------
W9X:
#include <windows.h>
#include <conio.h>
#include <stdio.h>
void main(void)
{
HKEY hkey;
DWORD dwDataSize;
DWORD dwType;
DWORD dwCpuUsage;
// starting the counter
if ( RegOpenKeyEx( HKEY_DYN_DATA,
"PerfStats\\StartStat",
0,KEY_ALL_ACCESS,
&hkey ) != ERROR_SUCCESS)
return;
dwDataSize=sizeof(DWORD);
RegQueryValueEx( hkey,
"KERNEL\\CPUUsage",
NULL,&dwType,
(LPBYTE)&dwCpuUsage,
&dwDataSize );
RegCloseKey(hkey);
// geting current counter's value
if ( RegOpenKeyEx( HKEY_DYN_DATA,
"PerfStats\\StatData",
0,KEY_READ,
&hkey ) != ERROR_SUCCESS)
return;
printf("\nCPU Usage (press any key to exit): ");
while(!_kbhit())
{
dwDataSize=sizeof(DWORD);
RegQueryValueEx( hkey,
"KERNEL\\CPUUsage",
NULL,&dwType,
(LPBYTE)&dwCpuUsage,
&dwDataSize );
Sleep(500);
printf("\b\b\b\b=%%",dwCpuUsage);
}
printf("\n");
RegCloseKey(hkey);
// stoping the counter
if ( RegOpenKeyEx( HKEY_DYN_DATA,
"PerfStats\\StopStat",
0,KEY_ALL_ACCESS,
&hkey ) != ERROR_SUCCESS)
return;
dwDataSize=sizeof(DWORD);
RegQueryValueEx( hkey,
"KERNEL\\CPUUsage",
NULL,&dwType,
(LPBYTE)&dwCpuUsage,
&dwDataSize );
RegCloseKey(hkey);
}
Introduction
One of the interesting features I found in C# is a �Events and Delegates� concept. The idea is good but not new in Object Oriented Programming, it is one of the most frequently used concepts in programming, sometimes referred to as �Observer� or �Document/View� design pattern. Classical formulation of it could be found in �Design Patterns, Elements of Reusable Object Oriented Software� by Erich Gamma, Richard Helm, Ralph Johnson, and John Vlissides (The Gang of Four).
This concept is used when you want some information stored in one object, called �model� (subject) to be watched by others, called �views� (observers). Each time when information is changed in the �model�, �views� attached to the model should receive notification and update there states accordingly to the changed �model�.
Classical implementation described in �Design Patterns�:
As it is seen from the class diagram, concrete models should be derived from Subject class and views from Observer. Any time the state of Subject is changed, it calls notify method which notifies all observers attached to the Subject.
 Collapse
 Copy Code
void Subject::notify()
{
for(int i=0; i<observes.size(); i++)
observers[i]->update();
}
In many applications, this straightforward implementation is good enough, but things are getting ugly when you have different kinds of changes in the �subject� and you want to pass different types of parameters to the �views�.
One of the examples for complex �Model�/�View� relations is a GUI control attached to its processing function. Each time the control�s state is changed, process function is called with parameters indicating new state of the control.
These kinds of problems are solved in C# by the introduction of �Events and Delegates� concept. The resolution of the problem is easier in C#, because all classes are inherited from the same �object� class.
At the beginning, I thought why we do not have this nice �Events and Delegates� thing in standard C++, but then I came to the conclusion that C++ does not need it.
C++ language is powerful enough to express �Events� and �Delegates� concept in terms of already existing primitives. Proposed design makes it possible to "connect" different methods with different number of parameters belonging to unrelated classes to the �model�.
The keys for this solution are C++ templates (generic types) and pointes to member functions.
Using Code
Suppose we have a class MySubject that has internal information connected to different views, it produces three different types of events called int_event, double_event and triple_event with different types and numbers of parameters.
Collapse Copy Code
class MySubject
{
public:
CppEvent1<bool,int> int_event;
CppEvent2<bool,double,int> double_event;
CppEvent3<bool,double,int,const char*> triple_event;
void submit_int()
{
int_event.notify(1);
}
void submit_double()
{
double_event.notify(10.5,100);
}
void submit_triple()
{
triple_event.notify(10.5,100,"Oh ye");
}
};
Views represented by MyListener1 and MyListener2 are unrelated. The only requirement is for callback (delegate) methods to have parameters signature similar to corresponding CppEvent.
Collapse Copy Code
class MyListener1
{
public:
bool update_int(int p)
{
Console::WriteLine(S"int update listener 1");
return true;
}
bool update_double(double p,int p1)
{
Console::WriteLine(S"double update listener 1");
return true;
}
bool update_triple(double p,int p1,const char* str)
{
Console::WriteLine(S"triple update listener 1");
return true;
}
};
class MyListener2
{
public:
bool fun(int p)
{
Console::WriteLine(S"int update listener 2");
return true;
}
};
The final step is to create viewers MyListener1 and MyListener2 and connect their member functions to corresponding events in MySubject model.
Collapse Copy Code
int main(void)
{
MyListener1* listener1 = new MyListener1;
MyListener2* listener2 = new MyListener2;
MySubject subject;
CppEventHandler h1 = subject.int_event.attach(listener1,
&MyListener1::update_int);
CppEventHandler h2 = subject.int_event.attach(listener2,
&MyListener2::fun);
CppEventHandler h3 = subject.double_event.attach(listener1,
&MyListener1::update_double);
CppEventHandler h4 = subject.triple_event.attach(listener1,
&MyListener1::update_triple);
subject.submit_int();
subject.submit_double();
subject.submit_triple();
subject.int_event.detach(h1);
subject.int_event.detach(h2);
subject.double_event.detach(h3);
subject.triple_event.detach(h4);
return 0;
}
Resulting output is:
Collapse Copy Code
> int update listener 1
> int update listener 2
> double update listener 1
> triple update listener 1
Implementation
First of all, if we want to attach different types of event handles (member functions with same types of parameters from different classes) to the same event, we should provide common base for them. We use templates to make it generic for any combination of parameter types in �delegate� or call back method. There are different event types for every number of arguments in callback function.
Collapse Copy Code
template <typename ReturnT,typename ParamT>
class EventHandlerBase1
{
public:
virtual ReturnT notify(ParamT param) = 0;
};
Specific type of member function pointer within a pointer to the object is stored in the derived class.
Collapse Copy Code
template <typename ListenerT,typename ReturnT,typename ParamT>
class EventHandler1 : public EventHandlerBase1<ReturnT,ParamT>
{
typedef ReturnT (ListenerT::*PtrMember)(ParamT);
ListenerT* m_object;
PtrMember m_member;
public:
EventHandler1(ListenerT* object, PtrMember member)
: m_object(object), m_member(member)
{}
ReturnT notify(ParamT param)
{
return (m_object->*m_member)(param);
}
};
Event class stores map of event handlers and notifies all of them when notify method is called. Detach method is used to release handler from the map.
Collapse Copy Code
template <typename ReturnT,typename ParamT>
class CppEvent1
{
typedef std::map<int,EventHandlerBase1<ReturnT,ParamT> *> HandlersMap;
HandlersMap m_handlers;
int m_count;
public:
CppEvent1()
: m_count(0) {}
template <typename ListenerT>
CppEventHandler attach(ListenerT* object,ReturnT (ListenerT::*member)(ParamT))
{
typedef ReturnT (ListenerT::*PtrMember)(ParamT);
m_handlers[m_count] = (new EventHandler1<ListenerT,
ReturnT,ParamT>(object,member));
m_count++;
return m_count-1;
}
bool detach(CppEventHandler id)
{
HandlersMap::iterator it = m_handlers.find(id);
if(it == m_handlers.end())
return false;
delete it->second;
m_handlers.erase(it);
return true;
}
ReturnT notify(ParamT param)
{
HandlersMap::iterator it = m_handlers.begin();
for(; it != m_handlers.end(); it++)
{
it->second->notify(param);
}
return true;
}
};
Comments
This implementation is quite similar to those in the article �Emulating C# delegates in Standard C++�. I found out it after I already wrote the article. Actually, the fact that we have a similar way to deal with the problem means that it�s a very intuitive solution for this kind of problem in C++. An advantage of the current implementation is that it supports different number of arguments, so any member function of any class could be a callback (delegate). Probably to have this thing as a part of standard library is a good thing, but even if it�s not a part of the standard, you can use it as it is. This implementation is restricted to events up to 3 parameters, it can be easily extended to other numbers by just rewriting it with different number of parameters (see code for details).
作用:
定义对象间的一种一对多的依赖关系,当一个对象的状态发生改变时,所有依赖于它的对象都得到通知并被自动更新。
UML结构图:

解析:
Observer模式定义的是一种一对多的关系,这里的一就是图中的Subject类,而多则是Obesrver类,当Subject类的状态发生变化的时候通知与之对应的Obesrver类们也去相应的更新状态,同时支持动态的添加和删除Observer对象的功能。Obesrver模式的实现要点是,第一一般subject类都是采用链表等容器来存放Observer对象,第二抽取出Observer对象的一些公共的属性形成Observer基类,而Subject中保存的则是Observer类对象的指针,这样就使Subject和具体的Observer实现了解耦,也就是Subject不需要去关心到底是哪个Observer对放进了自己的容器中。生活中有很多例子可以看做是Observer模式的运用,比方说,一个班有一个班主任(Subject),他管理手下的一帮学生(Observer),当班里有一些事情发生需要通知学生的时候,班主任要做的不是逐个学生挨个的通知而是把学生召集起来一起通知,实现了班主任和具体学生的关系解耦。
实现:
1)Observer.h
/**//********************************************************************
created: 2006/07/20
filename: Observer.h
author: 李创
http://www.cppblog.com/converse/
purpose: Observer模式的演示代码
*********************************************************************/
#ifndef OBSERVER_H
#define OBSERVER_H
#include <list>
typedef int STATE;
class Observer;
// Subject抽象基类,只需要知道Observer基类的声明就可以了
class Subject
{
public:
Subject() : m_nSubjectState(-1){}
virtual ~Subject();
void Notify(); // 通知对象改变状态
void Attach(Observer *pObserver); // 新增对象
void Detach(Observer *pObserver); // 删除对象
// 虚函数,提供默认的实现,派生类可以自己实现来覆盖基类的实现
virtual void SetState(STATE nState); // 设置状态
virtual STATE GetState(); // 得到状态
protected:
STATE m_nSubjectState; // 模拟保存Subject状态的变量
std::list<Observer*> m_ListObserver; // 保存Observer指针的链表
};
// Observer抽象基类
class Observer
{
public:
Observer() : m_nObserverState(-1){}
virtual ~Observer(){}
// 纯虚函数,各个派生类可能有不同的实现
// 通知Observer状态发生了变化
virtual void Update(Subject* pSubject) = 0;
protected:
STATE m_nObserverState; // 模拟保存Observer状态的变量
};
// ConcreateSubject类,派生在Subject类
class ConcreateSubject
: public Subject
{
public:
ConcreateSubject() : Subject(){}
virtual ~ConcreateSubject(){}
// 派生类自己实现来覆盖基类的实现
virtual void SetState(STATE nState); // 设置状态
virtual STATE GetState(); // 得到状态
};
// ConcreateObserver类派生自Observer
class ConcreateObserver
: public Observer
{
public:
ConcreateObserver() : Observer(){}
virtual ~ConcreateObserver(){}
// 虚函数,实现基类提供的接口
virtual void Update(Subject* pSubject);
};
#endif
2)Observer.cpp
/**//********************************************************************
created: 2006/07/20
filename: Observer.cpp
author: 李创
http://www.cppblog.com/converse/
purpose: Observer模式的演示代码
*********************************************************************/
#include "Observer.h"
#include <iostream>
#include <algorithm>
/**//* --------------------------------------------------------------------
| Subject类成员函数的实现
|
----------------------------------------------------------------------*/
void Subject::Attach(Observer *pObserver)
{
std::cout << "Attach an Observern";
m_ListObserver.push_back(pObserver);
}
void Subject::Detach(Observer *pObserver)
{
std::list<Observer*>::iterator iter;
iter = std::find(m_ListObserver.begin(), m_ListObserver.end(), pObserver);
if (m_ListObserver.end() != iter)
{
m_ListObserver.erase(iter);
}
std::cout << "Detach an Observern";
}
void Subject::Notify()
{
std::cout << "Notify Observers''s Staten";
std::list<Observer*>::iterator iter1, iter2;
for (iter1 = m_ListObserver.begin(), iter2 = m_ListObserver.end();
iter1 != iter2;
++iter1)
{
(*iter1)->Update(this);
}
}
void Subject::SetState(STATE nState)
{
std::cout << "SetState By Subjectn";
m_nSubjectState = nState;
}
STATE Subject::GetState()
{
std::cout << "GetState By Subjectn";
return m_nSubjectState;
}
Subject::~Subject()
{
std::list<Observer*>::iterator iter1, iter2, temp;
for (iter1 = m_ListObserver.begin(), iter2 = m_ListObserver.end();
iter1 != iter2;
)
{
temp = iter1;
++iter1;
delete (*temp);
}
m_ListObserver.clear();
}
/**//* --------------------------------------------------------------------
| ConcreateSubject类成员函数的实现
|
----------------------------------------------------------------------*/
void ConcreateSubject::SetState(STATE nState)
{
std::cout << "SetState By ConcreateSubjectn";
m_nSubjectState = nState;
}
STATE ConcreateSubject::GetState()
{
std::cout << "GetState By ConcreateSubjectn";
return m_nSubjectState;
}
/**//* --------------------------------------------------------------------
| ConcreateObserver类成员函数的实现
|
----------------------------------------------------------------------*/
void ConcreateObserver::Update(Subject* pSubject)
{
if (NULL == pSubject)
return;
m_nObserverState = pSubject->GetState();
std::cout << "The ObeserverState is " << m_nObserverState << std::endl;
}
3)Main.cpp
/**//********************************************************************
created: 2006/07/21
filename: Main.cpp
author: 李创
http://www.cppblog.com/converse/
purpose: Observer模式的测试代码
*********************************************************************/
#include "Observer.h"
#include <iostream>
int main()
{
Observer *p1 = new ConcreateObserver;
Observer *p2 = new ConcreateObserver;
Subject* p = new ConcreateSubject;
p->Attach(p1);
p->Attach(p2);
p->SetState(4);
p->Notify();
p->Detach(p1);
p->SetState(10);
p->Notify();
delete p;
system("pause");
return 0;
}
2009年7月21日
在许多广泛应用的程序库,我们会看到类似 #pragma pack(push, 4) 等这样的标示。因为用户会任意更改他们的结构成员对齐选项,对于先于这些内容创建的程序库来说,不能确保一定的内存布局将可能在预先书写的一些数据访问模块上导致错误,或者根本不可能实现。
我在实现一种 C++ 类的实例的序列化工具时,依赖了内存布局。我知道市面上很多“序列化”工具允许更为广泛的通信用途,但是它们也是用起来最麻烦的,有很多限制条件。我实现的序列化工具用意很明显,为特定运行模块提供便捷高效的持久化存储能力。
为了提供感性的认识,提供了一个使用这个序列化工具的类型定义。
class StorageDoc
: public SerialOwner
{
public:
Serializable(StorageDoc);
char c;
int i;
SerialString str;
};
它继承自 SerialOwner,它声明了 Serializable,隐含着实现了一些接口,为基类访问当前类型信息提供帮助。这是较早书写的一种方案,现在我会改用模板以便在编译时建立类型信息,不过原理完全一样。
现在,StorageDoc 当中的内存布局需要可确定的,但是用户会选择不同的结构成员对齐选项,为此需要设定一个结构成员对齐的“子域”,完成这项能力的伪指令是 #pragma pack。
#pragma pack( [ show ] | [ push | pop ] [, identifier ] , n )
1)当选用 show,则添加一条警告信息,指示当前编译域内的对齐属性
2)仅仅设置 n,则重写编译器选项 /Zp,并影响到此声明以下的同一个编译单元内的所有结构定义
3)push 以及 pop 管理了一组“子域”堆栈,可以不断加深嵌套
4)identifier 命名了堆栈上的对齐项,以便在特定需求中弹出合适的项目
以下是使用的注意事项:
1)不论何时,#pragma pack() 总是恢复到 /Zp 的预设值,即使处于 push 的“子域”
2)#pragma pack(push) 未指定对齐值,则不改变
3)#pragma pack(pop) 可指定对齐值出栈后的设置值,若不指定则按嵌套等级还原,直至 /Zp 预设值
综上,#pragma pack(pop) 总是能正确回退到上一个作用域,不管该作用域通过 #pragma pack(n) 声明或者 #pragma pack(push, n)。而 #pragma pack() 总是取预设值。对于用户事先指定了一个“子域”,并在其中引入了一个使用 #pragma pack(n) - #pragma pack() 对而非堆栈形式来声明局部结构成员对齐的头文件,会使用户非常困惑。 就是这样做的。
当我们为程序库编译运行时,有一些类型要求严格地遵守内存布局,比如一些硬件允许我们传入的数据就需要这么做,就可以把它们限定起来:
#pragma pack(push, 8)
#include "Chain.h"
#include "ByteQueue.h"
#include "SerialOwner.h"
#include "SerialUser.h"
#include "SerialString.h"
#include "SerialStream.h"
#pragma pack(pop)
事情再回到序列化上面,用户会多次尝试编译他们的序列化应用模块,并指望前一次编译之后运行所产生的文件仍然是可用的,所以还需要在用户文件当中明确所选用的对齐值,并一旦确定就不再更改:
#pragma pack(push, 8)
class StorageDoc
: public SerialOwner
{
public:
Serializable(StorageDoc);
char c;
int i;
SerialString str;
};
#pragma pack(pop)
并使用它们:
StorageDoc doc;
doc.Load(t("doc.bin"));
std::cout << doc.str.Get() << std::endl;
doc.str = ss.str();
std::cout << doc.str.Get() << std::endl;
doc.Save(t("doc.bin"));
这就是全部了,但是正如以上提到的,不仅仅在序列化上,和硬件、链接库的通信也可能存在严格的内存布局的要求,如果你在项目设计上遭遇这些困惑,那么现在就可以立即动手解决它们。
如果对本文提到的序列化能力感兴趣的话,可以到以下链接了解详情:
http://code.google.com/p/los-lib/source/browse/
目录是:
svn/trunk/Inc/Los/
文件分别是:
_ISerialUser.h
ByteQueue.h
Chain.h
Serialization.h
SerialOwner.h
SerialStream.h
SerialString.h
SerialUser.h
不过在本文发布之时,以上文件所处版本没有针对结构成员对齐选项进行修改,但并不影响阅读。
* 补充一(2009-1-18 02:41)
联合以及结构的结构成员对齐异常
class Tick
{
static int _StaticID;
__int64 _StartLI; // __alignof(LARGE_INTEGER) != __alignof(__int64)
__int64 _CurrentLI;
__int64 _Frequency;
int _ID;
clock_t _Start;
clock_t _Current;
bool _Stop;
bool _HighPerformance;
...
}
LARGE_INTEGER 是分别对应两个 32bit 以及一个 64bit 类型的联合,奇怪的是随着全局对齐选项的修改,LARGE_INTEGER 类型本身的请求对齐 __alignof(LARGE_INTEGER) 将取联合的成员的最大者同全局对齐选项的最小值,也就是说,当 /Zp 设置为 2,那么 LARGE_INTEGER 也将仅承诺在 2 字节边界上对齐,多么不幸啊。当然如果将这个类型纳入 #pragma pack 的限定域那就什么问题都没有了,不管联合的对齐算法多么的古怪,只要保证不修改所需的对齐值那将总是能获得确定的内存布局。
不过正如上面的代码列出的,我使用了 __int64 代替了 LARGE_INTEGER 的工作,并在请求 Win32 API 的接口上强制指针转型,使用的时候亦如此,但若访问联合成员刚好为 __int64 类型则直接使用便可。这种方式没有获得额外的好处,算是一种抗议的行为,并且让后来的阅读者有机会了解到这个见不得光的问题。
_HighPerformance = ::QueryPerformanceFrequency((LARGE_INTEGER*)&_Frequency) != 0;
当然作为严肃的代码写作者,也许你将在不止一处使用到 LARGE_INTEGER,为此我也不拒绝使用如下格式:
#pragma pack(push, 8)
#include
#pragma pack(pop)
它可保证你万无一失。
作为对比,FILETIME 有如下定义:
typedef struct _FILETIME
{
DWORD dwLowDateTime;
DWORD dwHighDateTime;
} FILETIME;
且不论它所需的可能的最大结构成员对齐为 4,它也将伴随着 /Zp 的更改而变动。因此,在不同的选项的影响下:
__alignof(LARGE_INTEGER) != __alignof(FILETIME) != __alignof(__int64)
有些人可能要指责会发生这样的问题纯粹是用户在玩弄“结构成员对齐选项”而导致的,我真希望他能够读一读这篇文章。
* 补充二(2009-1-18 02:41)
D3D 与用户定义结构的协调
class VertexXYZ_N_T1
{
public:
float x, y, z;
float normal_x, normal_y, normal_z;
float u, v;
DeviceBitmap* bitmap;
Material* material;
float temp_val;
static const int FVF = D3DFVF_XYZ | D3DFVF_NORMAL | D3DFVF_TEX1;
};
这是一个自定义顶点结构,它的最大成员字节数为 4,所有的成员也都是 4 字节边界,不论作何选项,始终保持紧凑存储,若其中一个成员扩展为 8 字节,那么伴随着选项的更改,VertexXYZ_N_T1 要求的对齐边界可导致部分空洞,从而同硬件所需的顶点缓存数据布局存在出入,我不追究硬件是否使用 double 值,但是现在就应当使用
#pragma pack(push, 4)
...
#pragma pack(pop)
加以限定。
我还定义了 Matrix, Material, Vector3, Colorf 等类型,如果要使得这些数据同 D3D, D3DX 的相应类型在内存上兼容的,也是需要限定的。
本文主要包括二个部分,第一部分重点介绍在VC中,怎么样采用sizeof来求结构的大小,以及容易出现的问题,并给出解决问题的方法,第二部分总结出VC中sizeof的主要用法。
1、 sizeof应用在结构上的情况
请看下面的结构:
struct MyStruct
{
double dda1;
char dda;
int type
};
对结构MyStruct采用sizeof会出现什么结果呢?sizeof(MyStruct)为多少呢?也许你会这样求:
sizeof(MyStruct)=sizeof(double)+sizeof(char)+sizeof(int)=13
但是当在VC中测试上面结构的大小时,你会发现sizeof(MyStruct)为16。你知道为什么在VC中会得出这样一个结果吗?
其实,这是VC对变量存储的一个特殊处理。为了提高CPU的存储速度,VC对一些变量的起始地址做了“对齐”处理。在默认情况下,VC规定各成员变量存放的起始地址相对于结构的起始地址的偏移量必须为该变量的类型所占用的字节数的倍数。下面列出常用类型的对齐方式(vc6.0,32位系统)。
类型
对齐方式(变量存放的起始地址相对于结构的起始地址的偏移量)
Char
偏移量必须为sizeof(char)即1的倍数
int
偏移量必须为sizeof(int)即4的倍数
float
偏移量必须为sizeof(float)即4的倍数
double
偏移量必须为sizeof(double)即8的倍数
Short
偏移量必须为sizeof(short)即2的倍数
各成员变量在存放的时候根据在结构中出现的顺序依次申请空间,同时按照上面的对齐方式调整位置,空缺的字节VC会自动填充。同时VC为了确保结构的大小为结构的字节边界数(即该结构中占用最大空间的类型所占用的字节数)的倍数,所以在为最后一个成员变量申请空间后,还会根据需要自动填充空缺的字节。
下面用前面的例子来说明VC到底怎么样来存放结构的。
struct MyStruct
{
double dda1;
char dda;
int type
};
为上面的结构分配空间的时候,VC根据成员变量出现的顺序和对齐方式,先为第一个成员dda1分配空间,其起始地址跟结构的起始地址相同(刚好偏移量0刚好为sizeof(double)的倍数),该成员变量占用sizeof(double)=8个字节;接下来为第二个成员dda分配空间,这时下一个可以分配的地址对于结构的起始地址的偏移量为8,是sizeof(char)的倍数,所以把dda存放在偏移量为8的地方满足对齐方式,该成员变量占用sizeof(char)=1个字节;接下来为第三个成员type分配空间,这时下一个可以分配的地址对于结构的起始地址的偏移量为9,不是sizeof(int)=4的倍数,为了满足对齐方式对偏移量的约束问题,VC自动填充3个字节(这三个字节没有放什么东西),这时下一个可以分配的地址对于结构的起始地址的偏移量为12,刚好是sizeof(int)=4的倍数,所以把type存放在偏移量为12的地方,该成员变量占用sizeof(int)=4个字节;这时整个结构的成员变量已经都分配了空间,总的占用的空间大小为:8+1+3+4=16,刚好为结构的字节边界数(即结构中占用最大空间的类型所占用的字节数sizeof(double)=8)的倍数,所以没有空缺的字节需要填充。所以整个结构的大小为:sizeof(MyStruct)=8+1+3+4=16,其中有3个字节是VC自动填充的,没有放任何有意义的东西。
下面再举个例子,交换一下上面的MyStruct的成员变量的位置,使它变成下面的情况:
struct MyStruct
{
char dda;
double dda1;
int type
};
这个结构占用的空间为多大呢?在VC6.0环境下,可以得到sizeof(MyStruc)为24。结合上面提到的分配空间的一些原则,分析下VC怎么样为上面的结构分配空间的。(简单说明)
struct MyStruct
{
char dda;//偏移量为0,满足对齐方式,dda占用1个字节;
double dda1;//下一个可用的地址的偏移量为1,不是sizeof(double)=8
//的倍数,需要补足7个字节才能使偏移量变为8(满足对齐
//方式),因此VC自动填充7个字节,dda1存放在偏移量为8
//的地址上,它占用8个字节。
int type;//下一个可用的地址的偏移量为16,是sizeof(int)=4的倍
//数,满足int的对齐方式,所以不需要VC自动填充,type存
//放在偏移量为16的地址上,它占用4个字节。
};//所有成员变量都分配了空间,空间总的大小为1+7+8+4=20,不是结构
//的节边界数(即结构中占用最大空间的类型所占用的字节数sizeof
//(double)=8)的倍数,所以需要填充4个字节,以满足结构的大小为
//sizeof(double)=8的倍数。
所以该结构总的大小为:sizeof(MyStruc)为1+7+8+4+4=24。其中总的有7+4=11个字节是VC自动填充的,没有放任何有意义的东西。
VC对结构的存储的特殊处理确实提高CPU存储变量的速度,但是有时候也带来了一些麻烦,我们也屏蔽掉变量默认的对齐方式,自己可以设定变量的对齐方式。
VC中提供了#pragma pack(n)来设定变量以n字节对齐方式。n字节对齐就是说变量存放的起始地址的偏移量有两种情况:第一、如果n大于等于该变量所占用的字节数,那么偏移量必须满足默认的对齐方式,第二、如果n小于该变量的类型所占用的字节数,那么偏移量为n的倍数,不用满足默认的对齐方式。结构的总大小也有个约束条件,分下面两种情况:如果n大于所有成员变量类型所占用的字节数,那么结构的总大小必须为占用空间最大的变量占用的空间数的倍数;
否则必须为n的倍数。下面举例说明其用法。
#pragma pack(push) //保存对齐状态
#pragma pack(4)//设定为4字节对齐
struct test
{
char m1;
double m4;
int m3;
};
#pragma pack(pop)//恢复对齐状态
以上结构的大小为16,下面分析其存储情况,首先为m1分配空间,其偏移量为0,满足我们自己设定的对齐方式(4字节对齐),m1占用1个字节。接着开始为m4分配空间,这时其偏移量为1,需要补足3个字节,这样使偏移量满足为n=4的倍数(因为sizeof(double)大于n),m4占用8个字节。接着为m3分配空间,这时其偏移量为12,满足为4的倍数,m3占用4个字节。这时已经为所有成员变量分配了空间,共分配了16个字节,满足为n的倍数。如果把上面的#pragma pack(4)改为#pragma pack(16),那么我们可以得到结构的大小为24。(请读者自己分析)
2、 sizeof用法总结
在VC中,sizeof有着许多的用法,而且很容易引起一些错误。下面根据sizeof后面的参数对sizeof的用法做个总结。
A. 参数为数据类型或者为一般变量。例如sizeof(int),sizeof(long)等等。这种情况要注意的是不同系统系统或者不同编译器得到的结果可能是不同的。例如int类型在16位系统中占2个字节,在32位系统中占4个字节。
B. 参数为数组或指针。下面举例说明.
int a[50]; //sizeof(a)=4*50=200; 求数组所占的空间大小
int *a=new int[50];// sizeof(a)=4; a为一个指针,sizeof(a)是求指针
//的大小,在32位系统中,当然是占4个字节。
C. 参数为结构或类。Sizeof应用在类和结构的处理情况是相同的。但有两点需要注意,第一、结构或者类中的静态成员不对结构或者类的大小产生影响,因为静态变量的存储位置与结构或者类的实例地址无关。
第二、没有成员变量的结构或类的大小为1,因为必须保证结构或类的每一
个实例在内存中都有唯一的地址。
下面举例说明,
Class Test{int a;static double c};//sizeof(Test)=4.
Test *s;//sizeof(s)=4,s为一个指针。
Class test1{ };//sizeof(test1)=1;
D. 参数为其他。下面举例说明。
int func(char s[5]);
{
cout<< sizeof(s) << endl;
//数组参数在传递的时候系统处理为一个指针,所
//以sizeof(s)实际上为求指针的大小。
return 1;
}
sizeof(func(“1234”))=4//因为func的返回类型为int,所以相当于
求sizeof(int).
以上为sizeof的基本用法,在实际的使用中要注意分析VC的分配变量的分配策略,这样的话可以避免一些错误。