Lesson 1: Getting Started with Direct3D
Lesson 1: 开始Direct3D编程
From:
http://www.directxtutorial.com/tutorial9/b-direct3dbasics/dx9b1.aspx#still
Translated By----Double One(王大宝) dfghj77777@gmail.com
课程概述
首先,我正式欢迎您的Direct3D。我想和大家一分享一些基础知识及3D编程的高级话题。无论你想建立你自己的引擎,借用一个或者修改它,或者仅仅买一个并且使用它,你了解它的基本概念,这是很重要的。
和一个游戏引擎的基本概念一样重要的,是DirectX的基本概念本身。本课程将涵盖Direct3D基础知识和你你创建你的第一个DirectX程序所需要知道的。然后,我们将建立一个窗口内的基本的Direct3D程序。
COM
And COM is what?
那是COM是个啥玩意儿呢?
COM stands for Component Object Model. COM is a method of creating very advanced objects that, well, they act a lot like Legos actually.
COM就是Component Object Model的缩写,翻译成咱天朝语言就是“组件模型模型”。 COM是创建软件组件的一种方法,事实上它更像乐高积木。我知道这么说可能还是很多童鞋不理解,没关系,程序写多了自然而然就懂了。
Legos, as you know, can be stuck together to create more advanced shapes. No single Lego actually cares about any other Lego in the set. They are all compatible with each other, and all you have to do is stick them together to get them to work. If you want to change pieces, all you have to do is unplug one piece and put another in its place.
如你所知,乐高积木可以组合成各种形状,只要你高兴,拼个小月月都行。同一个组合里没有哪个单独的积木关心别的积木。任意两块积木都可以拼接起来,而你要做的就是把他们摆到一起组成一个整体。如果你想改变这个某一片积木,你只要抽出某一块积木并把另一块积木插入这个空缺。
And so it is with COM. COM objects are actually C++ classes or groups of classes from which you can call functions and achieve certain aims. No class requires another to operate, and they don't really need to work together to get things done together, but you can plug them in or unplug them as you desire without changing the rest of the program also.
好了说了一堆废话我们回到正题。COM对象其实是C++的类或者你可以调用的实现一定目标的函数的组类。每个类都可以单独工作得很好,它们也不需要非得凑一块完成工作,于是你可以随心所欲地加载或者卸载某个类并且你不用改变其他程序。
For example, say you had a game distributed broadly and you want to upgrade it. Well, instead of keeping track of and shipping a new copy to every single user who ever bought your game, all you have to do is say "Upgrade! Right Here!". They download the updated COM object, and the new object plugs right in to your program without further hassle. Nice, huh?
其实上面那么说还是忒抽象了,咱来点具体的吧。好比说你做了一个游戏,十分火爆,很多宅男都下载安装并在夜深人静的时候偷偷玩上一把,但是现在你想给它做个更新。回去查查谁买了你的游戏然后给每个人EMS一份新的?好吧,您要有这钱您也不用做程序员了。我想告诉你的是,你只要大喊:“最新高清无码即将和谐速度下载!”让那帮SB去下载新的COM组件,并正确加载到你的游戏就OK了,是的,这个主意很棒,请尽情地赞美我吧,哇哈哈哈,好吧,我承认这是COM机制的功劳。
I won't get too detailed into COM, because it is far too complex for what we need. It's job is to get all the complex stuff out of the way so that you have an easy time. And if that's its job, what would be the purpose of learning all that complex material?
好了,关于COM组件我不想再多说了,这又不是讲COM的教程。COM的意义就在于把那些复杂的东西自己揽过来这样我们程序员才能偶尔有点空闲喝茶泡妞打DOTA。既然那是它的工作,你没事学习那些复杂的玩意干嘛呢?
So why COM? Well, DirectX is actually a series of COM objects, one of which is Direct3D. Direct3D is a rather advanced class that contains everything you need to run 2D and 3D graphics using software, hardware, or whateverware.
各位亲爱的读者可能又要问了,为什么一定是COM呢?难道你们有什么不可告人的关系还是它私下给你塞了不少票子。这个这个,作者我未入党未入团,像我这么洁身自爱的好青年怎么可能是那种人呢。来来来,尔等且听我慢慢-----道来:话说这DirectX实际上是一套COM组件,而Direct3D只是DirectX的一小部分。Direct3D是一个相当高级的类,它封装了你运行2D和3D图形所需要的全部硬件啊,软件啊,以及其他随便什么件。总之就是这方面的事,全都可以交给DirectX去做
So don't be surprised when you see Direct3D functions being called like this:
所以别奇怪Direct3D函数被这么调用:
1 d3d->CreateDevice()
2
3d3d->Release()
4
We use the indirect member access operator here to access the functions CreateDevice() and Release() from the Direct3D interface class. We'll get more into this when we see how it is applied in practice. I'm going to try to avoid unneeded theory from here on out.
我们使用间接成员访问操作符来访问Direct3D中的CreateDevice()和Release()这两个函数,
For now let's go on to the next topic:
好了说了半天,现在让们进入下一个章节,开始我们的Dierect3D之旅吧。
交换链和页交换
A graphics adapter contains in its memory a pointer to a buffer of pixels that contains the image currently being displayed on the screen. When you need to render something, such as a 3D model or texture, the graphics adapter updates this array and sends the information to the monitor to display. The monitor then redraws the screen from top to bottom, adding in the new part rendered.
一个图形适配器吧,它的内存中包含一个指向包含目前显示在屏幕上的图像的像素缓冲区的指针。当我们需要去渲染一些东西,比如说空姐姐的照片或者她的视频,图形适配器就会更新这个数组并把信息发送给显示器显示。然后显示器就会从上到下扫描屏幕,一行行地渲染新的数据。
However, there is a slight problem with this in that the monitor does not refresh as fast as needed for real-time rendering. Most refresh rates range from 60 Hz (60 fps) to about 100 Hz. If another model were rendered to the graphics adapter while the monitor was refreshing, the image displayed would be cut in two, the top half containing the old image and the bottom half containing the new. This effect is called tearing.
正所谓天有不测风云啊,这时候又有一个大问题横亘在我们面前,大多数的显示器刷新速率在60HZ到100HZ.。众所周知所谓动画就是一堆连续的图片,当你显示器刷新不够快的时候,也就是赶不上实时渲染的速度的时候,就会出现撕裂效应。具体表现为上一帧还没刷新好,又开始刷新下一帧了,于是屏幕的上半部分显示上一帧,下半部分显示下一帧,悲剧开始了-----好端端一帅哥就会变成四只眼睛两个鼻子的怪物了,但是我相信任何艰难险阻都难不倒伟大的中国程序员,因为我们爱写程序爱得深沉。
To avoid this, DirectX implements a feature called swapping.
为了避免这一切的发生,我们对DirectX实现了一个特征称为交换(swapping)。
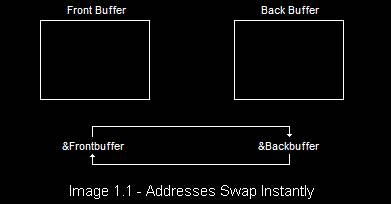
Swapping
Instead of rendering new images directly to the monitor, Direct3D draws your images onto a secondary buffer of pixels, known as a back buffer. The front buffer would be the buffer currently being displayed. You draw all your images onto the back buffer, and when you are done, Direct3D will update the front buffer with the contents of the back buffer, discarding the old image.
取代直接在显示器渲染的办法是,Direct3D把你的图画到第二像素缓冲区。现在我们有了两个像素缓冲区,我们把他俩分别称作前台缓冲区和后备缓冲区,前台缓冲区是目前在显示器上看到的,然后在后备缓冲区放入剩余的全部图像,当你完成这一切之后,Direct3D会从后备缓冲区拿出新的内容来更新前台缓冲区,并丢弃现有图像。
However, doing this can still cause tearing, because the image transfer can still occur while the monitor is refreshing (the CPU is faster than the monitor).
但是后来有些筒子发现这么干还是会引起撕裂,因为当显示器正在渲染的时候还是会有图像传输。(没办法啊,谁让CPU比显示器要快得多呢)
In order to avoid this (and to make the whole thing go much faster), DirectX uses a pointer for each buffer (both front and back) and simply switches their values. The back buffer then becomes the front buffer (and vice versa), and no tearing occurs.
为了避免这样做同时也是为了让整个过程进行得更快。DirectX会使用一个指针为每个缓冲(包括前台和后备)方便地交换值。让后备缓冲区成为前台缓冲区(反之亦然),这样就没有撕裂了。
这么说有点抽象,打个比方罢,你在饭店喝汤,那么小的碗一碗肯定不够,第一种情况就是你一边吃,厨师在旁边拿着勺子一边往你碗里加一边说客官多喝点多喝点我们的汤是如此的好喝云云,你要是喝的不够快,这汤就得满出来,弄得你衣鞋尽湿,后来的改进方法是给你上一碗汤,再另外拿个海碗盛一大碗放桌上你自己加,你亲爱的同桌朋友十分热情地帮你加汤,但是你喝汤实在太慢了,于是汤又漫出来了。最后你自己想了一般法,拿上连个玩,一碗喝着,一碗盛着汤,等你喝完这一碗就把那一碗拿过来接着喝,喝完的这个碗再拿去盛下一碗。你看,所有问题都不再是问题。
Of course, we could make our game have better performance by adding additional back buffers, like this.
当然了,我们可以添加更多的后备缓冲区来提高效率。
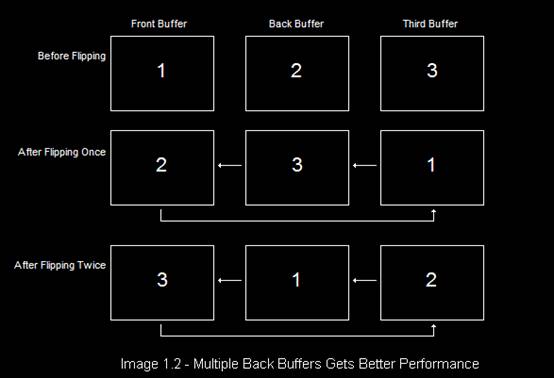
How can adding additional back buffers get better performance? Well, let's say that every once in a while you finish rendering the back buffer and are ready to swap, but the screen hasn't yet finished drawing the contents of the front buffer. Swapping now would cause more tearing. So what happens instead is your program stops and waits for the screen to finish. You could, of course, be spending this valuable time preparing the next image, and having multiple back buffers allows your program to do just that.
This setup called a swap chain, as it is a chain of buffers, swapping positions each time a new frame is rendered.
各位读者又要问了?增加缓冲区跟提高性能有嘛关系呢?你想啊,要是你这碗还没喝完,下一碗已经盛好了,那盛汤那姑娘岂不是要苦苦地等着你喝完这一碗(不然又是撕裂),于是多加一个碗,她第二碗盛好了,放那等你喝完第一碗,同时又拿起第三只碗开始盛汤。同理多个后背缓冲区也是这个道理,不让CPU喝显卡闲着,如果你喜欢的话还可以继续增加第四五六个后背缓冲区,于是就有了交换链-----一连串的缓冲区,每当有新的帧渲染时就交换位置,把后面的换到前面来。
The Basic Direct3D Program
We won't be making a "Hello World!" application for Direct3D. We will assume that Direct3D is not a language on its own (which it isn't). Instead, we will start by filling our window with blue. For this we have four steps:
1. Create global variables and function prototypes
2. Create a function to initialize Direct3D and create the Direct3D Device
3. Create a function to render a frame
4. Create a function to close Direct3D
Let's go over each function and its parts, then look at the whole picture and how to plug it in to your windows program.
我们不会去写一个Direct3D的“Hello World”。因为我们知道Direct3D不是一门新的语言,取而代之的是,我们要去写一个蓝色背景的WINDOWS窗体,具体步骤如下:
1.创建全局变量和函数原型
2.写一个函数来初始化Direct3D以及创建Direct3D设备
3.写一个函数来渲染帧
4.写一个关闭Dierect3D的函数
下面让我们来看看各个函数及其部分细节
,以及如何把它们嵌入到我们的Windows 程序中。
1. 创建全局变量和函数原型
We need to add a few things to the top of our program before we start working with Direct3D in the first place. Let's take a look at these and see what they are.
在主程序开始之前我们要添加一些Direct3D的引用和全局变量声明,我们看看下面的代码:
1// include the basic windows header files and the Direct3D header file
2#include <windows.h>
3#include <windowsx.h>
4#include <d3d9.h>
5// include the Direct3D Library file
6#pragma comment (lib, "d3d9.lib")
7// global declarations
8LPDIRECT3D9 d3d; // the pointer to our Direct3D interface
9LPDIRECT3DDEVICE9 d3ddev; // the pointer to the device class
10
11// function prototypes
12void initD3D(HWND hWnd); // sets up and initializes Direct3D
13void render_frame(void); // renders a single frame
14void cleanD3D(void); // closes Direct3D and releases memory
15
16// the WindowProc function prototype
17LRESULT CALLBACK WindowProc(HWND hWnd, UINT message, WPARAM wParam, LPARAM lParam);
18
#include <d3d9.h>
This includes the Direct3D 9 header file. This consists of various declarations to the actual methods contained in the Direct3D library.
这一句包含Direct3D9的头文件,这里是我们用到的Direct3D库里面的类啊函数啊神马的声明。
#pragma comment (lib, "d3d9.lib")
This includes the Direct3D 9 library file. The #pragma comment directive places a certain piece of information in your project's object file. With our first paramter, lib, we indicate that we want to add a library file to the project. We then specify which file, "d3d9.lib".
这一句包含了Direct3D的库文件。“#pragma comment”这个命令是用来在你的项目中指定包含一个静态库文件的。他的第一个参数”lib”表明要引入到项目的是一个静态库文件,然后第二个参数是文件名,这里我们用”d3d9.lib”
LPDIRECT3D9 d3d;
This variable is a long pointer to Direct3D. What this means is that we will create a class called iDirect3D9. When COM makes this class, we will ignore it, and access it only indirectly using this pointer. We will cover how the class is created in a moment.
这是一个指向Direct3D的长指针变量。这意思就是说我们将创建一个叫iDirect3D9的类。当然我们不需要动手,COM会自己创建它,而我们只要通过这个指针间接访问那个类。稍后我们会讲到这个类具体是怎样被创建的。
LPDIRECT3DDEVICE9 d3ddev;
The Direct3D Device interface holds all the information pertaining to the graphics drivers, the video card, and everything else having to do with the hardware side of graphics. This is a pointer to the class that stores all this information.
Direct3D Device接口里保留着所有与图形驱动,显卡,以及其他什么东西相关的信息。而我们定义的这个指针指向Direct3D Device类存储所有的信息。
2. 创建一个函数来初始化Direct3D和创建Direct3D Device
The first step to actually coding Direct3D is to create the interface and initialize the graphics device. This is done using two functions and a struct containing graphics device information. Let's take a look at this function here, then go over its parts. I didn't bother to bold the new parts, because the entire thing is new.
实际上Direct3D编码的第一步是建立界面和初始化图形设备。我们用两个函数加一个包含图形设备信息的结构体来完成这一步。让我们看看这个函数,然后再分析部分代码。我不想去加粗新的部分,因为那一整块都是新的。
1// this function initializes and prepares Direct3D for use
2void initD3D(HWND hWnd)
3

 {
{
4 d3d = Direct3DCreate9(D3D_SDK_VERSION); // create the Direct3D interface
5
6 D3DPRESENT_PARAMETERS d3dpp; // create a struct to hold various device information
7
8 ZeroMemory(&d3dpp, sizeof(d3dpp)); // clear out the struct for use
9 d3dpp.Windowed = TRUE; // program windowed, not fullscreen
10 d3dpp.SwapEffect = D3DSWAPEFFECT_DISCARD; // discard old frames
11 d3dpp.hDeviceWindow = hWnd; // set the window to be used by Direct3D
12
13 // create a device class using this information and information from the d3dpp stuct
14 d3d->CreateDevice(D3DADAPTER_DEFAULT,
15 D3DDEVTYPE_HAL,
16 hWnd,
17 D3DCREATE_SOFTWARE_VERTEXPROCESSING,
18 &d3dpp,
19 &d3ddev);
20 } };
} };
21
if the comments here are good enough for you, excellent. Otherwise, I've described each of these commands below.
如果这些注释足够你看懂程序,那TM太好了,恭喜你,你可以跳过下面的详细解释了
d3d = Direct3DCreate9(D3D_SDK_VERSION);
This is where the fun begins. This is the first Direct3D function you will run. It's primary purpose is to create the Direct3D interface. The return value is the address of the interface created, and so we will store this address in the pointer we created earlier, d3d.
这是个有趣的开始。这是你将要运行的第一个Direct3D函数。它的主要目的是创建Direct3D接口。它的返回值是创建的借口的地址,于是我们就能把这个地址存储在名为d3d的指针中。
Then there is the parameter. This parameter is always the same: D3D_SDK_VERSION. Why is this? Well, it really only matters for compatibility on other machines. When a later release of DirectX is published, the users will usually have varying levels of DirectX upgrades. This tells the user's DirectX which version you developed your game for. The user's DirectX can then look back and properly execute your program without implementing the upgrades that have occurred since then. Kinda useful, eh?
然后你发现,哎呀,这还有个参数呢。是的是的,我没忘记它,这个参数他永远是这个单词“D3D_SDK_VERSION”,这是为神马呢?原来,他是为了保证在不同机器上的兼容性。当一个更新版本的DirectX推出以后,用户一般会有不同程度的升级。这个常量会告诉用户的DirectX你写的程序是哪个版本的。然后用户的DirectX就不会调用升级后的新特性以便能够正确执行你的程序。
In the version of Direct3D 9c, this value returns 32. Previous versions would return different values, causing DirectX to function in different ways. Note that you should not change this value, as it will cause confusion and is not really needed anyway. Just use D3D_SDK_VERSION, and everything will work out all right.
在DirectX 9c中,这个返回值是32。更早的版本会返回其他值。造成DirectX调用不同的函数。注意,你不能改变这个值,这样会引起天下大乱而且你也不需要这么做。老老实实就就用“D3D_SDK_VERSION”吧,代表国家感谢你。
D3DPRESENT_PARAMETERS d3dpp;
There are certain factors involved in both beginning and advanced game programming which require certain information to be fed into the graphics device from the start. There are plenty of these, but we will only go into three of them here. For now, D3DPRESENT_PARAMETERS is a struct whose members will contain information about the graphics device. We will go over the ones we use here and cover new members as they come up throughout the tutorial.
在初级和高级游戏编程,有一些因素从一开始就需要馈入图形设备。这样的因素有许多,但是我们只需要三个。在这里,D3DPRESENT_PARAMETERS是一个结构体,它的成员包含了图形设备的信息。下面我们将来了解那些我们现在用到的以及后面将要用到的贯穿这个教程始终的新成员。
ZeroMemory(&d3dpp, sizeof(d3dpp));
We use ZeroMemory() to quickly initialize the entire d3dpp struct to NULL. That way we don't have to go through every member of the struct and set them individually.
我们ZeroMemory
这个函数来快速初始化我们的结构体d3dpp,将其值置为空。
d3dpp.Windowed = TRUE;
When we run Direct3D in a window like we are now, this value is set to TRUE. Otherwise, it is set to false. Later, when we make our window full-screen, we will change this value to FALSE.
Note: There are other changes to make when an application goes full-screen. Changing this one value will not make your application full-screen, unfortunately. Patience until the next lesson.
当我们像现在这样在窗口中运行Direct3D,把它的值设为TRUE。否则,它会被设置为false。之后,当我们要让我们的窗口全屏化,我们需将改变这个值设置为false。
注意:要想让程序全屏。仅仅改变这一个值可不行,欲知具体如何,请听下节课分解。
d3dpp.SwapEffect = D3DSWAPEFFECT_DISCARD;
Before, we talked about swap chains as the method Direct3D uses to change images on the screen. However, we get to pick which type of swap chain is used. There are three different kinds.
首先,我们讨论了交换链----也就是使用Direct3D改变屏幕上的图像的方法。然而,交换链是有很多种的,我们需要选择其中一种来使用。这里有三种。
[Table 1.1 - d3dpp.SwapEffect Flags]
So which one to use? Throughout this tutorial I will be using D3DSWAPEFFECT_DISCARD. The only exception to this will be at some later date when I add additional tutorials on various effects that use the other two methods.
那我们应该用哪一个呢?这个教程自始至终我都会选择D3DSWAPEFFECT_DISCARD。唯一的例外将在以后的某天,我用一个额外的教程讲述其他两种交换链的影响的时候。
d3dpp.hDeviceWindow = hWnd;
This value sets the handle to the window Direct3D should use. We'll just use the same hWnd we've always been using.
这个值用于设定Direct3D的窗口句柄。我们会始终使用“hWnd”这个单词。
d3d->CreateDevice()
This is a big function, but in actual fact, it is quite simple. Most of the parameters will probably stay the same in every game you write.
What this function does is create a graphics device interface. What this means is a new class will be created from which you will handle all the graphics you need. Notice that this function is part of the d3d class. Most of the functions you use in Direct3D will come from here, so we give the pointer a rather simple name, d3ddev, as seen before.
Here is this function's prototype:
这是一个很大的函数,但实际上,它还很简单的。大多数参数可能会总是一样,在你写的每个游戏中。
这个函数的作用是创建一个图形设备接口。这意味着一个新的类将被创建,从从您可以进行所有你需要的图形处理。注意,这个函数是D3D的类的一部分。你在Direct3D中使用的大多数函数将来自这里,所以我们给这个指针一个相当简单的名称,d3ddev,正如我们前面见过的那样。
下面是这个函数的原型:
1HRESULT CreateDevice(
2 UINT Adapter,
3 D3DDEVTYPE DeviceType,
4 HWND hFocusWindow,
5 DWORD BehaviorFlags,
6 D3DPRESENT_PARAMETERS *pPresentationParameters,
7 IDirect3DDevice9 **ppReturnedDeviceInterface);
8
现在让我们来看看这个函数的参数。他们都很简单,那么这将会很快。
UINT Adapter,
This is an unsigned integer that stores a value indicating what graphics adapter, or video card, Direct3D should use. We could get detailed here, and try to find the better graphics card, but we'll let Direct3D take care of that for us (because in most cases there's only one). To tell Direct3D that it needs to decide, we put into this parameter the value D3DADAPTER_DEFAULT, indicating the default graphics card.
这是一个无符号整数,用于存储一个值来指明我们要使用哪些图形适配器,或视频卡,Direct3D。在这里我们可以得到详细的,并试图找到更好的图形卡,但我们会让Direct3D尽量小心(因为在大多数情况下只有一个)。要告诉Direct3D它进行决断需要的信息,我们把这个参数的值设为D3DADAPTER_DEFAULT,表示默认的图形卡。
D3DDEVTYPE DeviceType,
While there are four possible values for this parameter, we are only going to be concerned with one of them, and stay away from the others until later. The one we will use is D3DDEVTYPE_HAL.
D3DDEVTYPE_HAL tells Direct3D to use what is called the Hardware Abstraction Layer. The Hardware Abstraction Layer, or HAL, is used to indicate that Direct3D should be using hardware to process graphics (and we would use...what else?). If for some reason our graphics device cannot use hardware to handle something, that something will be rendered by software instead. This is done automatically, but probably won't be done, considering the capabilities of modern cards.
虽然有四个可能的值,但我们只打算用其中的一个方面,并且一直用它。他就是D3DDEVTYPE_HAL。
D3DDEVTYPE_HAL告诉Direct3D使用所谓的硬件抽象层。硬件抽象层,或者简称HAL,是用来指示Direct3D应该用硬件来处理图像(不然我们还能用什么?)。如果由于某种原因,我们的图形设备无法使用硬件来处理的东西,这东西会被软件渲染来代替。这都是自动完成的,但也可能不会这么做,考虑到现代卡的性能。
HWND hFocusWindow,
This is the handle to our window. We can just put 'hWnd' in here as we passed the value from WinMain().
这是我们的窗口句柄。我们可以把'hWnd'放在这里,正如我们从WinMain()中传递了这个值一样。
DWORD BehaviorFlags,
While there are plenty of values we can store in this parameter, there are only three we will cover just now. They are D3DCREATE_SOFTWARE_VERTEXPROCESSING, D3DCREATE_MIXED_VERTEXPROCESSING and D3DCREATE_HARDWARE_VERTEXPROCESSING. These three values are fairly self-explanatory. The software one indicates that all 3D calculations should be done with software, the hardware one with hardware, and the mixed one using a combination of both, depending on which Direct3D sees fit. We will use the software value for compatibility, but you can experiment with these as you desire. At first you will notice no difference, but as we move into advanced topics, you may start to see some differences appear.
尽管有很多的值供我们存储在此参数中,但是我们只会用其中三个。他们是D3DCREATE_SOFTWARE_VERTEXPROCESSING,D3DCREATE_MIXED_VERTEXPROCESSING和D3DCREATE_HARDWARE_VERTEXPROCESSING。这三个值是相当顾名思义,不言自明,一目了然。第一个表示,所有的3D计算应用软件实现,第三个完全使用硬件,而第二个两者都用,这取决于Direct3D认为哪个在这个工作上哪者更合适。为了兼容性我们会使用第一个值,但是你个人高兴的话,试试别的我也不介意。起初,你会发现没有什么区别,但是当我们玩到更深层次的时候,你可能会开始看到一些不同之处。
D3DPRESENT_PARAMETERS *pPresentationParameters,
This is a pointer to the d3dpp struct that we filled out earlier. We just fill this with '&d3dpp'.
这是一个指向我们早些时候定义的d3dpp结构体的指针。我们只要在这写上'&d3dpp'。
IDirect3DDevice9 **ppReturnedDeviceInterface
This is a pointer to a pointer to the graphics device interface (if you can understand that). Earlier in the program we defined this pointer as d3ddev, so we will put '&d3ddev' in this parameter.
And that's it! You have an entire function using Direct3D. However, if you run this program (and you should not), you will find that absolutely nothing different occurs. All we have done at this point is prepare for action. Now let's have some action!
这是一个指向图形设备接口(如果你能理解)的指针。早些时候,我们在程序中定义的这个d3ddev指针,所以我们会在这使用参数'&d3ddev'。
就是这样!然后你就可以使用Direct3D的完整功能。但是,如果你运行这个程序(其实你不应该这么做),你会发现,绝对没有什么不同的发生。所有我们在这一点上做的准备动作。现在,让我们有一些行动!
3. Create a function to render a frame
In this function we will render a single frame. The frame will be rather simple, and will consist of a blue background. Of course, you can change the color if you want. Here is the code for this function.
1// this is the function used to render a single frame
2void render_frame(void)
3{ // clear the window to a deep blue
4 d3ddev->Clear(0, NULL, D3DCLEAR_TARGET, D3DCOLOR_XRGB(0, 40, 100), 1.0f, 0);
5 d3ddev->BeginScene(); // begins the 3D scene
6 // do 3D rendering on the back buffer here
7 d3ddev->EndScene(); // ends the 3D scene
8 d3ddev->Present(NULL, NULL, NULL, NULL); // displays the created frame }
9
10
11
There are four functions to rendering a frame, two of them big (but simple) and two of them small. We'll go over them here.
这儿有个用来渲染帧的函数,两个大的(但简单),两个小的。让我们一起去了解他们。
d3ddev->Clear(0, NULL, D3DCLEAR_TARGET, D3DCOLOR_XRGB(0, 40, 100), 1.0f, 0)
This clears a buffer to a specific color. In this case, we are going to clear our back buffer. It's pretty simple.
Because most of the parameters are irrelevant at this point, we will leave most of them alone. The first two have to do with clearing a specific area. You will rarely need this, but will just leave them at 0 and NULL, indicating the entire back buffer is to be cleared. The third parameter, set to D3DCLEAR_TARGET, indicates that we should clear the back buffer. There are other types of buffers, but we want this type. Next we have color. The parameter is the struct D3DCOLOR, and we will use the function D3DCOLOR_XRGB() to build the color. The next two parameters we will get into in later lessons. For now, just set them to '1.0f' and 0.
这将清空一个特定的颜色缓冲区。在这短代码中我们会清空我们的后缓冲区。这相当简单。
由于大多数参数里无关紧要,所以我们不管他。前两个负责清除特定区域。一般咱用不到,所以就给他们0和NULL,这样整个背部缓冲区都将被清除。第三个参数“D3DCLEAR_TARGET”表明我们应该清除后备缓冲区。还有其他类型的缓冲区,但我们需要清除的就是这种类型。下一步,我们的颜色参数是D3DCOLOR结构体,我们将使用函数D3DCOLOR_XRGB()来构建颜色。接下来的两个参数,我们将在以后的课程了解。现在,只需将它们设置为'1 .0 f'和0。
d3ddev->BeginScene()
Next we call the function BeginScene() which tells Direct3D you are ready to start rendering. This function needs to be called for two reasons. First, you need to tell Direct3D that you are in control of the memory. Second, this function does something called locking, where the buffer in the video RAM is 'locked', granting you exclusive access to this memory. There is no guarantee that your memory will stay put and not be moved around while you are trying to work on it. Having your memory suddenly appear somewhere else can be quite a hassle for sure.
接下来我们调用函数BeginScene(),它告诉Direct3D休息时间结束,可以开始渲染了。这个函数需要被调用的原因有两个。首先,你需要告诉Direct3D她现在受内存管。其次,这个函数会对在视频RAM的缓冲区进行锁定,授予您独家访问此内存的权限。毫无疑问,你的内存将留在原地,不会随意移动,而你正在试图进行这项工作的保证。如果你的内存突然出现在别的地方可以是一个相当肯定的麻烦。
d3ddev->EndScene()
Next we call the function EndScene(). While BeginScene() locked the video memory we wanted, EndScene() unlocks it, making it available by other processes that need access to it.
Note: Locking video RAM is slow, but required. You should call BeginScene() and EndScene() only once per frame to save your valuable CPU ticks.
接下来,我们调用函数EndScene()。BeginScene()会锁定我们想要的显存,而EndScene()可以对之解锁,使得它可以被其他进程访问。
注意:锁定视频RAM是很慢的,但又是必要的。你应该每帧只调用BeginScene()和EndScene()一次,节约宝贵的CPU资源。
d3ddev-> (NULL, NULL, NULL, NULL)
And finally we call the Present() function. The four parameters, all set to NULL, are not going to be used in this tutorial. Three of them have to do with the slowest method of handling the swap chain (which we don't use) and the other one has to do with presenting to a different window (which we won't need and won't go into).
最后,我们调用Present()函数。这四个都设置为NULL的参数,不会在本教程中使用。其中3个是与处理交换链的方法中最慢的(本教程坚决不用),而另一个是介绍到不同的窗口(我们不需要,也不会进入)。
4. Create a function to close Direct3D
This is the last (and easiest) step to creating a Direct3D program. We just have two steps here:
这是最后一个(最简单)的步骤,创建一个Direct3D程序。我们只是在这里有两个步骤:
1// this is the function that cleans up Direct3D and COM
2
3void cleanD3D(void)
4{
5 d3ddev->Release(); // close and release the 3D device
6 d3d->Release(); // close and release Direct3D
7}
8
Here, we call the Release() function from each of the two interfaces we created, d3ddev and d3d. No parameters, nothing spectacular. Just cleans everything up.
在这里,我们从我们创建的两个接口调用Release(),d3ddev和D3D的每一个功能。没有参数,没有返回。仅仅是清理一切。
Why? Well, let's say it would be a bad thing to do otherwise. Basically, if you create Direct3D, but never close it, it will just keep on running in the background of the computer until your next reboot, even after the program itself closes. Bad. Especially bad if you have a lot of resources in your game. Releasing these two interfaces let's everything off the hook and allows Windows to take back it's memory.
为什么呢?我得说如果不这么做请你后果自负。基本上,如果你创建了Direct3D却从来没有关闭它,它就会不停地在计算机后台运行直到你重启电脑,即使在程序本身关闭之后。特别是如果你有一堆坏的资源在你的游戏中,哦,买雷迪嘎嘎。释放这两个接口吧,让一切干干净净,而Windows也可以收回它的内存。
The Finished Program
Wow! That was quite a start, but it will go down from here.
Let's take a look at what we just did. Following is the code we added to our program. The new parts are now in bold.
哇!这仅仅还一个开始,但是我们将从这里迈出第一步。
让我们来跑跑看我们刚刚做的程序。以下是我们的代码。没出现的部分会以粗体显示。
[Show Code]
And that's it! If you run this program you should get something like this:
那么,不出意外的话,你的程序跑起来应该像这样:
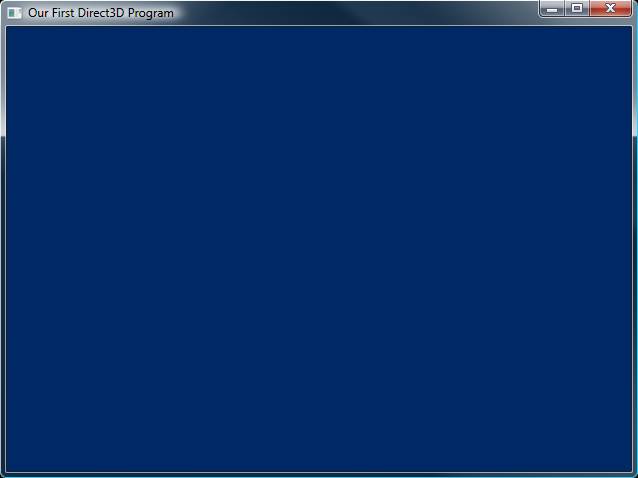
Image 1.3 - Our First Direct3D Program
Summary
Well, it isn't much yet. But you have begun the journey into the near-inifinite depths of 3D game programming. You've created a window and gotten DirectX to put an image (albeit a somewhat dull image) into it.
嗯,本节课已经没有多少了呢。但是我已经成功地把你带进3D游戏编程的旅程,虽然现在还在入门水平。您已经成功地创建了一个窗口,并通过DirectX成功嵌入一幅图像(虽然这图像实在很无聊)。
As an exercise, see if you can get your program to change colors while running. Try to make it fade from blue to black, then to blue again, and repeat.
尝试一下这个练习吧,看看你能不能在程序运行时改变它的颜色。尝试做个蓝黑渐变,然后再为蓝色,反复如此。
So we haven't got a game running yet, but we have enough concepts to start. So with that, let's dive right in and start your next step (which is rather short, btw)!
事实上我们还有没有一个游戏运行,但我们有足够的基础概念。千里之行,始于足下,各位看官切记,切记!
Next Lesson: Going Fullscreen
下一课:走向全屏
GO!GO!GO!
Finished 20101110,耗时10天
posted on 2010-11-11 11:57
叫我老王吧 阅读(3122)
评论(14) 编辑 收藏 引用 所属分类:
DierectX