#
抽象工厂(Abstract Factory)模式看起来和前面看到的工厂方法很相似,只是它使用若干工厂方法(Factory Method)模式。每个工厂方法模式创建一个不同类型的对象。当创建一个工厂对象时,要决定将如何使用由那个工厂创建的所有对象。示例代码如下(假设要创建一个通用的游戏环境,并且希望它能支持不同类型的游戏):
#include<iostream>
using namespace std;
class Obstacle
{
public:
virtual void action()=0;
};
class Player
{
public:
virtual void interactWith(Obstacle*)=0;
};
class Kitty: public Player
{
virtual void interactWith(Obstacle *ob)
{
cout<<"Kitty has encountered a";
ob->action();
}
};
class KungFuGuy: public Player
{
virtual void interactWith(Obstacle* ob)
{
cout<<"KungFuGuy now battles against a";
ob->action();
}
};
class Puzzle: public Obstacle
{
public:
void action(){cout<<"Puzzle"<<endl;}
};
class NastyWeapon: public Obstacle
{
public:
void action(){cout<<"NastyWeapon"<<endl;}
};
//the abstract factory
class GameElementFactory
{
public:
virtual Player* makePlayer()=0;
virtual Obstacle* makeObstacle()=0;
};
//concreate factories
class KittiesAndPuzzles:public GameElementFactory
{
public:
virtual Player* makePlayer(){return new Kitty;}
virtual Obstacle * makeObstacle(){return new Puzzle;}
};
class KillAndDismember:public GameElementFactory
{
public:
virtual Player* makePlayer(){return new KungFuGuy;}
virtual Obstacle *makeObstacle(){return new NastyWeapon;}
};
class GameEnvironment
{
GameElementFactory* gef;
Player* p;
Obstacle *ob;
public:
GameEnvironment(GameElementFactory * factory)
:gef(factory),p(factory->makePlayer()),ob(factory->makeObstacle()){}
void play(){p->interactWith(ob);}
~GameEnvironment()
{
delete p;
delete ob;
delete gef;
}
};
int main()
{
GameEnvironment
g1(new KittiesAndPuzzles),
g2(new KillAndDismember);
g1.play();
g2.play();
}
在此环境中,Player对象与Obstacle 对象交互,但是Player和Obstacle类型依赖于具体的游戏。可以选择特定的GameElementFactory来决定游戏的类型,然后GameEnvironment控制游戏的设置和进行。在本例中,游戏的设置和进行很简单,但是那些动作在很大程度上决定了游戏的结果。
工厂模式不允许将创建对象的代码散布于整个系统。如果程序中所有需要创建对象的代码都转到这个工厂执行,那么在增加新对象时所要做的全部工作就是只需修改工厂。这种设计时众所周知
的工厂方法模式的一种变体。由于每个面向对象应用程序都需要创建对象,并且由于人们可能通过添加新类型来扩展应用程序,工厂模式可能是所有设计模式中最有用的模式之一。实现工厂模式的一种方法就是在基类中定义一个静态成员函数,示例如下:
#include<iostream>
#include<stdexcept>
#include<cstddef>
#include<string>
#include<vector>
using namespace std;
class Shape
{
public:
virtual void draw()=0;
virtual void erase()=0;
virtual ~Shape(){}
class BadShapeCreation :public logic_error
{
public:
BadShapeCreation(string type):
logic_error("Cannot create type"+type){}
};
static Shape* factory(const string &type)
throw(BadShapeCreation);
};
class Circle:public Shape
{
Circle(){}
friend class Shape;
public:
void draw(){cout<<"Circle::draw"<<endl;}
void erase(){cout<<"Circle::erase"<<endl;}
~Circle(){cout<<"Circle::~Circle"<<endl;}
};
class Square:public Shape
{
Square(){}
friend class Shape;
public:
void draw(){cout<<"Square::draw"<<endl;}
void erase(){cout<<"Square::erase"<<endl;}
~Square(){cout<<"Square::~Square"<<endl;}
};
Shape *Shape::factory(const string & type)
throw(Shape::BadShapeCreation)
{
if(type=="Circle")return new Circle;
if(type=="Square")return new Square;
throw BadShapeCreation(type);
}
char *sl[]={"Circle","Square","Square","Circle","Circle","Circle","Square"};
int main()
{
vector<Shape*>shapes;
try{
for(size_t i=0;i<sizeof sl/sizeof sl[0];i++)
shapes.push_back(Shape::factory(sl[i]));
}catch(Shape::BadShapeCreation e)
{
cout<<e.what()<<endl;
return -1;
}
for(size_t i=0;i<shapes.size();i++)
{
shapes[i]->draw();
shapes[i]->erase();
}
}
函数factory 允许以一个参数来决定创建何种类型的Shape。在这里,参数类型为string,也可以是任何数据集。为了确保对象的创建只能发生在函数factory()中,Shape的特定类型的构造函数被设为私有,同时Shape被声明为友元类,因此factory()能够访问这些构造函数。
参考: C++编程思想卷2
职责链(Chain of Responsibility)模式也许被看做一个使用策略对象的“递归的动态一般化".此时提出一个调用,在一个链序列中的每个策略都试图满足这个调用。这个过程直到有一个策略成功满足该调用或者到达序列的末尾才结束。在递归方法中,有个函数反复调用其自身至达到某个终止条件。在职责链中,一个函数调用自身,(通过遍历策略链)调用函数的一个不同实现,如此反复直至达到某个终止条件。这个终止条件或者是已达到策略链的底部(这样就会返回一个默认对象;不管能否提供这个默认结果,必须有个方法能够决定该职责链搜索是成功还是失败)或者是成功找到一个策略。
除了调用一个函数来满足某个请求以外,链中的多个函数都有此机会满足某个请求,因此它有点专家系统的意味。由于职责链实际上就是一个链表,它能够动态创建,因此它可以看做是一个更一般的动态构建的switch语句。示例代码如下:
#include<iostream>
#include<vector>
using namespace std;
enum Answer{NO,YES};
class GimmeStrategy
{
public:
virtual Answer canIHave()=0;
virtual ~GimmeStrategy(){}
};
class AskMom: public GimmeStrategy
{
public:
Answer canIHave()
{
cout<<"Moom? can I have this?"<<endl;
return NO;
}
};
class AskDad: public GimmeStrategy
{
public:
Answer canIHave()
{
cout<<"Dad,I really need this!"<<endl;
return NO;
}
};
class AskGrandpa:public GimmeStrategy
{
public:
Answer canIHave()
{
cout<<"Grandpa , is it my birthday yet?"<<endl;
return NO;
}
};
class AskGrandma:public GimmeStrategy
{
public:
Answer canIHave()
{
cout<<"Grandma,I really love you!"<<endl;
return YES;
}
};
class Gimme:public GimmeStrategy
{
vector<GimmeStrategy*>chain;
public:
Gimme(){
chain.push_back(new AskMom());
chain.push_back(new AskDad());
chain.push_back(new AskGrandpa());
chain.push_back(new AskGrandma());
}
Answer canIHave()
{
vector<GimmeStrategy*>::iterator it=chain.begin();
while(it!=chain.end())
if((*it++)->canIHave()==YES)
return YES;
cout<<"whiiiiiinnne!"<<endl;
return NO;
}
~Gimme(){};
};
int main()
{
Gimme chain;
chain.canIHave();
}
参考 :c++编程思想卷二
前面模板方法模式是“坚持相同的代码“,而被覆盖的函数是“变化的代码“。然而,这种变化在编译时通过继承被固定下来。按照“组合优于继承“的格言,可以利用组合来解决将变化的代码从“坚持相同的代码“中分开的问题,从而产生策略(Strategy)模式。这种方法的一个明显的好处:在程序运行时,可以插入变化的代码。策略模式也加入“语境“,它可以是一个代理类,这个类控制着对特定策略对象的选择和使用。
“策略“的意思就是:可以使用多种方法来解决某个问题,即条条大陆通罗马。现在考虑一下忘记了某个人姓名时的情景。这里的程序可以用不同方法解决这个问题,实例代码如下:
#include<iostream>
using namespace std;
class NameStrategy
{
public:
virtual void greet()=0;
};
class SayHi: public NameStrategy
{
public:
void greet()
{
cout<<"Hi! How's it going?"<<endl;
}
};
class Ignore: public NameStrategy
{
public:
void greet()
{
cout<<"Pretend I don't see you)"<<endl;
}
};
class Admission:public NameStrategy
{
public:
void greet()
{
cout<<"I'm sorry ,I forgot your name."<<endl;
}
};
class Context
{
NameStrategy & strategy;
public:
Context(NameStrategy & strat):strategy(strat){}
void greet(){strategy.greet();}
};
int main()
{
SayHi sayhi;
Ignore ignore;
Admission admission;
Context c1(sayhi),c2(ignore),c3(admission);
c1.greet();
c2.greet();
c3.greet();
}
Context::greet()可以正规地写得更加复杂些,它类似模板方法模式,因为其中包含了不能改变的代码。但在函数main()中可以看到,可以在运行时就策略进行选择。更进一步的做法。可以将状态模式与Context对象的生存期间变化的策略模式结合起来使用。
应用程序结构框架允许从一个或一组类中继承以便创建一个新的应用程序,重用现存类中几乎所有的代码,并且覆盖其中一个或多个函数以便自定义所需要的应用程序。应用程序结构框架中的一个基本的概念是模板方法模式,它很典型地隐藏在覆盖的下方,通过调用基类的不同函数来驱动程序运行。
模板方法模式的一个重要特征是它的定义在基类中(有时作为一个私有成员函数)并且不能改动,模板方法模式就是“坚持相同的代码“。它调用其他基类函数(就是那些被覆盖的函数)以便完成其工作,但是客户程序员不必直接调用这些函数。驱动应用程序运行的“引擎”是模板方法模式,示例代码如下:
#include<iostream>
using namespace std;
class ApplicationFramework
{
protected :
virtual void customize1()=0;
virtual void customize2()=0;
public:
void templateMethod()
{
for(int i=0;i<5;i++)
{
customize1();
customize2();
}
}
};
class MyApp: public ApplicationFramework
{
protected:
void customize1(){cout<<"Hello";}
void customize2(){cout<<"World!"<<endl;}
};
int main()
{
MyApp app;
app.templateMethod();
}
参考:c++编程思想卷二
适配器(Adapter)模式接受一种类型并且提供一个对其他类型的接口。当给定一个库或者具有某一接口的一段代码,同事还给定另外一个库或者与前面那段代码的基本思想相同的一段代码而只是表达式不一致时,适配器模式将十分有用。通过调整彼此的表达方式来适配彼此,将会迅速产生解决方法。
实例代码如下:
//FibonacciGenerator.h, 斐波那契数列产生器类
#ifndef FIBONACCIGENERATOR_H
#define FIBONACCIGENERATOR_H
class FibonacciGenerator
{
int n;
int val[2];
public:
FibonacciGenerator():n(0){val[0]=val[1]=0;}
int operator()()
{
int result=n>2?val[0]+val[1]:n>0?1:0;
++n;
val[0]=val[1];
val[1]=result;
return result;
}
int count(){return n;}
};
#endif
也许读者希望利用这个产生器来执行STL数值算法操作。遗憾的是,STL算法只能使用迭代器才能工作,这就存在接口不匹配的问题。解决方法就是产生一个适配器。代码如下。
#include<iostream>
#include<numeric>
#include"FibonacciGenerator.h"
using namespace std;
class FibonacciAdapter
{
FibonacciGenerator f;
int length;
public:
FibonacciAdapter(int size):length(size){}
class iterator;
friend class iterator;
class iterator:public std::iterator<std::input_iterator_tag,FibonacciAdapter,ptrdiff_t>
{
FibonacciAdapter& ap;
public:
typedef int value_type;
iterator(FibonacciAdapter &a):ap(a){}
bool operator==(const iterator &)const{
return ap.f.count()==ap.length;
}
bool operator!=(const iterator &x)const
{
return !(*this==x);
}
int operator*()const{return ap.f();}
iterator& operator++(){return *this;}
iterator operator++(int){return *this;}
};
iterator begin(){return iterator(*this);}
iterator end(){return iterator(*this);}
};
int main()
{
const int SZ=20;
FibonacciAdapter a1(SZ);
cout<<"accumulate:"<<accumulate(a1.begin(),a1.end(),0)<<endl;
}
代理(Proxy)模式,状态(State)模式都提供一个代理类。代码与代理类打交道,而实际工作的类隐藏在代理类背后。当调用代理类中的一个函数时,代理类仅转而去调用实现类中的相应的函数。这两种模式是如此相似,从结构上看,可以认为代理模式只是状态模式的一个特例。但是这两个模式的内涵是不一样的。
基本思想很简单:代理类派生来自一个基类,由平行地派生来自同一个基类的一个或多个类提供实际的实现。当一个代理对象被创建的时候,一个实现对象就分配给了它,代理对象就将函数调用发给实现对象。
从结构上来看,代理模式和状态模式的区别很简单:代理模式只有一个实现类,而状态模式有多个(一个以上)实现。认为这两种设计模式的应用也不同:代理模式控制对其实现类的访问,而状态模式动态地改变其实现类。
(1)代理模式例子:
#include<iostream>
using namespace std;
class ProxyBase
{
public:
virtual void f()=0;
virtual void g()=0;
virtual void h()=0;
virtual ~ProxyBase(){}
};
class Implementation :public ProxyBase
{
public:
void f(){cout<<"Implementation.f()"<<endl;}
void g(){cout<<"Implementation.g()"<<endl;}
void h(){cout<<"Implementation.h()"<<endl;}
};
class Proxy: public ProxyBase
{
ProxyBase *implementation;
public:
Proxy(){implementation=new Implementation();}
~Proxy(){delete implementation;}
void f(){implementation->f();}
void g(){implementation->g();}
void h(){implementation->h();}
};
int main()
{
Proxy p;
p.f();
p.g();
p.h();
}
(2)状态模式
#include<iostream>
using namespace std;
class Creature
{
class State
{
public:
virtual string response()=0;
};
class Frog : public State
{
public:
string response(){return "Ribbet!";}
};
class Prince:public State
{
public:
string response(){return "Darling!";}
};
State *state;
public:
Creature(): state(new Frog()){}
void greet()
{
cout<<state->response()<<endl;
}
void kiss()
{
delete state;
state=new Prince();
}
};
int main()
{
Creature creature;
creature.greet();
creature.kiss();
creature.greet();
}
命令(command)模式的结构很简单,但是对于消除代码间的耦合,清理代码去有着重要的影响。从最直观的角度来看,命令模式就是一个函数对象:一个作为对象的函数。通过将函数封装为对象,就能够以参数的形式将其传递给其他函数或者对象,告诉它们在履行请求的过程中执行特定的操作。可以说,命令模式是携带行为信息的信使。一个简单的例子如下:
#include<iostream>
#include<vector>
using namespace std;
class Command
{
public:
virtual void execute()=0;
};
class Hello: public Command
{
public:
void execute(){cout<<"hello ";}
};
class World : public Command
{
public:
void execute(){cout<<"world!";}
};
class IAm:public Command
{
public:
void execute(){cout<<"I'm the command pattern!";}
};
class Macro
{
vector<Command *>commands;
public:
void add(Command *c){commands.push_back(c);}
void run()
{
vector<Command*>::iterator it=commands.begin();
while(it!=commands.end())
{
(*it++)->execute();
cout<<endl;
}
}
};
int main()
{
Macro macro;
macro.add(new Hello);
macro.add(new World);
macro.add(new IAm);
macro.run();
}
命令模式的主要特点是允许向一个函数或者对象传递一个想要的动作。上述例子提供了将一系列需要一起执行的动作集进行排队的方法。在这里,可以动态创建新的行为,某些事情通常只能通过编写新的代码来完成,而在上述例子中可以通过解释一个脚本来实现。
参考:c++编程思想2
设计模式或许是面向对象设计方法学前进过程中的最新,最重要的一步。设计模式当今已成为面向对象程序设计的重要部分。
单件也许是最简单的设计模式,它是允许一个类有且仅有一个实例的方法。创建一个单件模式的关键是防止客户程序员获得任何控制其对象生存期的权利。为了做到这一点,声明所有的构造函数为私有,并且防止编译器隐式生成任何构造函数。注意,拷贝构造函数和赋值操作符(这两个故意没有实现,,因为它们根本不会被调用)被声明为私有,以便防止任何这类复制动作产生。这种方法并没有限制只创建一个对象。这种技术也支持创建有限个对象的对象池。
下面的程序显示在c++中如何实现一个单件模式
#include<iostream>
using namespace std;
class Singleton
{
static Singleton s;
int i;
Singleton(int x):i(x){}
Singleton & operator=(Singleton &); //disallowed
Singleton(const Singleton &);
public:
static Singleton & instance(){return s;}
int getValue(){return i;}
void setValue(int x){i=x;}
};
Singleton Singleton::s(47);
int main()
{
Singleton &s =Singleton::instance();
cout<<s.getValue()<<endl;
Singleton &s2=Singleton::instance();
s2.setValue(9);
cout<<s.getValue()<<endl;
}
参考:c++ 编程思想 2
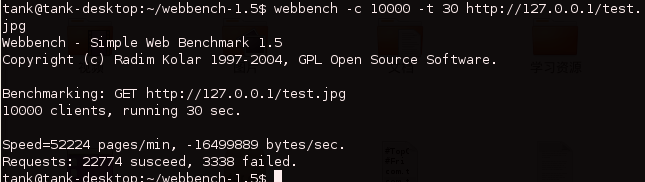
今天开始要看nginx 源码了,首先先看一个web服务器压力测试工具Web Bench
。
Web Bench is very simple tool for benchmarking WWW
or proxy servers. Uses fork() for simulating multiple clients and
can use HTTP/0.9-HTTP/1.1 requests. This benchmark is not
very realistic, but it can test if your HTTPD can realy handle that
many clients at once (try to run some CGIs) without taking
your machine down. Displays pages/min and bytes/sec. Can be used
in more aggressive mode with -f switch.
Web Bench 下载主页 http://home..cz/~cz210552/webbench.html
用Web Bench 简单测试下nginx服务器的性能。结果如下
测试参数 10000个用户并发请求30秒