|
|
在Win32时间类型有这样几种类型 FILETIME/SYSTEMTIME/WINDOWSTIME
先提个问题,如何计算当前时间100天以后的时间,在win32中。
1.SYSTEMTIME
SYSTEMTIME的定义是这样 typedef struct _SYSTEMTIME
{
WORD wYear;
WORD wMonth;
WORD wDayOfWeek;
WORD wDay;
WORD wHour;
WORD wMinute;
WORD wSecond;
WORD wMilliseconds;
} SYSTEMTIME; 很大,总共16个字节。你可以调用GetSystemTime来取得当前的时间 SYSTEMTIME st;
::GetSystemTime(&st); 但是如果你调用 st.wDay += 100;是达不到效果的,将会得到一个无效的时间格式 2. FILETIME FILETIME的定义是这样的 typedef struct _FILETIME
{
DWORD dwLowDateTime;
DWORD dwHighDateTime;
} FILETIME; FILETIME这个名字很奇怪,其实他跟FILE并没有直接关系,只是很多File的API中,都以这个为时间的类型,比如你可以调用GetFileTime来取得File的创建/修改/访问时间。 FILETIME是一个__int64。可以这样转化成__int64 __int64 d = *(__int64 *)&st;
//or
__int64 d2;
memcpy(&d2,&st,sizeof(d2)); 转化为__int64是一个以100纳秒为单位的值 补习一下时间单位( http://blog.vckbase.com/zaboli/archive/2005/06/29/8969.aspx) | 1ms (毫秒) | 1毫秒=0.001秒=10-3秒(millisecond) | | 1μs (微秒) | 1微秒=0.000001=10-6秒(microsecond) | | 1ns (纳秒) | 1纳秒=0.000000001秒=10-9秒(nanosecond) | | 1ps (皮秒) | 1皮秒=0.000000000001秒=10-12秒 | | 1fs (飞秒) | 1飞秒=0.00000000000001秒=10-15秒 |
SYSTEMTIME可以通过SystemTimeToFileTime来转化为FILETIME 3.Window Time ::GetTickCount()可以返回当前的以微秒为单位的时间,用在精度要求不高的场合,返回的只是一个DWORD,四字节。高一点的使用timeGetTime 如何计算当前时间100天以后的时间,在win32中。
应该这样写
const __int64 nano100SecInDay=(__int64)10000000*60*60*24;
SYSTEMTIME st;
::GetSystemTime(&st);
FILETIME f;
::SystemTimeToFileTime(&st,&f);
ULARGE_INTEGER now;
memcpy(&now,&f,sizeof(now));
now += 100*nano100SecInDay;
memcpy(&f,&now,sizeof(f));
FileTimeToSystemTime(&f,&st);
最后:附上我写的一个小工具,删除指定文件夹下面的过期文件的一个工具,并可以备份,支持子文件夹嵌套。 #include <windows.h>
#include <cstdio>
#include <string>
using namespace std;
const __int64 nano100SecInDay=(__int64)10000000*60*60*24;
ULARGE_INTEGER now;
int days = 14;
bool backup = false;
string dst_dir;
string backup_dir;
void make_sure_dir_exist(string & file)
{
int tag = 2;
while(true)
{
tag = file.find_first_of("\\",tag+1);
if(tag!=-1)
{
string tmp = file.substr(0,tag);
::CreateDirectory(tmp.c_str(),NULL);
}
else
{
break;
}
}
}
void xdel(const char *dir)
{
char tempFileFind[1024];
sprintf(tempFileFind,"%s\\*.*",dir);
WIN32_FIND_DATA ffd;
HANDLE hFind;
hFind = ::FindFirstFile(tempFileFind,&ffd);
if(hFind == INVALID_HANDLE_VALUE)
{
printf("can't find %s\n",dir);
return;
}
while(true)
{
//printf("find %s\n",ffd.cFileName);
FILETIME &ft = ffd.ftLastWriteTime;
ULARGE_INTEGER ui;
memcpy(&ui,&ft,sizeof(ui));
__int64 t = now.QuadPart-ui.QuadPart;
if(ffd.dwFileAttributes&FILE_ATTRIBUTE_DIRECTORY)
{
if(strcmp(ffd.cFileName, ".") && strcmp(ffd.cFileName, ".."))
{
char temp[1024];
sprintf(temp,"%s\\%s",dir,ffd.cFileName);
xdel(temp);
if(t>=nano100SecInDay*days)
{
if(::RemoveDirectory(temp))
{
printf("del dir %s ok\n",temp);
}
else
{
printf("del dir %s failed\n",temp);
}
}
}
}
else
{
char temp[1024];
sprintf(temp,"%s\\%s",dir,ffd.cFileName);
if(t>=nano100SecInDay*days)
{
if(backup)
{
string backup_file = temp;
backup_file.replace(0,dst_dir.length(),backup_dir.c_str());
make_sure_dir_exist(backup_file);
if(::MoveFile(temp,backup_file.c_str()))
{
printf("backup file %s ok\n",temp);
}
else
{
printf("backup file %s failed\n",temp);
}
}
else
{
SetFileAttributes(temp,FILE_ATTRIBUTE_NORMAL);
if(::DeleteFile(temp))
{
printf("del file %s ok\n",temp);
}
else
{
printf("del file %s failed\n",temp);
}
}
}
}
if (!FindNextFile(hFind, &ffd))
{
break;
}
}
FindClose(hFind);
}
int main(int argc,char ** argv)
{
if(argc<2)
{
printf("usage: xdel directory /d= /m=\n");
printf("[optional] /d: config the expired days,default is 14 days\n");
printf("[optional] /m: config the backup directory\n");
printf("for example: xdel d:\\test /d=10 /m=d:\\backup");
return 1;
}
for(int i=1;i<argc;++i)
{
string tmp = argv[i];
if(tmp.find("/d=")!=-1)
{
int d = atoi(tmp.substr(3).c_str());
if(d!=0)
{
days =d;
}
}
else if(tmp.find("/m=")!=-1)
{
backup = true;
backup_dir = tmp.substr(3);
}
else
{
dst_dir = tmp;
}
}
//Get system time
SYSTEMTIME st;
::GetSystemTime(&st);
FILETIME f;
::SystemTimeToFileTime(&st,&f);
memcpy(&now,&f,sizeof(now));
xdel(argv[1]);
return 0;
}
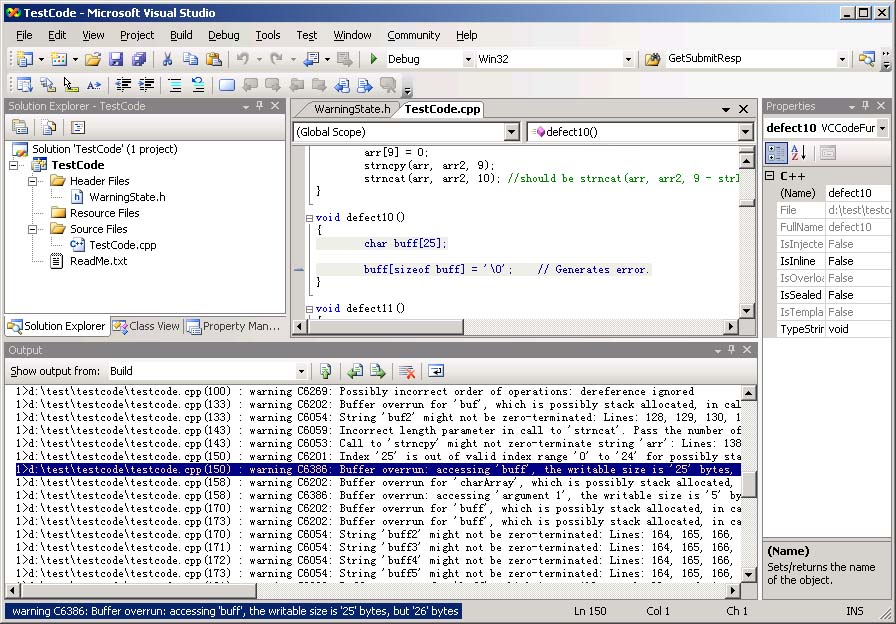
1. 什么是Prefast
Prefast是一种代码分析工具,它能够帮助你找到编译器不能找到的错误或者缺陷。Prefast首次被微软集成到Visual Studio 2005 Team Suite中去,使用起来非常方便。
2.怎么使用Prefast
在vs2005 Team Suite中,使用Prefast非常简单。修改你的工程属性,设置Enable Code Analysis For C/C++为Yes.
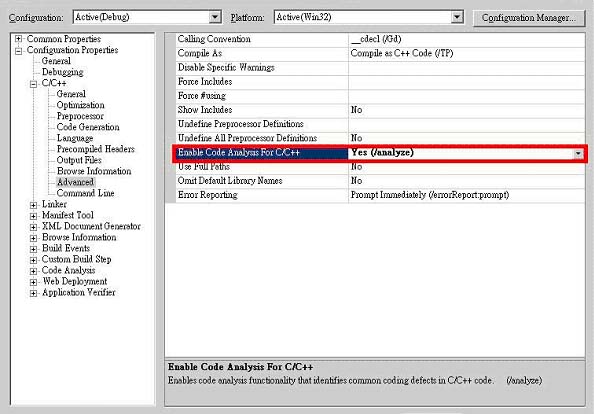
效果:
注意到有可能错误的地方以浅灰色显示在编辑器中了。
3.Prefast能帮你找到哪些错误
1)没有初始化
//
no initial
void
defect1()
{
int
a;
int
b;
b
=
a;
}
会报: d:\test\testcode\testcode.cpp(18) : warning C6001: Using uninitialized memory 'a': Lines: 15, 16, 18
2)空指针取值
//
one path dereference NULL
void
defect4(
int
b,
int
c)
{
int
*
p
=
NULL;
int
a
=
1
;
if
(b
==
1
) {
if
(c
==
1
) {
p
=
&
a;
}
else
{
}
}
else
{
if
(c
==
1
) {
}
else
{
p
=
&
a;
}
}
*
p;
return
;
}
会报:d:\test\testcode\testcode.cpp(65) : warning C6011: Dereferencing NULL pointer 'p': Lines: 45, 46, 48, 57, 65
3)可能错误的运算符优先级
void
defect5()
{
int
a
=
1
;
int
b
=
1
;
int
c
=
1
;
if
(a
&
b
==
c)
return
;
}
会报: d:\test\testcode\testcode.cpp(76) : warning C6281: Incorrect order of operations: relational operators have higher precedence than bitwise operators
4)可能的buffer overrun
void
defect8()
{
char
buf[
100
];
char
buf2[
200
];
int
i
=
100
;
sprintf(buf,
"
hello world %d
"
, i);
strcpy(buf, buf2);
}
会报: d:\test\testcode\testcode.cpp(133) : warning C6202: Buffer overrun for 'buf', which is possibly stack allocated, in call to 'strcpy': length '200' exceeds buffer size '100'
5)可能的无穷循环
//
infinite loop
void
defect14()
{
signed
char
i;
for
(i
=
100
; i
>=
0
; i
++
) {
;
}
}
会报: d:\test\testcode\testcode.cpp(198) : warning C6292: Ill-defined for-loop: counts up from maximum
6)格式字符串错误
//
Format string mismatch
void
defect21()
{
char
buff[
5
];
sprintf(buff,
"
%s %s
"
,
"
a
"
);
}
会报: d:\test\testcode\testcode.cpp(277) : warning C6063: Missing string argument to 'sprintf' that corresponds to conversion specifier '2'
7)安全问题
void
defect27()
{
CreateProcess(NULL,
"
c:\\program files\\Project.exe arg1
"
,
//
correct "\"c:\\program files\\Project.exe\" arg1",
NULL,
NULL,
false
,
0
,
NULL,
NULL,
NULL,
NULL);
}
会报: d:\test\testcode\testcode.cpp(327) : warning C6277: NULL application name with an unquoted path in call to 'CreateProcessA': results in a security vulnerability if the path contains spaces
8)=和==误用
void
defect32()
{
int
a
=
1
;
if
(a
=
2
)
return
;
}
会报: d:\test\testcode\testcode.cpp(405) : warning C6282: Incorrect operator: assignment of constant in Boolean context. Consider using '==' instead
9)逻辑运算问题
//
always false
void
defect45()
{
int
x;
if
(
0
&&
x
++
) {
;
}
}
会报: d:\test\testcode\testcode.cpp(564) : warning C6237: (<zero> && <expression>) is always zero. <expression> is never evaluated and might have side effects
10)其他
摘要: 主要阐述linux/windows跨平台开发
阅读全文
作为C++编译器,从vc6到vc8最大的调整就是对C++标准的支持更好了。
我发现的几点不同。
a. For 循环的声明
Vc6: for(int i<0;i<100;++i){}; j = i; (ok)
Vc8: for(int i<0;i<100;++i){}; j = i; (illegal)
int i; for(i<0;i<100;++i){}; j = i; (ok)
Vc8中的for循环中变量的有效期仅仅在for 循环的开始与结束期间有效。
b.string实现
Vc6: string s; char *p = s.begin(); (ok)
Vc8: string s; char *p = s.begin(); (illegal)
string s; char *p = const_cast<char *>(s.c_str()); (ok)
在vc6中,string::iterator被定义为char *,但是vc8中不是
c.更严格的typename声明的需要
Vc6:
template<class T>
class Test
{
public:
typedef map<T,T> mymap;
mymap::iterator mymap_iter;
}; (ok)
Vc8:
template<class T>
class Test
{
public:
typedef map<T,T> mymap;
mymap::iterator mymap_iter;
}; (illegal)
typename mymap::iterator mymap_iter;(ok)
vc8更加严格的要求程序员在类型前面加上typename以避免歧义
d.不允许默认的int类型
Vc6: fun() { return 0;} (ok)
Vc8: fun() { return 0;} (illegal)
int fun() { return 0;} (ok)
vc8不支持默认返回int类型
e.typedef必须是public才能被外界访问到
Vc6:
Class Test
{
typedef int iterator;
};
Test::iterator i; (ok)
Vc8:
Class Test
{
typedef int iterator;
};
Test::iterator i; (illegal)
Class Test
{
public:
typedef int iterator;
};
Test::iterator i; (ok)
附录:一些资源(From msdn)
Overviews:
Moving from 6.0 to 7.1:
Moving from 7.1 to 8.0:
1. ACE_Reactor的创建 ctor: ACE_Reactor (ACE_Reactor_Impl *implementation = 0, int delete_implementation = 0); 你可以自己创建一个ACE_Reactor 但是大多数时候,我们都是通过调用ACE_Reactor::instance()这个静态方法来返回唯一的实例。
ACE_Reactor *
ACE_Reactor::instance (void)
{
ACE_TRACE ("ACE_Reactor::instance");
if (ACE_Reactor::reactor_ == 0) //1
{
// Perform Double-Checked Locking Optimization.
ACE_MT (ACE_GUARD_RETURN (ACE_Recursive_Thread_Mutex, ace_mon,
*ACE_Static_Object_Lock::instance (), 0));
if (ACE_Reactor::reactor_ == 0) //2
{
ACE_NEW_RETURN (ACE_Reactor::reactor_,
ACE_Reactor,
0);
ACE_Reactor::delete_reactor_ = 1;
ACE_REGISTER_FRAMEWORK_COMPONENT(ACE_Reactor, ACE_Reactor::reactor_)
}
}
return ACE_Reactor::reactor_;
} 注意这点使用了双检测的机制(代码1和2),为了提高效率,不用每次都加锁。 2. Impl手法的运用 ACE_Reactor有个成员变量 ACE_Reactor_Impl *implementation_; 这个implementation_才是真正做事情的东西,典型的Impl手法。 为什么要多一个这个间隔层呢,主要是为了实现跨平台。 因为不同的平台的Reactor差异很大。 在Windows平台,实现这个是ACE_WFMO_Reactor
class ACE_Export ACE_WFMO_Reactor : public ACE_Reactor_Impl 3. Event_Handle的管理 ACE_WFMO_Reactor把要管理的Handle都放在 ACE_WFMO_Reactor_Handler_Repository handler_rep_; 这里要注意的是io_handle和event_handle的区别 io_handle是真正的handle,比如socket_handle, thread_handle 而event_handle是绑定在io_handle上面的事件handle 有代码为证:
1 int
2 ACE_WFMO_Reactor::register_handler_i (ACE_HANDLE event_handle,
3 ACE_HANDLE io_handle,
4 ACE_Event_Handler *event_handler,
5 ACE_Reactor_Mask new_masks)
6 {
7 // If this is a Winsock 1 system, the underlying event assignment will
8 // not work, so don't try. Winsock 1 must use ACE_Select_Reactor for
9 // reacting to socket activity.
10
11 // Make sure that the <handle> is valid
12 if (io_handle == ACE_INVALID_HANDLE)
13 io_handle = event_handler->get_handle ();
14
15 if (this->handler_rep_.invalid_handle (io_handle))
16 {
17 errno = ERROR_INVALID_HANDLE;
18 return -1;
19 }
20
21 long new_network_events = 0;
22 int delete_event = 0;
23 auto_ptr <ACE_Auto_Event> event;
24
25 // Look up the repository to see if the <event_handler> is already
26 // there.
27 ACE_Reactor_Mask old_masks;
28 int found = this->handler_rep_.modify_network_events_i (io_handle,
29 new_masks,
30 old_masks,
31 new_network_events,
32 event_handle,
33 delete_event,
34 ACE_Reactor::ADD_MASK);
35
36 // Check to see if the user passed us a valid event; If not then we
37 // need to create one
38 if (event_handle == ACE_INVALID_HANDLE)
39 {
40 // Note: don't change this since some C++ compilers have
41 // <auto_ptr>s that don't work properly
42 auto_ptr<ACE_Auto_Event> tmp (new ACE_Auto_Event);
43 event = tmp;
44 event_handle = event->handle ();
45 delete_event = 1;
46 }
47
48 int result = ::WSAEventSelect ((SOCKET) io_handle,
49 event_handle,
50 new_network_events); 可以看到在42行create event,在44复制到event_handle,最后通过 WSAEventSelect将这个io_handle和event_handle绑定在一起了 这个register_handle调用一般都在Event_Handler的open函数中,实现了注册到Reactor中去。 4. 等待事件 如何检测到要发生的socket的事件呢?比如有新的client连接,收发。ACE并不直接调用select函数来取得。 ACE调用 WaitForMultipleObjectsEx来等待事件的发生。ACE这样做的好处是不但可以捕捉socket事件,也可以捕捉到其他事件。前面说过了每一个对应的socket都有一个event_handle与之对应。 WaitForMultipleObjectsEx会将发生事件的socket handle的index返回。这样ACE_Reactor就可以利用这个slot来查到io_handle和event_handler( 注意:event_handle和event_handler是不同的)
1 DWORD
2 ACE_WFMO_Reactor::wait_for_multiple_events (int timeout,
3 int alertable)
4 {
5 // Wait for any of handles_ to be active, or until timeout expires.
6 // If <alertable> is enabled allow asynchronous completion of
7 // ReadFile and WriteFile operations.
8
9 return ::WaitForMultipleObjectsEx (this->handler_rep_.max_handlep1 (),
10 this->handler_rep_.handles (),
11 FALSE,
12 timeout,
13 alertable);
14 } 5.分发事件 根据WaitForMultiObjectEx返回的slot就可以查询到event_handler来调用用户的处理函数了
1 int
2 ACE_WFMO_Reactor::complex_dispatch_handler (DWORD slot,
3 ACE_HANDLE event_handle)
4 {
5 // This dispatch is used for I/O entires.
6
7 ACE_WFMO_Reactor_Handler_Repository::Current_Info ¤t_info =
8 this->handler_rep_.current_info ()[slot];
9
10 WSANETWORKEVENTS events;
11 ACE_Reactor_Mask problems = ACE_Event_Handler::NULL_MASK;
12 if (::WSAEnumNetworkEvents ((SOCKET) current_info.io_handle_,
13 event_handle,
14 &events) == SOCKET_ERROR)
15 problems = ACE_Event_Handler::ALL_EVENTS_MASK;
16 else
17 {
18 // Prepare for upcalls. Clear the bits from <events> representing
19 // events the handler is not interested in. If there are any left,
20 // do the upcall(s). upcall will replace events.lNetworkEvents
21 // with bits representing any functions that requested a repeat
22 // callback before checking handles again. In this case, continue
23 // to call back unless the handler is unregistered as a result of
24 // one of the upcalls. The way this is written, the upcalls will
25 // keep being done even if one or more upcalls reported problems.
26 // In practice this may turn out not so good, but let's see. If any
27 // problems, please notify Steve Huston <shuston@riverace.com>
28 // before or after you change this code.
29 events.lNetworkEvents &= current_info.network_events_;
30 while (events.lNetworkEvents != 0)
31 {
32 ACE_Event_Handler *event_handler =
33 current_info.event_handler_;
34
35 int reference_counting_required =
36 event_handler->reference_counting_policy ().value () ==
37 ACE_Event_Handler::Reference_Counting_Policy::ENABLED;
38
39 // Call add_reference() if needed.
40 if (reference_counting_required)
41 {
42 event_handler->add_reference ();
43 }
44
45 // Upcall
46 problems |= this->upcall (current_info.event_handler_,
47 current_info.io_handle_,
48 events);
49
50 // Call remove_reference() if needed.
51 if (reference_counting_required)
52 {
53 event_handler->remove_reference ();
54 }
55
56 if (this->handler_rep_.scheduled_for_deletion (slot))
57 break;
58 }
59 }
60
61 if (problems != ACE_Event_Handler::NULL_MASK
62 && !this->handler_rep_.scheduled_for_deletion (slot) )
63 this->handler_rep_.unbind (event_handle, problems);
64
65 return 0;
66 } 这里值得注意的是ACE通过调用WSAEnumNetworkEvents来重置event_handle。 讲的比较概要,更具体的细节请自己阅读源码。 关于ACE_Reactor的用法请参见前一篇我的示例。
Echo server就是那种提供回显服务的程序,就是收到什么,然后就发送什么的程序。 两种实现方法 1. Per client Per Thread (每个连接每个线程来处理) 这种方式比较简单,易于实现。缺点是如果有大量的连接,必然占用过量的系统资源。 代码:
#ifdef _DEBUG
#pragma comment(lib,"ACED.lib")
#else
#pragma comment(lib,"ACE.lib")
#endif
#include <ace/OS_main.h>
#include <ace/ACE.h>
#include <ace/Log_Msg.h>
#include <ace/SOCK_Acceptor.h>
#include <ace/Thread.h>
DWORD worker(void *arg)
{
ACE_SOCK_Stream *pStream =(ACE_SOCK_Stream *) arg;
char buffer[32] = {0};
int len;
while( (len = pStream->recv(buffer,sizeof(buffer)-1)) >0)
{
if(pStream->send_n(buffer,len)<=0)
{
ACE_DEBUG ((LM_DEBUG,
ACE_TEXT ("(%P|%t) %p\n"),
ACE_TEXT ("send failed")));
break;
}
}
ACE_INET_Addr raddr;
pStream->get_remote_addr(raddr);
ACE_DEBUG ((LM_DEBUG,ACE_TEXT ("(%P|%t) close:%s %d\n"),raddr.get_host_addr(),raddr.get_port_number()));
pStream->close();
delete pStream;
return 0;
}
int main(int argc, char *argv[])
{
ACE_INET_Addr addr(1500);
ACE_SOCK_Acceptor server;
if(server.open(addr)==-1)
{
ACE_DEBUG ((LM_DEBUG,
ACE_TEXT ("(%P|%t) %p\n"),
ACE_TEXT ("bind failed")));
return 1;
}
ACE_SOCK_Stream *pStream = 0;
while((pStream =new ACE_SOCK_Stream()) && server.accept(*pStream)!=-1)
{
ACE_INET_Addr raddr;
pStream->get_remote_addr(raddr);
ACE_DEBUG ((LM_DEBUG,ACE_TEXT ("(%P|%t) connect:%s %d\n"),raddr.get_host_addr(),raddr.get_port_number()));
ACE_Thread::spawn(worker,pStream);
}
server.close();
return 0;
} 说明: ACE_Thread用来启动thread,当有client连上来的时候,启动worker thread来处理。 2. 事件模型socket里面是有select机制,ACE也提供了这种方式。 概念: Event_Handler:有事件来临的时候的处理器 Reactor:事件管理,负责管理Event_Hanlde和分发事件 Acceptor负责连接Event_Handle,Reactor和Sock_Acceptor 代码:
#ifdef _DEBUG
#pragma comment(lib,"ACED.lib")
#else
#pragma comment(lib,"ACE.lib")
#endif
#include <ace/OS_main.h>
#include <ace/ACE.h>
#include <ace/Svc_Handler.h>
#include <ace/Acceptor.h>
#include <ace/Log_Msg.h>
#include <ace/SOCK_Acceptor.h>
#include <ace/Thread.h>
class My_Svc_Handler:
public ACE_Svc_Handler <ACE_SOCK_STREAM,ACE_NULL_SYNCH>
{
public:
int open(void*)
{
ACE_INET_Addr raddr;
peer().get_remote_addr(raddr);
ACE_DEBUG ((LM_DEBUG,ACE_TEXT ("(%P|%t) connect:%s %d %d\n"),raddr.get_host_addr(),raddr.get_port_number(),this));
reactor()->register_handler(this,ACE_Event_Handler::READ_MASK);
return 0;
}
int handle_input(ACE_HANDLE)
{
char buffer[32] = {0};
int len = peer().recv(buffer,sizeof(buffer)-1);
if(len>0)
{
if(peer().send_n(buffer,len)<=0)
{
ACE_DEBUG ((LM_DEBUG,
ACE_TEXT ("(%P|%t) %p\n"),
ACE_TEXT ("send failed")));
return -1; //must return -1 to call handle_close
}
return 0;
}
else
{
return -1; //must return -1 to call handle_close
}
}
int handle_close(ACE_HANDLE handle,ACE_Reactor_Mask close_mask)
{
ACE_INET_Addr raddr;
peer().get_remote_addr(raddr);
ACE_DEBUG ((LM_DEBUG,ACE_TEXT ("(%P|%t) close:%s %d\n"),raddr.get_host_addr(),raddr.get_port_number()));
peer().close();
return 0;
}
};
typedef ACE_Acceptor<My_Svc_Handler,ACE_SOCK_ACCEPTOR> MyAcceptor;
int main(int argc, char *argv[])
{
ACE_INET_Addr addr(1500);
MyAcceptor server;
if(server.open(addr)==-1)
{
ACE_DEBUG ((LM_DEBUG,
ACE_TEXT ("(%P|%t) %p\n"),
ACE_TEXT ("bind failed")));
return 1;
}
while(1){
ACE_Reactor::instance()->handle_events();
}
server.close();
return 0;
} 说明: 1.使用ACE_Acceptor模板类来定义自己的Acceptor 2.ACE_Reactor::instance()->handle_events()来实现事件分发 3.在Event_Handle里面使用reactor()->register_handler(this,ACE_Event_Handler::READ_MASK);来注册要关心的事件 4.在Event_Handle中使用peer()来获得Sock_Stream来发送接受数据。
摘要: ACE示例1-Time Server 阅读全文
摘要: 不用AppWizard写MFC程序
阅读全文
很早以前,在我初学c语言的时候,我的第一个象样的程序是一个五子棋程序,使用了TC2.0的图形库,纯面向过程的设计,由上到下的设计,而且只有一个c文件就搞定了,大概几百行,可惜代码已经失传,非常可惜。 为什么要全局变量? List 1
int main()
{
int s1,s2,s3;
fun1(s1);
fun2(s1,s2);
fun3(s1,s2,s3);
return 0;
}
上面的s1,s2,s3如果改成全局变量,则变为 List 2
int s1,s2,s3;
int main()
{
fun1();
fun2();
fun3();
} 似乎简洁了一些,而且没有了传递参数的开销。但是缺点也是很明显的,带了三个函数之间的耦合。 既然我们认识到全局变量的问题,怎么改进呢? 代码1中由于有三个变量,如果有更多的,就更麻烦,我们可以这样改进 List 3
typedef struct statusTag
{
int s1,s2,s3;
}Status;
int main()
{
Status s;
fun1(&s);
fun2(&s);
fun3(&s);
return 0;
} 这种技巧你可以在lua中看到,看lua的使用代码 List4
#include "lua.h"
#include "lauxlib.h"
#include "lualib.h"
int main(int argc, char *argv[])
{
lua_State *L = lua_open();
const char *buf = "var = 100";
int var ;
luaopen_base(L);
luaopen_io(L);
lua_dostring(L, buf);
lua_getglobal(L, "var");
var = lua_tonumber(L, -1);
lua_close(L);
return 0;
} 请注意到这里的lua_open方法,这其实是一种创建自己的工厂方法。不使用全局变量的好处就是,我们保留了可以创建多个对象的自由。 时代在发展,进入C++时代,但是全局变量仍然有人在用,存在就是合理的。GOF提出一种设计模式叫Singleton的模式,其核心思想就是不让全局变量漂浮在空中,把它放入class中,成为衣冠楚楚的C++公民。著名的Meyer Singleton像这样 List 5
class Status
{
private:
Status(){};
public:
static Status& getInstance()
{
static Status s;
return s;
}
};
class User
{
void fun()
{
Status &s = Status::Instance();
//. . .use s
}
}; 一切似乎很完美,使用private来防止client 创建它,保证了对象的唯一性(注意:Meyer singleton并不具有多线程安全,可能导致多次初始化对象) 但是随着 针对接口编程和单元测试越来越流行,singleton带来的对单元测试不友好的特点日益体现,全局变量不能很好的被mock,所以难于测试。 这时候所谓的IOC思想( Inversion of Control,即反转模式)出来了,简单的来说,就是通过构造函数或者set方法实现注入 List6 - 构造函数注入
class Status{};
class User
{
public:
User(Status *s):m_ps(s){};
void fun()
{
Status *s = m_ps;
}
private:
Status *m_ps;
} List7 - Set 注入
class Status{};
class User
{
public:
User(){}
void setStaus(Status *s)
{
m_ps = s;
}
void fun()
{
Status *s = m_ps;
}
private:
Status *m_ps;
} 使用IOC的好处是带来了更强大的灵活性,但是带来的问题就是调用者麻烦了(天下没有免费的午餐阿) List8
int main()
{
Status s;
User u;
u.setStatus(&s);
u.fun();
return 0;
} 好像一切又返朴归真,似乎并没有带来什么简单。有的时候简单和灵活性就是死对头。 为了简化用户进行手工注入,IOC容器出现,在Java世界里面,最著名的莫过于Spring了.IOC容器就像一个巨大的创建工厂,她可以使用xml来配置这些,这真的是一场革命。
<beans>
<bean id="status" class="Status">
</bean>
<bean id="user" class="User">
<property name="status"><ref bean="status"/></property>
</bean>
</beans> Spring就是这样把注入的工作移到配置文件中去,提供了强大的灵活性和可配置性 但是由于c/c++ 不具备的java那么多运行期的类型识别和反射的功能,所以我目前还没有发现有在C++中使用的IOC容器,如果你知道,请告诉我 那么如果是C++怎么来使注入变得简单一点呢,可以使用工厂方法了 List9
User * createUser(Status &s,Status2 &s2)
{
User *user = new User();
user->setStatus(s);
user->setStatus2(s2);
return user;
}
总结: 其实软件的设计根本就没有所谓的黄金法则,没有免费的午餐,你在获得更强大的灵活性,往往都得到复杂性的附加效果。如果你就是写一个自己玩的小游戏,ok,你就是用全局变量。如果你要设计庞大的Office,那你就没有办法把代码写的很简单,因为你要考虑的东西多了,可维护性,可测试性。
所谓的compile-time Constraints就是在编译期使用C++的语法规则对设计进行约束检查,尽量在编译期把程序的问题暴露出来,节省成本。 常用的规则: 1. 大小为0的数组在编译期会报错
template<typename T1,typename T2>
void check_size()
{
int dmp[sizeof(T1)==sizeof(T2)];
} 比如 check_size<int,long>();//ok check_size<int,char>();//compile error:cannot allocate an array of constant size 0 2.不同类型的指针需要强制转换以此可以用来判断两个对象是否有继承关系
template<typename T1,typename T2>
void is_derived(T1 *pd =0 ,T2 *pb=0)
{
pb = pd;
} 比如: is_derived<int,char>() //compile failed 3.union的成员不能是非PODunion Test { std::string s; //illegal }; 这一点可以用来测试一个类型是否是POD
template<typename T>
void check_pod()
{
union {
T data;
};
}; 比如: check_pod<int>();//ok check_pod<std::string>();//failed 常用的技巧: 1.利用模板特化Loki里面的例子
namespace Loki
{
template<int> struct CompileTimeError;
template<> struct CompileTimeError<true> {};
}
#define LOKI_STATIC_CHECK(expr, msg) \
{ Loki::CompileTimeError<((expr) != 0)> ERROR_##msg; (void)ERROR_##msg; } 利用特化来定制错误信息 2. 利用空函数来实现0开销编译器可能将空函数优化掉 3. 利用enum无开销的取得编译期的所得到的整数值
Loki里面的例子:
template <class TList> struct Length;
template <> struct Length<NullType>
{
enum { value = 0 };
};
template <class T, class U>
struct Length< Typelist<T, U> >
{
enum { value = 1 + Length<U>::value };
};
对于多线程编程,很多人概念不清,写代码的时候要么是处处加锁,影响性能不说,还容易莫名其妙的死锁,还有人对多线程敬而远之。 所以学习多线程编程最重要的不是学习API,而是理解什么才是多线程安全的代码 从例子说起
#include <windows.h>
#include <process.h>
long global1 = 0;
volatile long global2 = 0;
class MyClass
{
public:
MyClass() : m(0)
{
++m;
}
int fun(int v)
{
return m+v; //-----------9
}
void set(int v)
{
m = v; //-------------10
}
int m;
};
MyClass global_object; //-------------8
unsigned int __stdcall thread_fun1(void *param)
{
static int static2 = 0;
static MyClass static_object; //--------6
int local1 = 0;
++local1; //-------1
++static2; //-------2
++global1; //-------3
++global2; //-------4
InterlockedIncrement(&global1); //--------5
local1 = global_object.fun(local1); //----------7
global_object.set(local1); //---------------11
return 0;
}
unsigned int __stdcall thread_fun2(void *param)
{
++global1; //-------3
++global2; //-------4
InterlockedIncrement(&global1); //--------5
global_object.set(1); //-----------11
return 0;
}
int main()
{
HANDLE thread1 = (HANDLE)_beginthreadex(0,0,&thread_fun1,0,0,0); //thread 1
HANDLE thread2 = (HANDLE)_beginthreadex(0,0,&thread_fun1,0,0,0); //thread 2
HANDLE thread3 = (HANDLE)_beginthreadex(0,0,&thread_fun2,0,0,0); //thread 3
WaitForSingleObject(thread1,INFINITE);
WaitForSingleObject(thread2,INFINITE);
WaitForSingleObject(thread3,INFINITE);
return 0;
}
1.局部变量局部使用是安全的为什么?因为每个thread 都有自己的运行堆栈,而局部变量是生存在堆栈中,大家不干扰。 所以代码1 int local1; ++local1; 是安全的 2.全局原生变量多线程读写是不安全的
全局变量是在堆(heap)中 long global1 = 0; ++global2; ++这个操作其实分为两部,一个是读,另外一个是写 mov ecx,global add ecx,1 mov global,ecx 所以代码3处是不安全的 3.函数静态变量多线程读写也是不安全的
道理同2 所以代码2处也是不安全的 4.volatile能保证全局整形变量是多线程安全的么不能。 volatile仅仅是告诫compiler不要对这个变量作优化,每次都要从memory取数值,而不是从register 所以代码4也不是安全 5.InterlockedIncrement保证整型变量自增的原子性所以代码5是安全的 6.function static object的初始化是多线程安全的么不是。 著名的Meyer Singleton其实不是线程安全的 Object & getInstance() { static Object o; return o; } 可能会造成多次初始化对象 所以代码6处是不安全的 7.在32机器上,4字节整形一次assign是原子的比如 i =10; //thread1 i=4; //thread2 不会导致i的值处于未知状态,要么是10要么是4 其它的大家自己去体会。 写好多线程安全的法宝就是封装,使数据有保护的被访问到 安全性: 局部变量>成员变量>全局变量
1.无穷loop
int i,a[10];
for(i=0;i<=10;++i)
{
a[i] = 0 ;
}
why?
函数运行时堆栈:
a[0] a[1] ....a[9] i
a[10] = 0;改变i的值为0,造成无穷循环
2.八进制的误用
int i[] = { 012,
024,
125,
};
为了对齐可能造成的错误,变成了八进制
3.如何调用地址为0的过程?
(*(void(*)())0)();
ps:在大多数现代操作系统,进程引用的地址为虚拟地址,所以这个调用可能合法
4.运算符的优先级
int i = 1;
i = i<<4 + 2;
这时i的值是多少?
不是18,是64,因为 i=i<<4+2; <==> i=i<<(4+2);
5.悬挂的if
if(x==0) //1
if(y==0) error(); //2
else{ //3
z=x+y;
f(&z);
}
C中的else总是和最近的if匹配,所以3和2匹配,而不是和1匹配。等价于
if(x==0) //1
{
if(y==0) error(); //2
else{ //3
z=x+y;
f(&z);
}
}
解决方法:总是使用{}和if配对
有很多性能问题,在系统使用的初期,不大能看出来,因为使用量的很小。随着系统的不断深入使用,性能问题才出现,尤其是那种24*7都要不停运行的程序。 下面的一个例子,是经常在项目中都会用到的.ini配置文件生成和解析的过程 比如 [section1] key1 = value1 ;here is comment key2 = value2 [section2] key3 = value3 key4 = value4 当然WinAPI也提供了 WritePrivateProfileString, GetPrivateProfileString两个API来读写这种文件格式,但是 每次使用都会打开文件来读写,性能非常低,只适用于小规模的数据读写。 看我们的代码:
#define _TD_INI_H_
#include <list>
#include <fstream>
using namespace std;
class KEV_VALUE
{
public:
KEV_VALUE(){m_bIsGarbage=FALSE;m_bSingleLine=FALSE;};
virtual ~KEV_VALUE(){};
string m_key;
string m_value;
BOOL m_bIsGarbage;
BOOL m_bSingleLine;
};
typedef list<KEV_VALUE> LIST_KEY_VELUE;
class SECTION
{
public:
SECTION(){};
virtual ~SECTION(){};
string m_section;
LIST_KEY_VELUE m_listKeyValue;
};
typedef list<SECTION> LIST_SECTION;
class CTDIni
{
public:
CTDIni( void );
virtual ~CTDIni( void );
BOOL UpdateData( BOOL bSave=true );
void SetFileName( const CHAR *lpstrFileName );
BOOL GetLastSectionName( string& str );
BOOL AddSection( const CHAR *lpstrSection );
BOOL DeleteSection( const CHAR *lpstrSection);
BOOL ReadSection( const CHAR *lpszSection, string& str );
BOOL SetKeyValue( const CHAR *lpstrSection, const CHAR *lpstrKey, const CHAR *lpstrValue );
BOOL SetKeyValue( const CHAR *lpstrSection, const CHAR *lpstrKey, const INT32 nValue );
BOOL GetKeyValue( const CHAR *lpstrSection, const CHAR *lpstrKey, CHAR *lpstrValue );
BOOL DeleteKeyValue( const CHAR *lpstrSection, const CHAR *lpstrKey );
BOOL ChangeKeyName( const CHAR *lpstrSection, const CHAR *lpstrKeyOld, const CHAR *lpstrKeyNew );
BOOL ChangeSectionName( const CHAR *lpstrSectionOld, const CHAR *lpstrSectionNew );
private:
LIST_SECTION m_sections;
string m_strFileName;
BOOL AddGarbage( const CHAR *lpstrSection, const CHAR *lpstrGarbage, BOOL bSingleLine=FALSE );
};
#endif // !defined(_TD_INI_H_) 这个是解析类的声明,重要的是它的数据结构,它采用了两级链表的结构,第一级是所有section的list,第二级是section下面的key-value的list. 下面是其中的实现代码片断
BOOL CTDIni::SetKeyValue( const CHAR *lpstrSection, const CHAR *lpstrKey, const CHAR *lpstrValue )
{
LIST_SECTION::iterator i;
for( i = m_sections.begin(); i != m_sections.end(); i++ )
{
if( (*i).m_section == lpstrSection )
{
LIST_KEY_VELUE::iterator j;
for( j = (*i).m_listKeyValue.begin(); j != (*i).m_listKeyValue.end(); j++ )
{
if( (*j).m_key == lpstrKey )
{
(*j).m_value = lpstrValue;
return TRUE;
}
}
KEV_VALUE tmp;
tmp.m_key = lpstrKey;
tmp.m_value = lpstrValue;
(*i).m_listKeyValue.push_back( tmp );
return TRUE;
}
}
return FALSE;
} 上面的一个方法是添加一个值到配置中去,它的算法是首先查找它所在的section,然后查找所在的key, 最后决定是insert还是update. 这样性能问题就来了,当数据不断增加,SetKeyValue所需要的时间呈N*N的方式增长。很可怕。CPU的占用率也会跑到很高。 最后,我们不得不进行优化,因为在我们的项目中,不存在相同的section,也没有相同的key,所以我们使用map,使得查找时间变成常数级别。(即使有相同的key§ion,也可以使用multimap) 优化后的数据结构是这样的
#include <string>
#include <stdio.h>
#include <list>
#include <map>
#include <fstream>
using namespace std;
struct VELUE
{
string m_value;
BOOL m_bIsGarbage;
BOOL m_bSingleLine;
};
typedef std::map<std::string,VELUE> MAP_KEY_VELUE;
typedef std::map<std::string,MAP_KEY_VELUE> MAP_SECTION;
class CTDIni
{
public:
CTDIni( void );
virtual ~CTDIni( void );
BOOL UpdateData( BOOL bSave=true );
void SetFileName( const CHAR *lpstrFileName );
BOOL GetLastSectionName( string& str );
BOOL AddSection( const CHAR *lpstrSection );
BOOL DeleteSection( const CHAR *lpstrSection);
BOOL ReadSection( const CHAR *lpszSection, string& str );
BOOL IsExistSection( const CHAR *lpstrSection);
BOOL SetKeyValue( const CHAR *lpstrSection, const CHAR *lpstrKey, const CHAR *lpstrValue );
BOOL SetKeyValue( const CHAR *lpstrSection, const CHAR *lpstrKey, const INT32 nValue );
BOOL GetKeyValue( const CHAR *lpstrSection, const CHAR *lpstrKey, CHAR *lpstrValue );
BOOL DeleteKeyValue( const CHAR *lpstrSection, const CHAR *lpstrKey );
BOOL ChangeKeyName( const CHAR *lpstrSection, const CHAR *lpstrKeyOld, const CHAR *lpstrKeyNew );
BOOL ChangeSectionName( const CHAR *lpstrSectionOld, const CHAR *lpstrSectionNew );
private:
MAP_SECTION m_sections;
string m_strFileName;
BOOL AddGarbage( const CHAR *lpstrSection, const CHAR *lpstrGarbage, BOOL bSingleLine=FALSE );
}; SetKeyValue那个方法的实现是这样:
BOOL CTDIni::SetKeyValue( const CHAR *lpstrSection, const CHAR *lpstrKey, const CHAR *lpstrValue )
{
MAP_SECTION::iterator i;
MAP_KEY_VELUE::iterator j;
i = m_sections.find(lpstrSection);
if ( i == m_sections.end())
{
return FALSE;
}
j = i->second.find(lpstrKey);
if( j != i->second.end()) //update
{
j->second.m_value = lpstrValue;
}
else //insert
{
VELUE tmp;
tmp.m_value = lpstrValue;
tmp.m_bSingleLine = false;
tmp.m_bIsGarbage = false;
i->second[lpstrKey] = tmp;
}
return TRUE;
} 两者的性能差距有多大?超过你的想象
PostThreadMessage的原型是这样的
BOOL PostThreadMessage( DWORD idThread,
UINT Msg,
WPARAM wParam,
LPARAM lParam
);
PostThreadMessage可以用于线程之间的异步通讯,因为它不用等待调用者返回,
这也许是线程通讯中最简单的一种方法了。
但是要注意以下问题
1 .PostThreadMessage有时会失败,报1444错误(Invalid thread identifier. )
其实这不一定是线程不存在的原因,也有可能是线程不存在消息队列(message queue)造成的。
事实上,并不是每个thread都有message queue,那如何让thread具有呢?
答案是,至少调用message相关的function一次,比如GetMessage,PeekMessage。
2.如果是post动态分配的memory给另外一个thread,要注意内存的正确释放。
3.PostThreadMessage不能够post WM_COPYDATE之类的同步消息,否则会报错
4.最好不要使用PostThreadMessage post message给一个窗口,使用PostMessage替代。
下面是我写的一个比较严整的例子,仅供参考。
#include <windows.h>
#include <cstdio>
#include <process.h>
#define MY_MSG WM_USER+100
const int MAX_INFO_SIZE = 20;
HANDLE hStartEvent; // thread start event
// thread function
unsigned __stdcall fun(void *param)
{
printf("thread fun start\n");
MSG msg;
PeekMessage(&msg, NULL, WM_USER, WM_USER, PM_NOREMOVE);
if(!SetEvent(hStartEvent)) //set thread start event
{
printf("set start event failed,errno:%d\n",::GetLastError());
return 1;
}
while(true)
{
if(GetMessage(&msg,0,0,0)) //get msg from message queue
{
switch(msg.message)
{
case MY_MSG:
char * pInfo = (char *)msg.wParam;
printf("recv %s\n",pInfo);
delete[] pInfo;
break;
}
}
};
return 0;
}
int main()
{
HANDLE hThread;
unsigned nThreadID;
hStartEvent = ::CreateEvent(0,FALSE,FALSE,0); //create thread start event
if(hStartEvent == 0)
{
printf("create start event failed,errno:%d\n",::GetLastError());
return 1;
}
//start thread
hThread = (HANDLE)_beginthreadex( NULL, 0, &fun, NULL, 0, &nThreadID );
if(hThread == 0)
{
printf("start thread failed,errno:%d\n",::GetLastError());
CloseHandle(hStartEvent);
return 1;
}
//wait thread start event to avoid PostThreadMessage return errno:1444
::WaitForSingleObject(hStartEvent,INFINITE);
CloseHandle(hStartEvent);
int count = 0;
while(true)
{
char* pInfo = new char[MAX_INFO_SIZE]; //create dynamic msg
sprintf(pInfo,"msg_%d",++count);
if(!PostThreadMessage(nThreadID,MY_MSG,(WPARAM)pInfo,0))//post thread msg
{
printf("post message failed,errno:%d\n",::GetLastError());
delete[] pInfo;
}
::Sleep(1000);
}
CloseHandle(hThread);
return 0;
}
===========Happy New Year==============
当我第一次使用boost::serlization的时候,就意识到它在RMI(Remote method Invoke)的意义,因为JAVA RMI就是建立在java serlization的基础之上。 先来个boost::serlization使用的例子
#include <boost/archive/text_oarchive.hpp>
#include <boost/archive/text_iarchive.hpp>
#include <boost/archive/xml_oarchive.hpp>
void test_serialization()
{
boost::archive::text_oarchive to(cout , boost::archive::no_header);
int i = 10;
string s = "This is a test\n";
to & i;
to & s;
ofstream f("test.xml");
boost::archive::xml_oarchive xo(f);
xo & BOOST_SERIALIZATION_NVP(i) & BOOST_SERIALIZATION_NVP(s);
boost::archive::text_iarchive ti(cin , boost::archive::no_header);
ti & i & s;
cout <<"i="<< i << endl;
cout <<"s="<< s << endl;
}
假如我们可以将object序列化以后通过socket传过去,就可以实现RMI了。 当然这种方法只能是在C++程序之间传递。 今天在codeproject上面发现已经有人已经这样做了,原来早就有人跟我有一样的想法 看看作者封装的结果吧 server端:
#include <RCF/RCF.hpp>
RCF_BEGIN(I_Echo, "I_Echo")
RCF_METHOD_R1(std::string, echo, const std::string &);
RCF_END(I_Echo);
class Echo
{
public:
std::string echo(const std::string &msg) { return msg; }
};
int main()
{
int port = 50001;
RCF::RcfServer server(port);
server.bind<I_Echo, Echo>();
server.start();
return 0;
} client端:
#include <RCF/RCF.hpp>
RCF_BEGIN(I_Echo, "I_Echo")
RCF_METHOD_R1(std::string, echo, const std::string &);
RCF_END(I_Echo);
int main()
{
std::cout << RcfClient<I_Echo>("localhost",
50001).echo("my message");
return 0;
} 比较简洁,利用了boost强大的function,thread,serlization RCF下载地址: http://www.codeproject.com/threads/RMI_For_Cpp/RCF.zip介绍: http://www.codeproject.com/threads/RMI_For_Cpp.asp
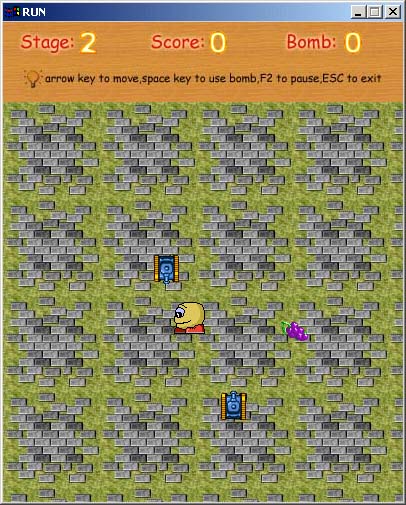
SDL(Simple DirectMedia Layer)是一个跨平台的multimedia library ,包含了对video,audio,keyboard,mouse的支持。
它的接口比较简洁,你甚至不需要知道Win32 API,就可以写出游戏来。它封装了跟
平台相关的部分。它使我想起了TC下面的graphics BGI
官方地址: http://www.libsdl.org/
下面是我用SDL写的一个小游戏
1.骨架程序
#include "sdl.h"
#pragma comment(lib,"sdl.lib")
#pragma comment(lib,"sdlmain.lib")
int main(int argc,char ** argv)
{
//Init SDL
SDL_Init( SDL_INIT_VIDEO );
atexit(SDL_Quit);
screen = SDL_SetVideoMode(400,480,0,SDL_SWSURFACE);
SDL_WM_SetCaption("RUN",NULL);
//load resource
//
bool pause = false;
bool gone = true;
SDL_Event event;
while(gone)
{
if(SDL_PollEvent(&event)>0)
{
if(event.type == SDL_QUIT)
{
break;
}
else if(event.type == SDL_KEYDOWN)
{
//handle event
//
}
else if(event.type == SDL_KEYUP)
{
//handle event
//
}
}
else if(!pause)
{
run();
}
}
//release resource
//
return 0;
}
SDL_Init : 初始化子系统 SDL_SetVideoMode:设置分辨率 SDL_WM_SetCaption: 设置窗口标题 SDL_PollEvent:查询事件,用户的输入 2.表面的概念表面(SDL_Surface)是SDL中一个重要的概念,精灵都是保存在表面中
SDL_Surface * temp = SDL_CreateRGBSurface(SDL_SRCCOLORKEY, w, h, 32,
0, 0, 0, 0);
rc.x = x * w ;
rc.y = y * h;
SDL_BlitSurface(surf,&rc,temp,0);
SDL_SetColorKey(temp,SDL_SRCCOLORKEY,transcolor); SDL_CreateRGBSurface 创建一个表面 SDL_BlitSurface 表面之间的copy SDL_SetColorKey 设定表面的透明色 ps:主表面是由SDL_SetVideoMode返回的,也可以通过 SDL_GetVideoSurface查询到 3. 声音的使用游戏离不开声音,SDL也提供了支持
void play_sound(const char *file)
{
int index;
SDL_AudioSpec wave;
Uint8 *data;
Uint32 dlen;
SDL_AudioCVT cvt;
/* 寻找一个空的(或者完成了的)音频口 */
for ( index=0; index<NUM_SOUNDS; ++index ) {
if ( sounds[index].dpos == sounds[index].dlen ) {
break;
}
}
if ( index == NUM_SOUNDS )
return;
/* 加载声音文件,并转换成16位、立体声、22kHz格式 */
if ( SDL_LoadWAV(file, &wave, &data, &dlen) == NULL ) {
fprintf(stderr, "无法加载 %s: %s\n", file, SDL_GetError());
return;
}
SDL_BuildAudioCVT(&cvt, wave.format, wave.channels, wave.freq,
AUDIO_S16, 2, 22050);
cvt.buf = (unsigned char *)malloc(dlen*cvt.len_mult);
memcpy(cvt.buf, data, dlen);
cvt.len = dlen;
SDL_ConvertAudio(&cvt);
SDL_FreeWAV(data);
/* 将音频数据放入音频口(立刻开始回放了) */
if ( sounds[index].data ) {
free(sounds[index].data);
}
SDL_LockAudio();
sounds[index].data = cvt.buf;
sounds[index].dlen = cvt.len_cvt;
sounds[index].dpos = 0;
SDL_UnlockAudio();
} 4.一些有用的模块
#include "sdl_image.h"
/*
* Return the pixel value at (x, y)
* NOTE: The surface must be locked before calling this!
*/
Uint32 getpixel(SDL_Surface *surface, int x, int y)
{
int bpp = surface->format->BytesPerPixel;
/* Here p is the address to the pixel we want to retrieve */
Uint8 *p = (Uint8 *)surface->pixels + y * surface->pitch + x * bpp;
switch(bpp) {
case 1:
return *p;
case 2:
return *(Uint16 *)p;
case 3:
if(SDL_BYTEORDER == SDL_BIG_ENDIAN)
return p[0] << 16 | p[1] << 8 | p[2];
else
return p[0] | p[1] << 8 | p[2] << 16;
case 4:
return *(Uint32 *)p;
default:
return 0; /* shouldn't happen, but avoids warnings */
}
}
/*
* Set the pixel at (x, y) to the given value
* NOTE: The surface must be locked before calling this!
*/
void putpixel(SDL_Surface *surface, int x, int y, Uint32 pixel)
{
int bpp = surface->format->BytesPerPixel;
/* Here p is the address to the pixel we want to set */
Uint8 *p = (Uint8 *)surface->pixels + y * surface->pitch + x * bpp;
switch(bpp) {
case 1:
*p = pixel;
break;
case 2:
*(Uint16 *)p = pixel;
break;
case 3:
if(SDL_BYTEORDER == SDL_BIG_ENDIAN) {
p[0] = (pixel >> 16) & 0xff;
p[1] = (pixel >> 8) & 0xff;
p[2] = pixel & 0xff;
} else {
p[0] = pixel & 0xff;
p[1] = (pixel >> 8) & 0xff;
p[2] = (pixel >> 16) & 0xff;
}
break;
case 4:
*(Uint32 *)p = pixel;
break;
}
}
bool showpic(SDL_Surface *surface,const char *filename)
{
SDL_Surface *image;
/* Load the BMP file into a surface */
image = IMG_Load(filename);
if (image == NULL) {
fprintf(stderr, "Couldn't load %s: %s\n",filename,SDL_GetError());
return false;
}
/* Blit onto the screen surface */
if(SDL_BlitSurface(image, NULL, surface, NULL) < 0)
fprintf(stderr, "BlitSurface error: %s\n", SDL_GetError());
SDL_UpdateRect(surface, 0, 0, image->w, image->h);
/* Free the allocated BMP surface */
SDL_FreeSurface(image);
return true;
}
SDL_Surface* createsurf(const char * filename)
{
SDL_Surface *image;
/* Load the BMP file into a surface */
image = IMG_Load(filename);
if (image == NULL) {
fprintf(stderr, "Couldn't load %s: %s\n",filename,SDL_GetError());
return 0;
}
return image;
} getpixel 取得像素的颜色 putpixel 画点 showpic 加载一个图片到某个表面 createsurf 从文件中创造表面 SDL有大量的示例和第三方库可以使用,非常的不错 最后推荐一个SDL写的超级玛丽游戏 http://smclone.sourceforge.net/
对于性能优化,相信喜欢C++的人都是比较重视效率。我准备写一个系列,主要是基于我的一些实践,至于理论上的东西,不是我的重点。我也讲不出来一堆道理:-)。我所说的例子,都将是我以前所遇到的一些案例,记录一下思路,拿出来跟大家share。
在C++程序中,自从有了STL,很少有人去自己去设计数据结构,当然大部分情况STL的效率都是可以的。万事都有例外。
我接触到一个需求,是根据手机号码的号段表(位数不定,一般是七八位)来查出手机号码所在的地区。
比如
1315156 南京
13812345 北京
1366789 上海
025 南京
一种可能的方案是设计多个hashmap
map<int,string> seg8; map<int,string> seg7; map<int,string> seg3; ...
每个map分别对应不同的位数。对于一个phone,分别在这些map中查找
但是效率不行。
这里面有个关键,因为手机号码都是数字,我们可以设计出一棵树,每个节点都是0-9,他可以有10个节点,叶子节点我们就可以储存数据。迅速在大脑里想象一个这样的模型。
还是看代码比较明了。 十叉树
#if !defined __TREE10__
#define __TREE10__
#pragma warning(disable:4786)
namespace sandy
{
namespace Private
{
template<class VALUE>
struct __Node10 //节点struct
{
typedef __Node10<VALUE>* POINTER;
VALUE * data; //数据
POINTER ptr[10]; //子节点
__Node10():data(0)
{
memset(ptr,0,sizeof(POINTER)*10);
}
};
}
template<typename VALUE>
class CTree10
{
typedef Private::__Node10<VALUE> NODE;
private:
long m_lcount; //插入的数据数量
long m_lnodecount; //节点数
NODE* m_proot; //根结点指针
public:
CTree10():m_lcount(0),m_lnodecount(0),m_proot(CreateNode()) //notice:Keep order with their declare
{
}
~CTree10()
{
DestroyAll();
}
void DestroyAll()
{
for(short i =0;i<10;++i)
{
if(m_proot->ptr[i]!=0)
{
Remove(m_proot->ptr[i]);
m_proot->ptr[i] = 0;
}
}
}
bool Insert(const char*pKey,const VALUE &data) //插入节点
{
assert(pKey!=0);
NODE * pNode = m_proot;
NODE * pChildNode =0;
char c = 0;
for(unsigned int i=0;i<strlen(pKey);++i)
{
c = pKey[i]; if(c<'0' || c>'9') return false;
pChildNode = pNode->ptr[(c-'0')];
if(pChildNode == 0) //not build
{
pChildNode = pNode->ptr[(c-'0')] = CreateNode();//create a new child
}
pNode = pChildNode ;//change node to child node
}
if(pNode->data == 0) //empty
{
pNode->data = new VALUE(data);
++m_lcount;
return true;
}
else//already inserted
{
return false;
}
}
bool Lookup(const char*pKey,VALUE &data,bool strick = true)
{
assert(pKey!=0);
NODE * pNode = m_proot;
NODE * pChildNode =0;
char c = 0;
for(unsigned int i=0;i<strlen(pKey);++i)
{
c = pKey[i]; if(c<'0' || c>'9') return false;
pChildNode = pNode->ptr[(c-'0')];
if(pChildNode!=0)
{
pNode = pChildNode;
}
else // can't find
{
if(!strick)
{
break;
}
return false;
}
}
if(pNode->data != 0) //already inserted
{
data = *(pNode->data);
return true;
}
else // no inserted
{
return false;
}
}
private:
NODE *CreateNode()
{
NODE *pNewNode = new NODE();
assert(pNewNode!= 0);
++m_lnodecount;
return pNewNode;
}
void Remove(NODE *pNode)
{
assert(pNode!=0);
for( short i = 0 ; i < 10 ; i ++ )
{
if( pNode -> ptr[ i ] )
Remove( pNode -> ptr[ i ] );
}
if(pNode->data!=0)
{
delete pNode->data;
--m_lcount;
}
--m_lnodecount;
delete pNode;
}
};
}
#endif
这个Tree10我在vc6下测试的结果:
插入速度比std::map快3倍,查询速度则是std::map的10倍
我是比较铁杆的英雄无敌3的fans,在网上看到这样的文章: http://game.china.com/zh_cn/play/10002765/20021113/11362720.html就是让我方英雄学会所有技能,真的蛮爽的 学会28项技能修改法 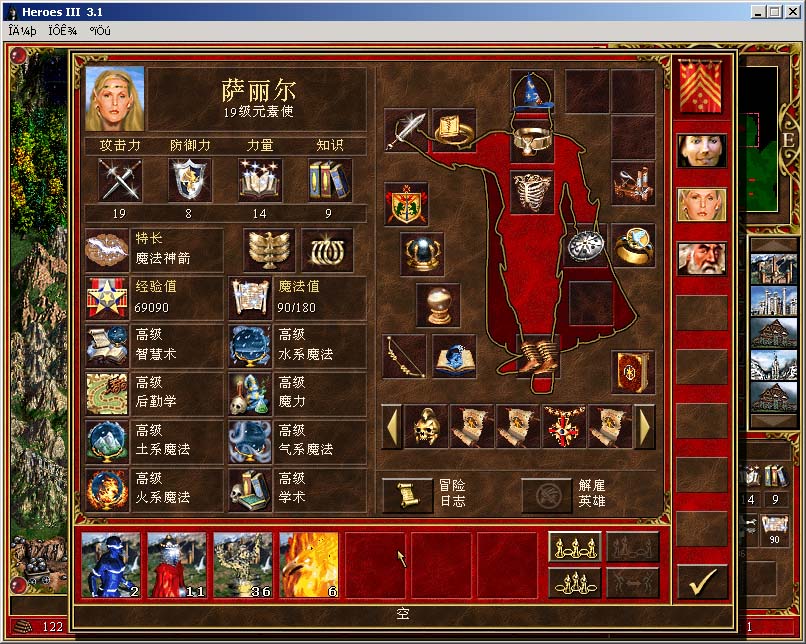 首先,把你的英雄的士兵调到前面几格来,接着用FPE来搜索。例如你的士兵数:第一格3,第二格14,第三格4,那么就用 3,0,14,0,4,0 来搜索,就可以找到地址。显示为: 首先,把你的英雄的士兵调到前面几格来,接着用FPE来搜索。例如你的士兵数:第一格3,第二格14,第三格4,那么就用 3,0,14,0,4,0 来搜索,就可以找到地址。显示为:
士兵种类- FF FF FF FF FF FF FF FF FF FF FF FF FF FF FF FF
FF FF FF FF FF FF FF FF FF FF FF FF 03 00 00 00-士兵数量
0E 00 00 00 04 00 00 00 00 00 00 00 00 00 00 00
00 00 00 00 00 00 00 00 01 02 03 04 05 06 07 08
09 10 11 12 13 14 15 16 17 18 19 20 21 22 23 24
25 26 27 28 01 02 03 04 05 06 07 08 00 00 00 00
00 00 00 00 00 00 00 00 00 00 00 00 00 00 00 00
04 00 00 00 00 00 00 00 FF FF FF FF FF FF FF FF
FF FF FF FF FF FF FF FF FF FF FF FF FF FF FF FF
FF或00作为一格,每4格是代表一种属性,物品, 状态等等。前面28格是士兵的种类,接下来28格是士兵的数量。例如: 英雄可带7种士兵,你要每种都是天使,那么把
03 00 00 00 前面的FF FF FF FF 改为0D 00 00 00。 如果你要数量100, 那么把
03 00 00 00 改为64 00 00 00。 士兵的种类是这样分的:00 00 00 00 是枪兵,
01 00 00 00 是 进化一级的枪兵,02 00 00 00 是弓箭手,03 00 00 00 是神箭手。
如此类推。
从03那一格开始数,28格后就是英雄的技能等级,接着的28格是英雄的技能,
也就是从01到28代表的是英雄的技能等级,技能等级最多只能是3。
01 箭术等级 02 寻路术等级 03 后勤学等级
04 侦察术等级 05 外交术等级 06 航海术等级
07 领导术等级 08 智慧术等级 09 神秘术等级
10 幸运术等级 11 弹道术等级 12 鹰眼术等级
13 招魂术等级 14 理财术等级 15 火系魔法等级
16 气系魔法等级 17 水系魔法等级 18 土系魔法等级
19 学术等级 20 战术等级 21 炮术等级
22 学习能力等级 23 进攻术等级 24 防御术等级
但是每次使用FPE真的很麻烦,我又是很懒的人。FPE可以做到的事情,我也可以做到。 其实游戏修改不过是使用 ReadProcessMemory和 WriteProcessMemory花了半天不断的试验,终于写出一个可以用于英雄无敌3.1版的修改器,没有写界面(I'm lazy-:)),运行之后就是让我方英雄学会所有技能。
#include <windows.h>
#include <tlhelp32.h>
#include <cstdio>
const char MODULE_NAME[] = "Heroes3.exe";
void printError( TCHAR* msg )
{
DWORD eNum;
TCHAR sysMsg[256];
TCHAR* p;
eNum = GetLastError( );
FormatMessage( FORMAT_MESSAGE_FROM_SYSTEM | FORMAT_MESSAGE_IGNORE_INSERTS,
NULL, eNum,
MAKELANGID(LANG_NEUTRAL, SUBLANG_DEFAULT), // Default language
sysMsg, 256, NULL );
// Trim the end of the line and terminate it with a null
p = sysMsg;
while( ( *p > 31 ) || ( *p == 9 ) )
++p;
do { *p-- = 0; } while( ( p >= sysMsg ) &&
( ( *p == '.' ) || ( *p < 33 ) ) );
// Display the message
printf( "WARNING: %s failed with error %d (%s)\n", msg, eNum, sysMsg );
}
DWORD findProcessId(const char *module)
{
DWORD result = -1;
HANDLE hProcessSnap;
// Take a snapshot of all processes in the system.
hProcessSnap = CreateToolhelp32Snapshot( TH32CS_SNAPPROCESS, 0 );
if( hProcessSnap == INVALID_HANDLE_VALUE )
{
printError( "CreateToolhelp32Snapshot (of processes)" );
return result;
}
PROCESSENTRY32 pe32;
// Set the size of the structure before using it.
pe32.dwSize = sizeof( PROCESSENTRY32 );
// Retrieve information about the first process,
// and exit if unsuccessful
if( !Process32First( hProcessSnap, &pe32 ) )
{
printError( "Process32First" ); // Show cause of failure
CloseHandle( hProcessSnap ); // Must clean up the snapshot object!
return result;
}
// Now walk the snapshot of processes, and
// display information about each process in turn
do
{
if(stricmp(pe32.szExeFile,module)==0)
{
printf( "find process: %s\n", module );
result = pe32.th32ProcessID;
break;
}
} while( Process32Next( hProcessSnap, &pe32 ) );
CloseHandle( hProcessSnap );
return result;
}
int main(int argc,char *argv[])
{
DWORD h3pid = -1;
h3pid = findProcessId(MODULE_NAME);
if(h3pid == -1)
{
printf("can't find %s in memory,please make sure the program started!\n",MODULE_NAME);
return 1;
}
HANDLE h3 = OpenProcess( PROCESS_ALL_ACCESS, FALSE, h3pid );
if( h3 == NULL )
{
printError( "OpenProcess" );
return 1;
}
unsigned long sideOffset=0x824994;
unsigned char side = 0xff;
if(!ReadProcessMemory(h3,(LPCVOID)sideOffset,&side,1,0)) //查找我方的颜色
{
printError( "ReadProcessMemory" );
return 1;
}
if(side!=0xff)
{
printf("find current side:%d\n",(int)side);
}
else
{
printf("can't find current side\n");
side = 0;
}
unsigned long heroBaseAddress = 0x15216ab; //hero name start
unsigned char name[20]={0};
unsigned long temp = heroBaseAddress-1;
char b[28]; //28种技能
int size = sizeof(b);
memset(b,3,size);
b[12]=0;//不学招魂术
for(int i=0;i<=155;++i) //一共156个Hero
{
if(!ReadProcessMemory(h3,(LPCVOID)temp,name,sizeof(name),0))
{
printError( "ReadProcessMemory" );
return 1;
}
if(name[0]==side)
{
printf("find:%s\t",name+1);
if(!WriteProcessMemory(h3,(LPVOID)(temp+0xA7),b,size,0))
{
printError( "WriteProcessMemory" );
return 1;
}
else
{
printf("update skill sucess!\n");
}
}
temp += 0x492;
}
CloseHandle(h3);
return 0;
}
附加:
让我方英雄所有英雄学会除了招魂术的以外的27种技能的小程序
以前英雄世界也有一个这样的程序,但是版本太老,不能用了。
使用版本:中文版3.1,其他版本没有测试
使用方法:进入游戏后,运行程序
Download: http://www.cppblog.com/Files/sandy/h3c.zip
 我的WinRar过期了,每次打开文件都会弹出这个对话框,很是郁闷。 我的WinRar过期了,每次打开文件都会弹出这个对话框,很是郁闷。
没办法,我要想办法把这个Dialog去掉。
我从网上下载了IDA Pro,准备大干一场
反汇编后,发现代码狂多,基本上不知道从哪里下手
无奈.......
后来突然想起以VC打开WinRAR
用打开资源的方式
居然查找到这个Dialog
遂删除之
保存exe
WinRar终于哑火了。
世界又清静了。:-)
-----end-------
|