就不费话了,直接点
来一个我做的插件例子
//! 插件基类 class PluginAddon : public QObject
{ Q_OBJECT
public:
(){} virtual ~(){} public:
...
signals:
void notify(const Target& t);
};
Q_DECLARE_INTERFACE(,"ooo/1.0.0")
具体插件
class cPluginon
: public PluginAddon
{ Q_OBJECT
// 将该接口注册到Qt的meta-object system
Q_INTERFACES(PluginAddon)
public:
...
};
.cpp
Q_EXPORT_PLUGIN2(cplug_Plugin,cPluginon)
这个宏所在头文件是:
#include <QtPlugin>
至于插件的使用.
loader
= new QPluginLoader("dongrays_Plugin.dll"); QObject* instance = loader->instance();
if(instance)
{ interface = qobject_cast<Addon*>(instance);
connect(interface,SIGNAL(notify(target)),this,SLOT(getInfo(target)));
 }

谈过connect照样可以再插件之前传送数据
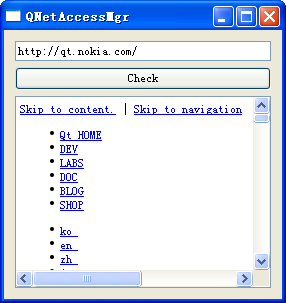
1,软件界面如图:
2.代码如下:
class Widget : public QWidget
{
Q_OBJECT
public:
Widget(QWidget *parent = 0);
~Widget();
public slots:
void query(QNetworkReply* reply);
public slots:
void click();
private:
QVBoxLayout* layout;
QLineEdit* link;
QPushButton* button;
QTextEdit* edit;
QNetworkAccessManager* mgr;
};
#include <QtNetwork/QNetworkReply>
#include "widget.h"
Widget::Widget(QWidget *parent):QWidget(parent)
{
layout = new QVBoxLayout;
this->setLayout(layout);
link = new QLineEdit("http://qt.nokia.com");
layout->addWidget(link);
button = new QPushButton("Check");
layout->addWidget(button);
edit = new QTextEdit;
layout->addWidget(edit);
mgr = new QNetworkAccessManager(this);
connect(mgr,SIGNAL(finished(QNetworkReply*)),this, SLOT(query(QNetworkReply*)));
connect(button,SIGNAL(clicked()),this,SLOT(click()));
}
Widget::~Widget()
{
}
void Widget::query(QNetworkReply* reply)
{
QString buffer = reply->readAll();
edit->setText(buffer);
}
void Widget::click()
{
QString uri = link->text();
mgr->get(QNetworkRequest(QUrl(uri)));
}
需要说明的是Qt是使用异步的方式下载网页的
Pro文件
QT += core gui network
1.写二进制文件
#include <QtCore/QCoreApplication> #include <QFile>
#include <QDataStream>
#include <iostream>
int main(int argc, char *argv[])
{ QCoreApplication a(argc, argv);
QFile file("file.dat"); if(!file.open(QIODevice::WriteOnly))
{ std::cerr<<qPrintable(file.errorString())<<std::endl;
return -1;
}
QDataStream stream(&file);
stream.setVersion(9);
QString id("ID:"); quint32 num(quint32(0x123456));
stream << id<< num;
file.close();
return a.exec();
}
2.类似读文件则是:
#include <QtCore/QCoreApplication> #include <QFile>
#include <QDataStream>
#include <iostream>
int main(int argc, char *argv[])
{ QCoreApplication a(argc, argv);
QFile file("file.dat"); if(!file.open(QIODevice::ReadOnly))
{ std::cerr<<qPrintable(file.errorString())<<std::endl;
return -1;
}
QDataStream stream(&file);
stream.setVersion(9);
QString id;
quint32 num;
stream >> id >> num;
std::cout<<id.toStdString()<<" "<<num<<std::endl;
file.close();
return a.exec();
}
感觉比较好的是直接可以读写字符串而不需要关心字符串长度 这个比较好
3.写文本文件
#include <QtCore/QCoreApplication> #include <QFile>
#include <QTextStream>
#include <iostream>
int main(int argc, char *argv[])
{ QCoreApplication a(argc, argv);
QFile file("output.txt"); if(!file.open(QIODevice::WriteOnly))
{ std::cerr<<qPrintable(file.errorString())<<std::endl;
return -1;
}
QTextStream stream(&file);
QString id("Eric Home."); quint32 num(123456);
stream << id << num;
file.close();
return a.exec();
}
4.读文本文件
则可以通过设置编码方式 之后一次性读入或者以一个字符的模式读入
1.
#include <QtCore/QCoreApplication> #include <QCryptographicHash>
#include <iostream>
int main(int argc, char *argv[])
{ QCoreApplication a(argc, argv);
QString pwd="abcdef";
QString md5;
QByteArray ba,bb;
QCryptographicHash md(QCryptographicHash::Md5);
ba.append(pwd);
md.addData(ba);
bb = md.result();
md5.append(bb.toHex());
std::cout<<md5.toStdString()<<std::endl;
return a.exec();
}
2.
#include <QtCore/QCoreApplication> #include <QCryptographicHash>
#include <iostream>
int main(int argc, char *argv[])
{ QCoreApplication a(argc, argv);
QString md5;
QString pwd="abcdef";
QByteArray bb;
bb = QCryptographicHash::hash(pwd.toAscii(),QCryptographicHash::Md5 );
md5.append(bb.toHex());
std::cout<<md5.toStdString()<<std::endl;
return a.exec();
}
基本上所有的GUI都不允许在线程中操作GUI
QT也是一样
那么在QT中如何操作呢?
举一个例子具体如下:
GUI中
connect(thread,SIGNAL(notify(int)),this,SLOT(updateProgress(int)));
void MainWindow
::updateProgress
(int value
) { progressbar->setValue(value);
}
Thread中
signals: void notify(int);
Thread run中
emit notify(percent);
很犀利吧
一个简单的代码如下:
#include <QtGui/QApplication> #include <QtGui>
#include <math.h>
int main(int argc, char *argv[])
{ QApplication a(argc, argv);
QGraphicsItem *ball = new QGraphicsEllipseItem(0,0,20,40);
QTimeLine *timer = new QTimeLine(15000);
timer->setFrameRange(0,100);
QGraphicsItemAnimation *animation = new QGraphicsItemAnimation;
animation->setItem(ball);
animation->setTimeLine(timer);
for(int i = 0; i < 600; ++i)
animation->setPosAt(i / 600.0, QPointF(i, i));
QGraphicsScene *scene = new QGraphicsScene();
scene->setBackgroundBrush(QBrush(Qt::blue));
scene->setSceneRect(0,0,250,250);
scene->addItem(ball);
QGraphicsView *view = new QGraphicsView(scene);
view->setBackgroundBrush(QBrush(Qt::red));
view->show();
timer->start();
return a.exec();
}

另外一个例子如下:
#ifndef TIMELINE_H
#define TIMELINE_H
#include <QtGui/QWidget>
#include <QVBoxLayout>
#include <QTimeLine>
#include <QProgressBar>
#include <QPushButton>
class timeline : public QWidget
{
Q_OBJECT
public:
timeline(QWidget *parent = 0);
~timeline();
private:
QPushButton *pushButton;
QTimeLine *timeLine;
QProgressBar *progressBar;
QVBoxLayout *layout;
};
#endif // TIMELINE_H
#include "timeline.h"
timeline::timeline(QWidget *parent):QWidget(parent)
{
layout= new QVBoxLayout(this);
progressBar = new QProgressBar(this);
progressBar->setRange(0, 100);
// Construct a 5-second timeline with a frame range of 0 - 100
timeLine = new QTimeLine(5000, this);
timeLine->setFrameRange(0, 100);
connect(timeLine, SIGNAL(frameChanged(int)), progressBar, SLOT(setValue(int)));
// Clicking the push button will start the progress bar animation
pushButton = new QPushButton(tr("Start animation"), this);
connect(pushButton, SIGNAL(clicked()), timeLine, SLOT(start()));
layout->addWidget(progressBar);
layout->addWidget(pushButton);
setLayout(layout);
}
timeline::~timeline()
{
// No need to delete any QObject that got proper parent pointer.
}
简单的说 QTimeLine就是一个带有线程的对象,通过设置持续时间和帧数来控制动画
1.QHeaderView
设置表头是否充满整个QTableView,默认为false
setStretchLastSection(true);
2.给QtableView增加多选框
QStandardItem->setCheckState(Qt::Unchecked);
使用QT TableView
感觉QTableView还是蛮复杂的
QTableView是显示表格状的视图
其经常使用的函数有
1.显示格子 setShowGrid
(false);2.由内容调整列 resizeColumnsToContents
();3.获取垂直表头 verticalHeader
();
当然还有水平表头
4.设置非编辑状态 verticalView->setEditTriggers(QTableView::NoEditTriggers);
5.设置点击行为
verticalView->setSelectionBehavior
(QTableView::SelectRows
);
6.模型对象
QStandardItemModel *model
= new QStandardItemModel; model->setColumnCount(4);
model->setHeaderData(0,Qt::Horizontal,tr("File")); model->setHeaderData(1,Qt::Horizontal,tr("Path")); model->setHeaderData(2,Qt::Horizontal,tr("Size")); model->setHeaderData(3,Qt::Horizontal,tr("Duration")); 设置显示模型为4列
7.增加项到模型
QStandardItem* item1
= new QStandardItem(tr
("Yesterday Once More.mid")); QStandardItem* item2 = new QStandardItem(tr("C://Mid//")); QStandardItem* item3 = new QStandardItem(tr("0.001M")); QStandardItem* item4 = new QStandardItem(tr("3:48")); QList<QStandardItem*> item;
item << item1 << item2 << item3 << item4;
 model->appendRow(item);
8.设置模型到View
setModel(model);
#include <cstdlib>
#include <cstdio>
#include <iostream>
#include <tidy/tidy.h>
using namespace std;
int main(int argc, char *argv[])
{
int rc = -1;
Bool ok;
TidyDoc tdoc = tidyCreate();
ok = tidyOptSetBool(tdoc,TidyXhtmlOut,yes);
rc = tidyParseFile(tdoc,"file.html");
rc = tidyCleanAndRepair(tdoc);
rc = tidyRunDiagnostics(tdoc);
rc = tidySaveFile(tdoc,"file.htm");
tidyRelease(tdoc);
system("PAUSE");
return EXIT_SUCCESS;
}
学习QTabWidget例子
1.
#ifndef GENERALTAB_H
#define GENERALTAB_H
#include <QWidget>
#include <QFileInfo>
class GeneralTab : public QWidget
{
Q_OBJECT
public:
GeneralTab(const QFileInfo &fileInfo, QWidget *parent = 0);
~GeneralTab();
};
#endif
源文件:
#include "generaltab.h"
#include <QDateTime>
#include <QtGui/QVBoxLayout>
#include <QtGui/QLabel>
#include <QtGui/QLineEdit>
GeneralTab::~GeneralTab(){}
GeneralTab::GeneralTab(const QFileInfo &fileInfo, QWidget *parent):
QWidget(parent)
{
QLabel *fileNameLabel = new QLabel(tr("File Name:"));
QLineEdit *fileNameEdit = new QLineEdit(fileInfo.fileName());
QLabel *pathLabel = new QLabel(tr("Path:"));
QLabel *pathValueLabel = new QLabel(fileInfo.absoluteFilePath());
pathValueLabel->setFrameStyle(QFrame::Panel | QFrame::Sunken);
QLabel *sizeLabel = new QLabel(tr("Size:"));
qlonglong size = fileInfo.size()/1024;
QLabel *sizeValueLabel = new QLabel(tr("%1 K").arg(size));
sizeValueLabel->setFrameStyle(QFrame::Panel | QFrame::Sunken);
QLabel *lastReadLabel = new QLabel(tr("Last Read:"));
QLabel *lastReadValueLabel = new QLabel(fileInfo.lastRead().toString());
lastReadValueLabel->setFrameStyle(QFrame::Panel | QFrame::Sunken);
QLabel *lastModLabel = new QLabel(tr("Last Modified:"));
QLabel *lastModValueLabel = new QLabel(fileInfo.lastModified().toString());
lastModValueLabel->setFrameStyle(QFrame::Panel | QFrame::Sunken);
QVBoxLayout *mainLayout = new QVBoxLayout;
mainLayout->addWidget(fileNameLabel);
mainLayout->addWidget(fileNameEdit);
mainLayout->addWidget(pathLabel);
mainLayout->addWidget(pathValueLabel);
mainLayout->addWidget(sizeLabel);
mainLayout->addWidget(sizeValueLabel);
mainLayout->addWidget(lastReadLabel);
mainLayout->addWidget(lastReadValueLabel);
mainLayout->addWidget(lastModLabel);
mainLayout->addWidget(lastModValueLabel);
mainLayout->addStretch(1);
setLayout(mainLayout);
}
如上是QTabWidget中一个页面对象
#ifndef DIALOG_H
#define DIALOG_H
#include <QtGui/QDialog>
#include <QtGui/QTabWidget>
#include <QtGui/QDialogButtonBox>
class Dialog : public QDialog
{
Q_OBJECT
public:
Dialog(QWidget *parent = 0);
~Dialog();
private:
QTabWidget *tab;
QDialogButtonBox *buttonbox;
};
#endif // DIALOG_H
#include "dialog.h"
#include <QFileInfo>
#include <QDialogButtonBox>
#include <QDateTime>
#include <QtGui/QVBoxLayout>
#include <QtGui/QLabel>
#include <QtGui/QLineEdit>
#include "generaltab.h"
Dialog::Dialog(QWidget *parent)
: QDialog(parent)
{
QFileInfo fileInfo("tab.exe");
tab = new QTabWidget;
tab->addTab(new GeneralTab(fileInfo),tr("Info1"));
tab->addTab(new GeneralTab(fileInfo),tr("Info2"));
tab->addTab(new GeneralTab(fileInfo),tr("Info3"));
buttonbox = new QDialogButtonBox(QDialogButtonBox::Ok | QDialogButtonBox::Cancel);
connect(buttonbox, SIGNAL(accepted()), this, SLOT(accept()));
connect(buttonbox, SIGNAL(rejected()), this, SLOT(reject()));
QVBoxLayout *layout = new QVBoxLayout;
layout->addWidget(tab);
layout->addWidget(buttonbox);
setLayout(layout);
setWindowTitle(tr("Tab Dialog"));
}
Dialog::~Dialog()
{
}